🚗 Transform your garage floor into a showroom-ready space—fast and flawless!
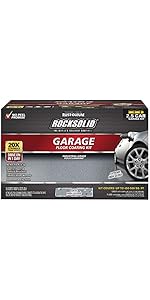
Rust-Oleum 238466 Professional Floor Coating Kit in Dunes Tan is a high-solids, solvent-based epoxy designed for superior adhesion and durability. Ideal for garages, basements, and workshops, it resists chemicals, wear, and standing water while covering up to 400 sq ft per kit. Ready for heavy foot traffic in 1 day and vehicle traffic in 4 days, it delivers a semi-gloss finish with options for decorative chips to elevate your space.


| Manufacturer | Rust-Oleum |
| Part Number | 238466 |
| Item Weight | 25.7 pounds |
| Product Dimensions | 13.62 x 17.25 x 8.75 inches |
| Item model number | 238466 |
| Is Discontinued By Manufacturer | No |
| Size | 2 Gallon (Pack of 1) |
| Color | Dunes Sand |
| Finish | Matte |
| Material | stone |
| Shape | Triangle |
| Item Package Quantity | 1 |
| Coverage | 300-400 sq ft per kit |
| Usage | Garage floor coating |
| Included Components | Painting Supplies;Paint & Stains;household-paint-solvents |
| Batteries Included? | No |
| Batteries Required? | No |
D**E
Great Product
Just finished my garage with the Rustoleum Professional Epoxy Shield (SOLVENT based, not the water based junk from HD) and the Premium Clear. Looks amazing. 1) As said by others many times before, prep, prep, prep and then prep some more! My garage is about 6 years old and the floor was in really good shape. Only issue I had was with a large oil spot caused by my 2002 civic which likes to mark its territority. I used the Rutoleum degreaser and got a lot of it up but this stuff was really in there. Then I used a product call "Pour-n-Restore". This worked really well and I was surprised how much of the oil it "pulled out" of the concrete. 2) I etched my floor with acid but I used the stuff made by Surface Gel Tek. They make a 24% acid solution that is suspended in a gel solution. You actually roll the stuff on with a paint roller. It produce a very uniform profile on the floor that felt like 100~120 grit sand paper. VERY easy to use and much less messy than muratic acid. Only drawback is it is a little pricey, about $70 per gallon and most likely it will have to be shipped to you (very few distributors). Shipping is expensive since it is hazardous materials. Total cost to get 2 gallons was about $180, but I think it made the job MUCH easier and was definitely worth it. 3) After etching, washing, etc I let the floor dry for 4 days to be 100% sure it was dry. 4) I applied 2 coats of the epoxy shield color about 24 hrs about. Don't try to be cheap and do just 1 coat of the epoxy. You won't be happy with the results. My garage is 440 sq ft. I talked with Rustoleum and the tech said even though they kit says it will cover 500 sq ft in reality the Professional Epoxy kit covers about 350~400 sq ft. So i purchased 4 kits, total of 8 gallons of material. And I am glad I did. No way that 1 kit would have been enough for each coat. Applied the 1st coat "medium" and went very heavy on the 2nd coat. I did not follow the suggestion from Rustoleum to paint in 4x4 sections. I just painted from side to side front to back and made sure to keep a wet edge. I did a medium broadcast of the color chips on top of the 2nd coat. I made a pair of "spike" shoes using two pieces of 1"x4" board and drove drywall screws through it. Then I used duct tape to attach them to a cheap pair of shoes. Worked like a charm and allowed me to easily walk across the wet epoxy to broadcast the chips.. 5) After 48 hrs I applied 1st coat of the Premium Clear. Stuff goes on very thin and like others have said you have to use a bright light sitting at floor level in order to be able to see where you have painted. I actually found it was best to shut the garage door and just use the floor light (yes, you HAVE to wear a respirator if you don't want to die). 6) Applied a 2nd coat of clear after 24 hrs. For this final coat I mixed in the Shark-Grip anit-slip additive. Without it the floor would have been an ice rink! The directions on the Shark Grip say to use the entire 3 oz bottle to 1 gallon of clear but I cut this back to about 1/2 and ended up with a good compromise between floor gloss, clean ability and anti-slip. You couldn't slip on this floor if your tried. So, the stuff has been down about 9 days at this point. I am going to wait at least 1 more week before pulling the cars back in just to make sure I won't have any issues. I'll try to update in 6 moths or so to let you know how it looks. ***Update*** 4/16/13 - Well it has been about 1 year since I applied the Rustoleum Professional Epoxy and it has held up very well. Not a single occurence of the epoxy lifting from "hot tire" pick-up or a single chip from all the tools I have dropped on the floor. I think this is motly due to the extensive prep work and the nice etching profile I was able to get with the Surface Gel Tek product. I do a fair amount of auto repairs in my garage and nothing that I have spilled on the floor has left a single stain (and no issues from the winter's road salt). The floor did get a little dirty after some of the larger repair projects but after sweeping and a quick mop it looked pretty good. What really made it look like new was a good spring scrubbing with simple green and water. I was surprised how great it looked after this. The only cons I have encountered is that the clear coat does scratch a little easier that I thought it would. For example, if a pebble gets stuck under the wheel of my creeper it will scratch the surface. But I am a very OCD person who notices every little scratch. Most people don't even see the scratches unless I point them out. Also, I am only talking about surface scratches on the clear coat. I don't have any scrathes that cut through the epoxy. I just make sure to use common sense when moving a heavy object around the floor (I would not reccommend dragging a transmission from one end of the shop to the other). Overall, I am still very happy with how the floor looks and how the Rustoleum Professional Epoxy has held up. I would definitely use it again. Btw, did I mention to be sure and prep the floor? :)
M**N
Highly recommended product to finish your garage - no matter what you use it for!
Some people think that just because their garage is dry-walled and insulated it is "finished" - it's not! Most people forget about the floor. Concrete is porous and unless its been epoxied or sealed, it'll absorb almost anything that spills on it: vehicle fluids (motor oil, transmission/differential fluid, etc), lawn fertilizers and pesticides, paints and varnishes, and everything in between. The answer to help combat this stuff from staining your concrete and, in some cases, preventing odors from these chemicals even after they've been cleaned, is to epoxy your garage floor. If prepped and applied correctly, it'll cover the existing eyesores and smell and will make your garage look good as new! I've lost count of how many times I've applied this product for myself (in three different houses and two barns) and for friends and family. When I epoxied my first house, I used Rust-Oleum 251965 Garage Floor Kit but found that even after I had prepped the floor properly, I would have chipping and hot-tire lift. I was able to remove most of it and used this professional grade floor kit and fond it to be the best! Ever since then, I've been using it with great results. Some people might be turned off about the amount of work and time that is involved. Make no mistake about it! Depending on the size of the floor you are doing and how dirty is was previously, it take A LOT OF TIME and some elbow grease (this has allowed me to make a part-time business out of applying this stuff). You also need decent weather conditions (70°+ and no rain for two days) for the best application. Also, make sure you have plenty of epoxy. If you are remotely close to 300 sq ft per kit, I recommend getting another kit - it is better to have too much than to run short! When you are starting to apply you have no way of knowing how much you'll have left. But as long as you don't slop it on there or have excessively porous or rough concrete, you should be in great shape! To make it easy, you'll need the following: Garage floor Decent weather (70°F+ and no rain for a few days) Rust-Oleum 238466 Professional Floor Coating Kit (one kit for each ~300 sq ft) Rust-Oleum 214382 EPOXYShield Heavy-Duty Degreaser, 32-Ounce (one bottle should do unless you have a lot of oil spillage) Rust-Oleum 238475 EPOXYShield Concrete Etch (one package for each ~250 sq ft) (2) 5-gallon pails Paint brushes Paint roller tray (a good metal one - not a cheap plastic one) 3/8" nap roller w/ paint roller and extension stick (so you aren't bending over) Stiff-bristle brush Paint stir sticks or power stirrer Cardboard, carpet reminant, or whatever to catch spills/drops and from tracking the stuff around if you are sloppy Hose with sprayer Squeegee The first step is to remove everything from the floor. This can take time and can be a pain since some items can be heavy and cumbersome to move. But don't complain - I can't stress how much it'll be worth it in the end. When I've moved items out of the garage, I usually just place them about 10 feet or so away from the garage door in the driveway and put a tarp over the belongings (keeps the rain off the material and keeps the riffraff from seeing what you have out there). Second step is to degrease. If you have a brand new garage floor, which most people don't, you'll likely need this step. This help remove all of the oils, grease, and some chemicals from the surface so the epoxy bonds properly to the concrete. I've used Rust-Oleum 214382 EPOXYShield Heavy-Duty Degreaser, 32-Ounce straight out of the bottle (don't dilute) for the areas where the oils and grease are. Make sure to use a stiff-bristle brush. You'll notice that the stain may not disappear because it has soaked down into the concrete but that the surface contamination is gone - this is the point! Make sure to use plenty of water when washing this stuff out of the garage, especially when using at 100% concentrate. Squeegee after rinsing. Immediately after degreasing (if applicable), you'll prepare to etch. A good etch without using muriatic acid is Rust-Oleum 238475 EPOXYShield Concrete Etch . You'll mix it in a 5-gallon pail and then should use a watering can to distribute it on the concrete. You'll hear fizzing sound (which means its working!); after few minutes, scrub with a stiff-bristle brush again and then rinse and squeegee. Let sit overnight or a few hours in the day to dry. Finally, after all that prep work, you are ready to apply the product! You'll want to have a "helper" if you are doing more than a 2 car garage - it'll help keep the application time down and give someone to help you edge (paint the concrete reveals [if you have them]), get the relief cracks and where the roller can't get to. You'll want a small, plastic paint bucket and a decent brush for this. If you are using more than one kit (in the case of anything larger than a 1 car garage), you'll want to mix the "Part B's" in a 5-gallon bucket to ensure the color is consistent across the garage. This instructions state this. Once you've done that, you'll dump the Part B's back into the can (with the exception of the last can - you'll just start and will add "Part A" and mix in the 5 gallon bucket [along with each subsequent kit]). Make sure to mix well with a pain stick with vigorous stirring or use a power stirrer. You'll then have a 30-60 minute break while the materials activate. You can always start a tad early by starting the edging and painting where the roller can't get to. Once your wait time is up and you've edged, start applying the epoxy via roller. I typically do 4' x 10' sections at a time so I can throw the flake on and keep a good rhythm. One thing about flake - use as much as you want but don't use too much. I also highly recommend that you use some, even if you don't want to, since it'll help disguise dirt, grime, and eventual sun fade and shadows from where your stuff was (if you leave your garage doors open to the sun a lot). After application, you'll need to wait at least 24 hours to walk on it and a few days (3-4) to start putting your stuff back into the garage, including vehicles. After all this time and work, you'll have a garage (floor) that everyone will envy! I still get compliments on ours, even by family that have seen the finished product.
P**X
moderately to very good
I did my 120sq' garage floor just today. I've been a residential and commercial painter for over 30 years and have used nearly all products/materials one could think of. I found the Rust-Oleum to be adequate, and was convinced that all was okay with it after having read some of the reviews and having spoken with another painter, familiar with this brand of epoxy. The product was delivered with evidence of a slight leak, which was due to the lid being somewhat separated from the can. Only a minor amount of the resinous gray material was spilled and all seemed okay otherwise, though I didn't really like the fact this had happened at all. Measures should be taken to prevent this (e.g., a strip of sealer taper along the lids). Anyhow, I still proceeded forward, mixing in a separate container, about 1/2 of each can, which was plenty for the space I was covering. I still have enough (unmixed) for a 2nd coat, should I decide to apply it. The floor is only 2yrs old and in excellent shape, though I still sanded and etched (muriatic acid) before hand. Shortly afterwords (10 mins or so) I pressure washed the floor twice, and then I shop vacuumed any residual water and let my dehumidifier run for a few days thereafter. I also did a moisture test using a plastic sheet which was taped to the floor for over a day, which yielded no detectable moisture. So far, no one has mentioned the use of a moisture meter. I have a German one I had bought about 15 years ago (one of the best investments for a true painter!) It displays a table for both wood and masonry, which indicates (in a percentile reading) moisture content within the respective surface type. Alas, all was dry (6%-8% in my situation). I've heard general contractors mention that concrete foundations and slabs are usually never really 100% dry, due to contact with the ground, though I suspect that may be a regional question. I'm in Rhode Island (NE United States), but would believe Florida or Arizona to be much more arid. However, don't get overly caught up in relative humidity and the like, especially if you really work in the product and have it mesh and bond with the surface/substrate. Here are the Do-s: -Follow all instructions provided, especially the etching; watch any related videos as well. Do mix as specified. I used a power drill and a long, paint mixing bit. -Read some more reviews, the good and the bad, and try to infer what the common problems and/or advantages may have been for others, and keep that information in mind upon your approach to the job. -Vacuum, vacuum, vacuum...right before application. If possible, use a well constructed vacuum (Miele) with sufficient filtration so as not to reintroduce any particulate back into the work space. If you only have a shop-vac, drape a moist cloth over the exhaust vent so as to collect any dusty blowout. My initial consideration to use a tack cloth was dismissed as being unnecessary in my situation, though others may have the need, which is almost always part of a great prep phase, particularly when it comes to wood stains/preservatives. I primarily like to deal in producing a furniture-quality result within my paint or stain applications. in this regard, the same approach to keen preparation should be considered for a solvent/masonry job. Treat your prep phase as equally crucial. I, too, feel that if preparations are highly considered, anyone can complete this task to at least a near-professional finish (or better). -Use a roller sleeve designated for epoxy or urethane. I (albeit hesitantly) stopped by Home Depot (who stock this epoxy product) though they had no such sleeves for sale, let alone within their inventory. The 2 reps advised me that any roller would do, which is nonsense...another reason to avoid HD and their paint department entirely. When humbly and politely asked if either of them had worked with the product, or epoxy in general, neither did. As I offered to them, other rollers will fall apart as epoxy, by nature, is extremely viscous and tacky, especially when nearing the end of its open time. -Be liberal with the product, though WORK it into the surface. Keep a wet edge where you can, and attempt to roll in varying directions upon the working area as you make progress. Don't overwork already drying areas, wait to see if a 2nd coat will be needed and address the issue(s) then. Remember, you may always have 2 simultaneously drying edges at any time, should you do square swaths or patches. I'd recommend this approach and that they be upwards of 4'sq in dimension. Work swiftly and evenly and let no one be around to distract you, not even for a related conversation about what you're doing. The Don't-s: -Do not forget to use a respirator. Whomever said (in another review) they felt no need to wear one is sadly mistaken. This is a fairly toxic product and sustained exposure will effect anybody. My wife is complaining (10 hours later) that the house "smells horrendous". I returned home 8 hours after this job and my whole 1st floor was obnoxious. Don't let this dissuade you from using the product however, as this is typically an indication that the product is really rather good, like the oil-based paints of yesteryear... Anyways, don't forget to wear a decent respirator or be prepared to have much of your nervous system standing on end, and for at least a little while... -See the job all the way through and don't reach a stopping point thinking you can return in 5 or ten or however many minutes later. See it through! For an area larger than my own, perhaps 2 people are advisable. Or at least a 2-person scenario could alleviate some of the burden of the job, as a sustained, even application should feel slightly arduous to a even a pro. But the key is the even and steady application. One should have worked up a light sweat while during the application process. If not, I'd question the efficacy of their approach/method. -Don't forget to wear protective gear, such as eye-shields (glasses) and gloves. If you're inexperienced or don't have ratty jeans or painters clothes in general, wear old clothing you don't really care about, because anyone should expect some degree of mess by the end. -Don't worry about very minor drips/touch marks, etc., as you go, the product does in fact boast a good open time, meaning you will be able to work in the blemishes as you go, especially if upon a more cool surface. -Don't go cheap on a cut-in brush. A somewhat stiff bristle brush is advisable, though throw it away afterwords -- cleaning up with xylol is really not worth the additional cost and chemical exposure. Same with the roller sleeve(s), just chuck it all away but do wipe down any residual product from tools/knives/roller handles/mixers, etc. All-in-all: A very decent end result, even after only one coat, which could in fact be adequate. I will likely apply an additional coat after a few days, but am really not sure at this point, as it uniformly looks very good. It is, after all, epoxy. Even though I always advocate at least 2 coats, this 1st application is looking tight thus far and I'm rather pleased. On a 2nd coat, I may add some aggregate, like silica sand, just to give some tooth to the surface and mitigate potentially slippery conditions. I will try to update this review as time passes. So far, I would recommend this product. Lastly, I opted out of the flecks...a touch gaudy for my tastes. Best of luck!
E**4
Great Professional epoxy if you follow all instructions and take your time.
I read so many reviews over and over about this epoxy and compared it to the others at Home Depot/Lowes. I watched tons of videos and honestly couldn't decide for months on this. Seriously, every day I thought about it and just was debating constantly on what to get or who should do it. I thought about hiring someone to do it which would have cost about $1k with labor with the water solvent epoxy. I finally took the plunge, bought this product along with the extra material and just did it myself. I bought a new construction home with new concrete so it was fairly easy to clean my 420 sqft garage. I started on a Wednesday and finished on a Saturday morning so give yourself a few days to finish this project. I bought 2 packages of the professional epoxy and 2 packages of clear coat but with the intention of not using the 2nd ones. Although, that did not work out as planned. My wife didn't like the included blue chips so I bought 2 bags of the Glacier Gray Decorative Color Chips. The 1st day in the early afternoon I cleaned the garage with Rust-Oleum concrete etch and used a brush and squeegee. I brushed around the area for 1 hour and rinsed the floor off. I did it a 2nd time with the concrete etch and then used Rust-Oleum Degreaser in which I rinsed everything off thoroughly. I left a fan on overnight to make sure there was a good amount of air moving around. The 2nd day in the morning I taped all the areas and edges of the garage. In the early afternoon, I started the process and mixed the A&B epoxy per instructions in a separate bucket. This stuff gets really messy therefore its best to cover the floors with cardboard or bags. I used a new bucket and mixed it together. I started painting the sides really fast and my father was using the roller on the floor. I sprinkled some chips but noticed the dried areas was coming out uneven so I stopped doing it. Me and my father finished the entire garage in 1 hour but I really had to use all of the epoxy out of the can to get everything. In the early morning of the 3rd day, I noticed there were so many uneven spots that it looked terrible up close. I was supposed to clear coat the garage but I changed my plans and used the 2nd package of epoxy. I did all the sides as usual and made sure I covered all areas along with using the chips very lightly (I only used 2 1lb bags of glacier colored chips) since I decided I did not want the floor filled with chips. This time around it looked much better and again I used the whole can of epoxy. The 4th day early in the morning, I reviewed the floor and it looked great but looked a bit bland without the clear coat. The mixing of the clear coat was easier since its a burst pouch and it mixes all in the bag. I poured the bag into a separate bucket along with the anti-skid and mixed it well. This stuff was really hard to see since its very clear and did not smell much at all. I started on the sides which were easy and did the best lines on the floors. I tried to only use 1 package but unfortunately, I had to use the 2nd package to really get all the missed areas fast since it dries up in 90 minutes. Basically, this ended up being another coat of clear on top of the existing one. I had to look at it from different angles to make sure I did not miss any areas (even though I did). The next morning I checked it and it looked great. Just to be safe I did not park my vehicles in the garage until 5 days after and I left the garage open a little bit to dry up. After 5 days, the epoxy was hard as a rock and ready. I did put some garage mats under the tires so there won't be any hot tire pick up. I have also been cleaning the floor once in a while with ammonia and a mop. Other than that it has been 2 months since I painted the floors and it looks great. There are a few spots I missed but I know from experience Ill do a better job next time. I would definitely recommend this product but it really does take 4-5 days in total and 5 days of drying time afterward. Whats important is 2 coats of epoxy and 2 coats of clear are needed to make it look great. DO NOT skip out on the extra coats or else it will look bad and not durable. The epoxy fumes are super strong and make sure to vent out the garage properly. If I had to do it again I would buy the items needed below without a thought, rent a grinder to clean the garage (because I would need to take out the existing epoxy), paint it evenly and inspect all angles to check for missing spots. I would have definitely prepared everything beforehand and take my time instead of rushing to get the job done. Items Needed to cover a 420 SQFT Garage: - 2 Packages Rust-Oleum 203373 Professional Floor Coating - 2 Packages Rust-Oleum 292514 Epoxy Shield Premium Series Clear - 1 Package Rust-Oleum 238475 EPOXYShield Concrete Etch - 1 Rust-Oleum EpoxyShield Interior/Exterior Concentrated Concrete Cleaner and Degreaser - 3 5-Gallon Buckets from the local hardware store - 1 Floor squeegee with handle - 1 Brush Scrub Masonry 8in with handle - 4 Epoxy Glide Roller, 1/4-Inch Nap, 9-Inch - 3 Painting Brushed 1-3" depending on the area needed (2 for epoxy coats and 1 for clear) - 1 Paint Roller Frame, 9 IN., Cage (use the same handle from the brush) - 1 Paint Tray if needed or just get the epoxy straight from the bucket - 4 Paint sticks to stir the epoxy and clear (Otherwise use a paint mixer with power drill) - Watering Can (for concrete etch) - Water hose to reach areas of garage when cleaning - Small Box of gloves to cover hands - Disposable Respirator unless you want to sniff all the epoxy fumes - Cardboard boxes and garbage bags to place the epoxy cans and materials on (Gets messy) - OPTIONAL: Extra Decorative Flakes Spiked Shoes Goof Off - 6 oz. Professional Strength Remover (If needed to remove epoxy from the walls, cabinets or clothes) All items above will be instantly garbage once it touches the epoxy or clear coat.
D**X
This kit is not for the lazy, and it looks fantastic when done.
I like this kit because it's two gallons of epoxy (1 gal base, 1 gal activator) and two bags of chips. No cheap prep products, brushes, rollers or other crap thrown in to make it an "all-in-one" deal. It was perfect for me, since I had to do pretty intensive prep work to get the floor ready. I applied this to a ten year old garage floor that was absolutely filthy with oil, grime, and sticky spots. That meant many, many hours of prep work. I did a soap and water wash to get the surface grime off, then two rounds of degreaser. Then I rented a pressure washer and gave it a thorough wash at 2000psi. Finally I used "safer muriatic acid" to etch the surface, followed by a thorough water rinse. At this point the surface was clean and dull. After that I allowed the garage to sit empty for two weeks to let the concrete completely dry (in a humid climate it may take longer). TWO YEAR UPDATE: Zero hot tire pickup. The only place where it has flaked off is in two spots where there was some defect in the concrete beforehand. The areas flaking off are about the size of a 50 cent piece. Rest of the surface still looks like the day I put it down. After all that came the easy part, applying this product. My garage has a bump-out, so it's too big for one kit. But I wanted to do half of the garage at a time anyway due to my storage needs. I bought two kits, and used them one at a time about a week apart. Two kits easily covered a 2.5 car garage, plus the six inch wall at the perimeter of the garage. I did half the garage, let it cure for a week, and then moved my stuff over to that side. Then I did the other half. Having two kits was well worth the extra $100. After what I spent on prep it seemed like nothing. Even if I were doing it all in one shot I would NOT have mixed two kits at the same time, because the chemical reaction is exothermic and heat speeds up curing. This means that mixing more than one kit actually SHORTENS the time that you have to put it down. TIPS: 1. The can of base may very well settled and separated. Be prepared to scrape out the contents with your hand. 2. Buy a whole pack of disposable gloves for this project. 3. Get a cheap, new, clean $3 bucket from Home Depot to mix this in. Don't mess with anything smaller than a 5 gal bucket. 4. Rig up a mixing attachment for your power drill. This stuff needs SERIOUS mixing. See #1. 5. DO NOT use a cheap roller cover, it will shed fibers into your epoxy. Cheap brushes will drop bristles too. 6. DO use a cheap roller frame so you can just toss it when you are done. It will probably be ruined anyway. 7. They give you WAY more chips than you need. I think a light broadcast looks better anyway. I used half of one bag. 8. Keep your area well ventilated, this stuff REEKS when applied and during curing. 9. Follow the enclosed instructions to the letter, and you should have no problems with this product. I will revisit this review in a year or two to comment on the durability of the finish. I invested so much time and $$ in the prep, I have very high hopes.
R**E
I recommend using the Rust Oleum etching powder
Preparation is the key. I recommend using the Rust Oleum etching powder. It does not gas off like miratic acid or eat holes in clothing. I found getting an even coating of chips to be the most difficult part of the process. The chips supplied are not enough for a proper coating. I recommend 3 to 5 more bags per kit. I also recommend the Valspar flakes over the Rust Oleum. They are bigger and look better. The Rust Oleum flakes end up looking like ground pepper. Throw the flakes high and let them drift down to get the best dispersement. One way I found works well is to blow them out of a container with a blower or vacuum cleaner hose hooked to the exhaust side. Update; this did not hold up. After 3 to 4 years it started to chip and flake off in chunks. It also started yellowing where there was some sun exposer. I had to have it all ground off and redone by a professional applicator at a significant expense. This is one case where DIY did not pay off and was actually more expensive in the long run. I believe the failure was ultimately due to inadequate etching of the bare concrete. Citrus based enchant is just not strong enough to get a good bonding surface. I think I would have been better off using muratic acid which is awful to work with. The pros use diamond grinders to prep the concrete and that’s hard for the DIYer to compete with.
T**S
Good Product but Shame on Amazon Fulfillment
First, shame on Amazon! PA distro center knowingly sent a damaged case of floor coating. How do I know it wasn't damaged in transit you say? Because the exterior shipping box was 100% in-tact but inside the items box was wrapped in 4 heavy clear plastic bags and knotted. It seems that the can of grey coating (not the activator) was opened/damaged in storage and rather than toss the product the shipping monkeys elected to just wrap it up and fullfill the order. Well, it didn't leak out of the plastic bags but the product was ruined and I had to wait another 4 days for a replacement to ship. The only saving grace is Amazon is good about replacements and I've never been hassled. On to the product. These Rust-Oleum Pro Floor coatings are the High-end of the Low-end. They are solvent based products whereas you can probably only get water based versions at your local big box store depending on your states regulations. The box advertises coverage at 250 sq ft and my single garage came in right around 240 sq ft. There was plenty to do the floor. I was worried about not having enough at first but my fears were unfounded in the end. No problem spreading the coating. Came with plenty of decorative chips. The concrete flooring I started with was approx 60 yrs old. 60 years of dirt, grime, grease, oil, damage and 2 coats of paint. Prep is always the key with ANY kind of coating. There are many products advertised, methods recommended, etc, here's what I did. Emptied out the garage, swept out the area, scrubbed down with stiff bristle brush and Purple Power cleaner, power washed with steam/hot water pressure washer (this removed all the floor paint that I didn't realize was there because it was so dirty), scrubbed down with TSP (as a test), scrubbed down again with Purple Power, etched the concrete with HCL (I couldn't get Muratic acid) and let it dry. Each step of this process was followed with several washing of clean water to ensure any contaminates were removed. Then I let the concrete dry for 3 days. This whole process occured over two weeks because of the bad product being shipped. From there it was essentially just following the directions and laying the product down. I did one extra step. After the base coat had been down for 24hrs I put down the Rust-Oleum Pro Clear Coating product down. Goes down just like the base coat, no prep necessary if it's within 48hrs of the base going down. I left out the anti-slip grit included as I feel the decorative chips give enough grip because the clear coat isn't so thick that you end with a perfectly smooth surface. Let dry for 24 hrs before I started moving equipment back into the garage. After 72 hrs was able to park on it but didn't for about 1 week because of other issues. End Results: I'm in it for about $260 total between the base, clear and some supplies I didn't already have, product has been down for 3 summer months now and I'd do it again. So far no hot tire pickup, it has cut down on the dust and dirt in the garage tremendously, can walk out there without shoes on with no problem and is easy clean up. Haven't done any heavy garage work yet this summer as I haven't had time but I've dropped hammers and heavy metal parts with no significant damage to the coating. If you get down to the clear you can find a scratch where it hit but you are unable to discern that scratch/rub mark at any distance over 6". Extended long term performance has yet to be seen but no issues with the East Coast heat nor extended amounts and weeks of rain. If I had a double car garage I would be seriously looking at other brands of products. It would cost approximately $400 to use Rust-Oleum (2xbase and clear coat kits) whereas you could step into the mid-tier brands with better solids %'s for anywhere from $0-$100 more. ****Update Sept 2010, 1 year of use**** Still no complaints. Never got any hot tire pickup, no lifting from moisture, nothing. I'd do it all again.
R**S
Followed Directions To The Letter - Results Not As Expected - See Pics
This product and the company rustoleum really has me upset. I have tried calling their tech # listed in the instructions for the last month and it never goes through, I even had my phone company try and same result so talking with an expert for this product is impossible... I also tried emailing them and have not heard back. Before applying this product I studied up on it very well by reading amazon reviews and followed the manufacturer directions to the letter and even bought a top quality 7 inch Diamond Cup Wheel with 24 segments for a smooth finish with no swirl marks, I first used rustoleums epoxy patch on any cracks, chips etc which turned out to be extremely tedious dues to multiple applications over the course several days due to the settling of the product which created a "low spot" that need additional filling. Using the diamond cup wheel i was able to get the patches ground perfectly smooth and level with the surrounding area..If you do this be prepared for major dust which must be thoroughly removed which i did. After I cleaned i did the wipe test and no white powder came up on my fingers so i was ready to apply the finish. I was going to only mix half of each 1 gallon can because my porch is only 150 square feet (tried calling rustoleum to see if i could safely do this..tried emailing..no answer to each) so as i was stirring up each can i realized the oils/epoxy were difficult to get mixed really well so wanting to make sure i had no issues with bonding i went ahead and poured in both 1 gallon cans into a new five gallon bucket using a power mixer ( this made me have to waste about an entire gallon i wanted to save for my 1 car garage i was to do later down the road) i mixed for 5 minutes as instructions indicated. based on my temperature i waited 30 minutes..started the cutting in process around all edges then applied the epoxy using the recommended "Wooster Brush R232-9 Epoxy Glide Roller Cover, 1/4-Inch Nap" keeping a wet edge at all times and only doing 4ft x 4ft at a time and spreading the paint chips. When finished all looks uniform and great...after it dried in perfect temperature and humidity ( purposely waited for nice days in the 70's & 80's and not dropping below 65 degrees at night) it came out very splotchy with shiny spots and dull spots ( see pictures) that look horrible. so basically after working like a dog on this project for almost two weeks in all, the end finish pretty much sucks. People say doing the clear coat RUST-OLEUM 263997 Epoxy Shield Gallon Clear Professional Premium Floor Coating Kit will eliminate the dull spots which i want to do when i can so ill tell you if you were like me and also read people saying their finish came out great without using the clear well good for them, glad it worked but im telling you go ahead and get the clear coat if it turns out this actually works and plan on putting it down afterward. I marked this product at 3 stars as "it's ok" mainly because its better looking than bare concrete with grey epoxy colored patches. If someone knows for sure if the clear coat will correct this issue and not lock into place forever the shiny/dulls spots please let me know, I need some encouragement at this point. Also if anyone knows if i have to use the rustoleum clear coat or if there is another type of clear coat i can use like the stuff for hardwood floors which i have..but afraid to try it please let me know because at this point i'm done bothering with the manufacturer. IMPORTANT UPDATE: I was finally able to reach rustoleum through an amazon agent connecting me to them..apparently some kind of telephone switch issue between my area (North Central Missouri) and them. I explained the issue to the rustoleum representative (she was extremely nice and professional) she came to the conclusion the issue i was having is due to density differences in my concrete slab and that it usually is more common in a rather old slab like mine (20+years old) normally one coat of the epoxy would be enough but in my case i would need another coat ( which can be applied over the paint chips with no problem) to make it look right. I just needed to email a couple pictures of the problem with my receipt and she would then have me a new complete kit at my door within 5-7 business days free of charge. Now that is a company that stands behind their product and values their customer. I may not be able to apply this second coat until next spring due to temperature but i will update this review as to the results when I am able to do so.
Trustpilot
1 month ago
2 weeks ago