
DOWNLOAD THE APP


Customer Services
Copyright © 2025 Desertcart Holdings Limited
DOWNLOAD THE APP
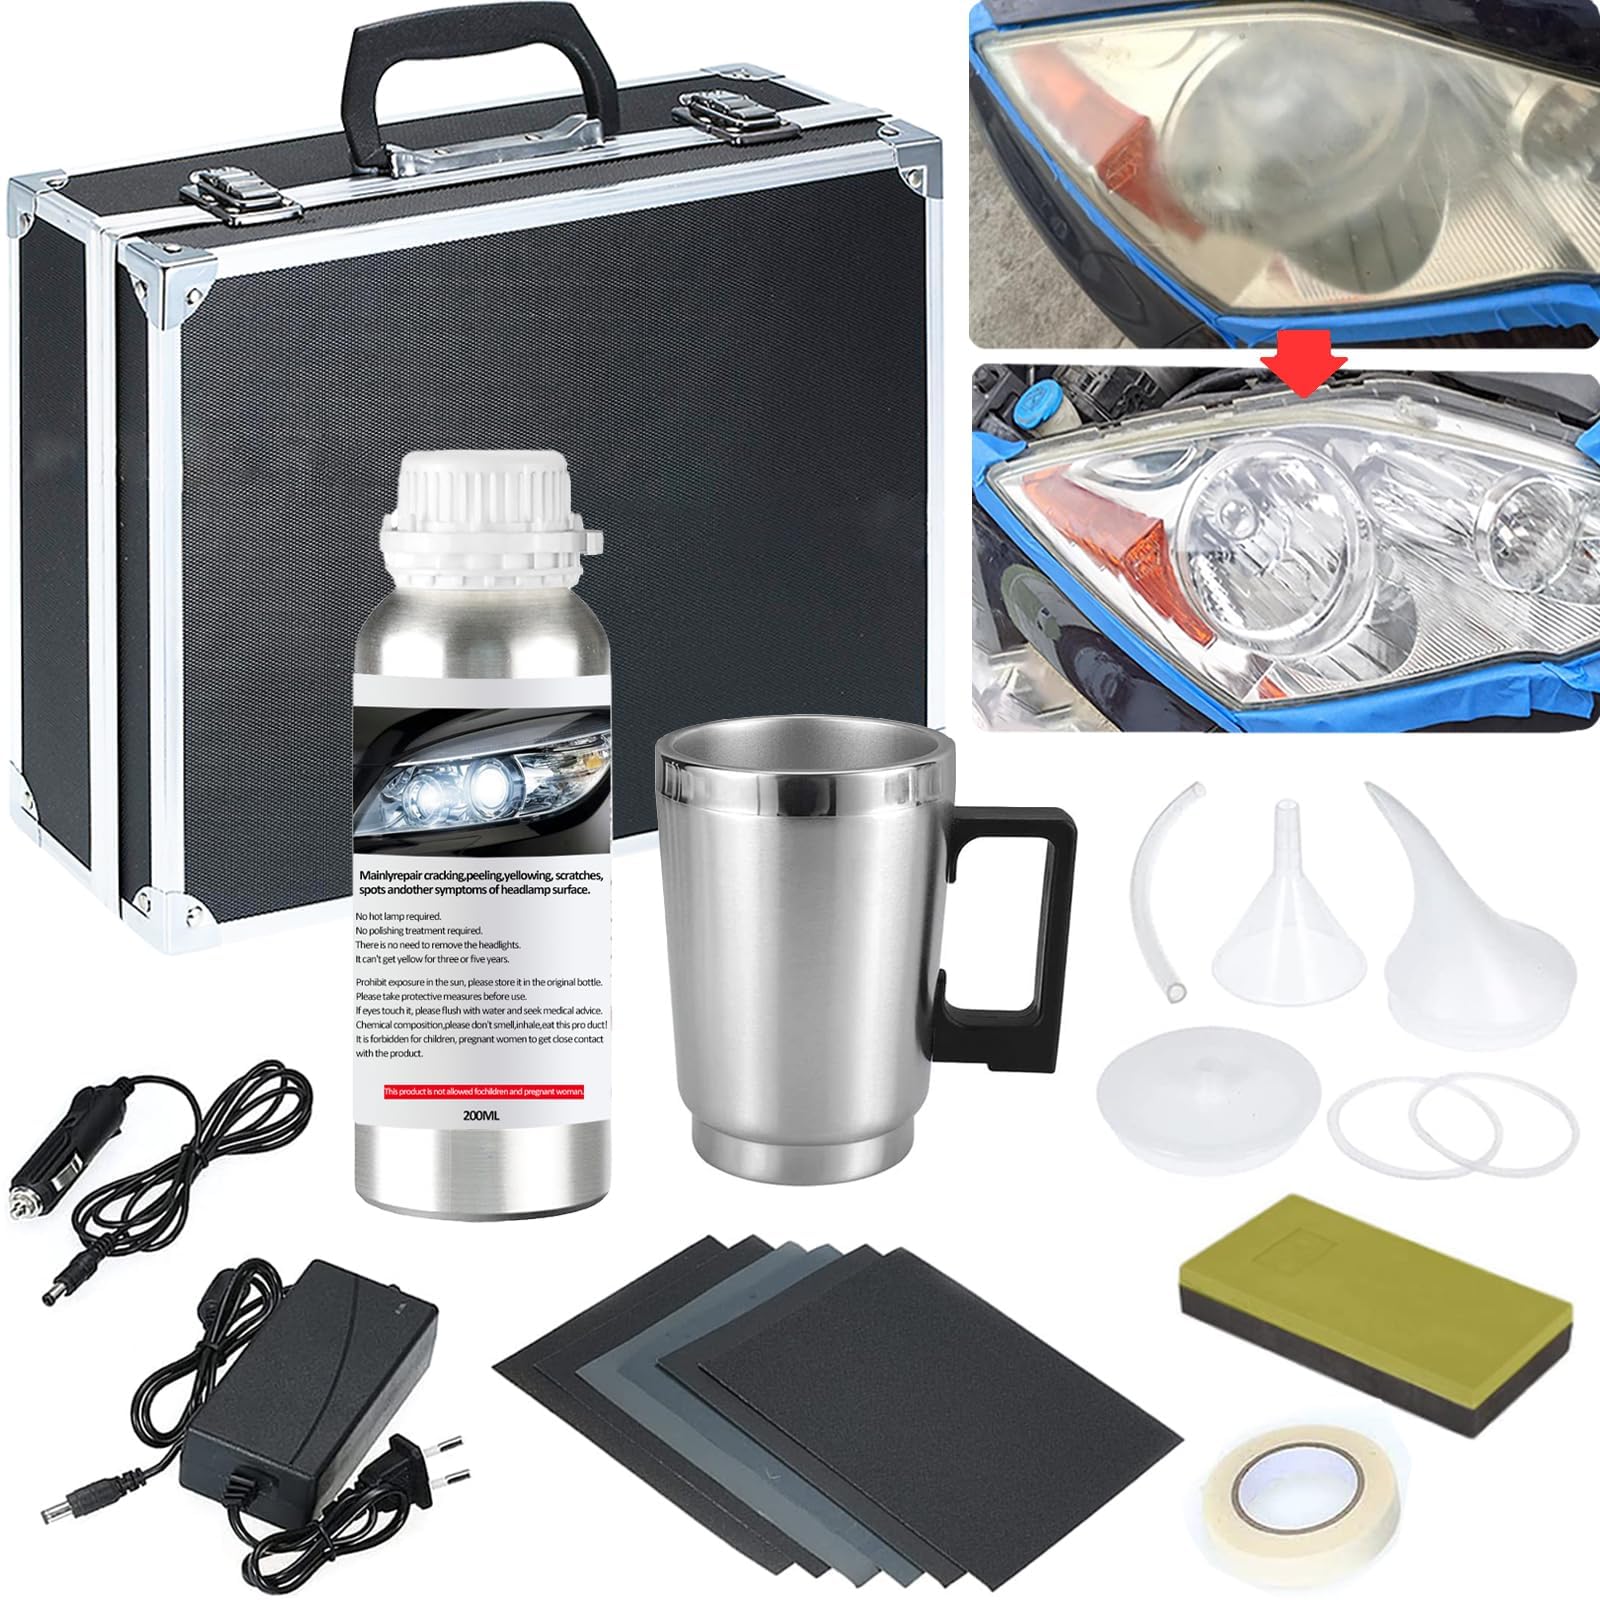
💡 Shine Bright, Drive Safe — Headlight Revival Made Effortless!
This Headlight Restoration Kit features a 200ml repair liquid capable of restoring 16-20 headlights by removing oxidation, yellowing, and scratches. The kit includes six sandpapers, an emery board, an atomizing cup for heated UV coating application, and power cords for versatile use. Designed for easy DIY use, it quickly forms a durable, transparent UV layer that enhances light transmittance and protects against future damage, saving you costly replacements while improving nighttime driving safety.


| ASIN | B0BB7TCY5H |
| Best Sellers Rank | #3,226 in Automotive ( See Top 100 in Automotive ) #8 in Automotive Headlight Restoration Kits |
| Brand | Pmbqifay |
| Customer Reviews | 4.4 4.4 out of 5 stars (1,099) |
| Date First Available | October 17, 2022 |
| Grit Material | Emery |
| Grit Number | 1200 |
| Grit Type | Medium |
| Item Weight | 3.05 pounds |
| Item model number | ZY-122 |
| Manufacturer | Pmbqifay |
| Manufacturer Part Number | XFY-1 |
| Material | Emery, Rubber |
| Model | ZY-122 |
| Number of Items | 1 |
| Package Dimensions | 11.18 x 8.11 x 4.29 inches |
| Set Name | Headlight Restoration Kit |
C**I
Excellent Results. Easy to Use. Highly recommend.
This was my first time doing this. I took my time and followed the process. Preparation & proper sanding is key. Taped around the headlights with wide painters tape to protect paint/chrome. Sanded each headlight six times with increasingly fine sandpaper and alternating direction each time. Use a spray bottle with water to spray the headlights before you start and during each sanding step. At the end of the sanding process the headlights were smooth and almost opaque. I found the heater cup and the solvent slow to heat before vapor/steam started gently puffing out. It did this intermittently rather than in a continuous flow but you hear a slight hissing as it does (which is helpful because the vapor was almost invisible). I was in a covered carport which was well ventilated so that may have impacted the vapor as it emerged. Applied the nozzle about 1/2 inch from the headlights. As it puffed, a small area of the sanded headlight immediately turned crystal clear. You just take time and work your way around the headlight as it puffs along slowly (the heater cup didn’t seem very powerful) until the headlight is complete. Don’t touch the headlight. Let the little puffs of heated solvent do their job and leave it alone for as long as you can. At the end, I am pleased with the results. The lights looked like new. (See before and after photos attached). They still had some abrasions from 18 years of use but you have to look closely to see them. The crystal clear headlights elevated the look as the truck is otherwise in good condition. I am giving the truck to a relative and I also just put on its new license plates so it’s good to go! 👍 The only downside to the product is that other relatives are now asking me to do the headlights on their cars … so it looks like my weekends will be booked for the next while 🙈😂
M**Z
Easy and Effective Headlight Restoration Kit – Like New Results
I bought this kit for my husband because the headlights on our vehicles were quite dull and yellowed, which affected both visibility and the overall appearance of the car. The product really surprised me in a good way: it’s easy to use, comes with everything you need, and doesn’t require any prior experience. After just one application, I could already notice a huge difference – the headlights regained their clarity and shine, looking almost like new. In addition, it leaves a protective layer that helps prevent them from deteriorating quickly. The product also goes a long way, since with the amount in the bottle I was able to restore both headlights and still have some left for future applications.
D**K
Headlights look brand new — amazing results!
This headlight restoration kit worked perfectly. The process was simple, and the results speak for themselves — my headlights went from cloudy and dull to clear and bright. I even attached after videos so you can see the difference. Excellent quality product, highly recommended!
R**A
Clear Vision Restored
This repair liquid works great for removing yellowing, haze, and scratches. Easy to apply and headlights look like new again
B**Y
Amazing headlamp vapor restoration kit! The BEST hands down!
I am not paid by Amazon nor any seller, this is my own personal experience with this product. This was hands down the best headlamps restoration kit ever made. Absolutely worth the value for the money. It was easy to use. The smell was very minimal and barely even noticeable. The speed was very quick once you have all of the prep work and sanding done. The headlamps were super smooth and like new once complete. The look was as if I had went out and bought new headlamps and looked brand new! This was the best and none of the other creams and pastes work well. You really do have to sand it down and do the work if you want that brand new look. Also once complete this will last you about 3-5 years approximately but you can make them last even longer if you put a UV coating over the restoration and a ceramic coating as well to give you another 3 to 5 years extra. Well worth it!
K**S
Excellent results. Take your time sanding.
I divided the sandpaper into 6 pieces per sheet and wet sanded by dipping the sandpaper in a 5 gallon bucket of water. I rinsed well with clean water and allowed the lenses to dry completely. I plugged the cup into an extension cord and it worked well. Just make sure not to tip the cup too far or the liquid will leak out and you'll have to wait for it to dry and then re sand.
M**R
Great product
It’s pretty easy to use. If you’re not really sure how to use it you can watch yt on it. I used it on my car head lights and it looks great
B**D
Practice makes perfect.
It's tricky to use, but the results are magical. Twice, my batch would dry up halfway through the job of coating one headlamp. Getting it to puff directly onto the lens in the direction one wants is almost like a dark art. It's weird. But it does work. Nothing better out there than this method. The end result is consistently perfect. The sandpaper it came with is top-notch. The instructions are commonly terrible with these Chinese products, so I suggest you read other people's comments on how they did it. Good luck!
Trustpilot
3 days ago
1 month ago