
DOWNLOAD THE APP


Customer Services
Copyright © 2025 Desertcart Holdings Limited
DOWNLOAD THE APP


✨ See and be seen — headlights reborn with every shine!
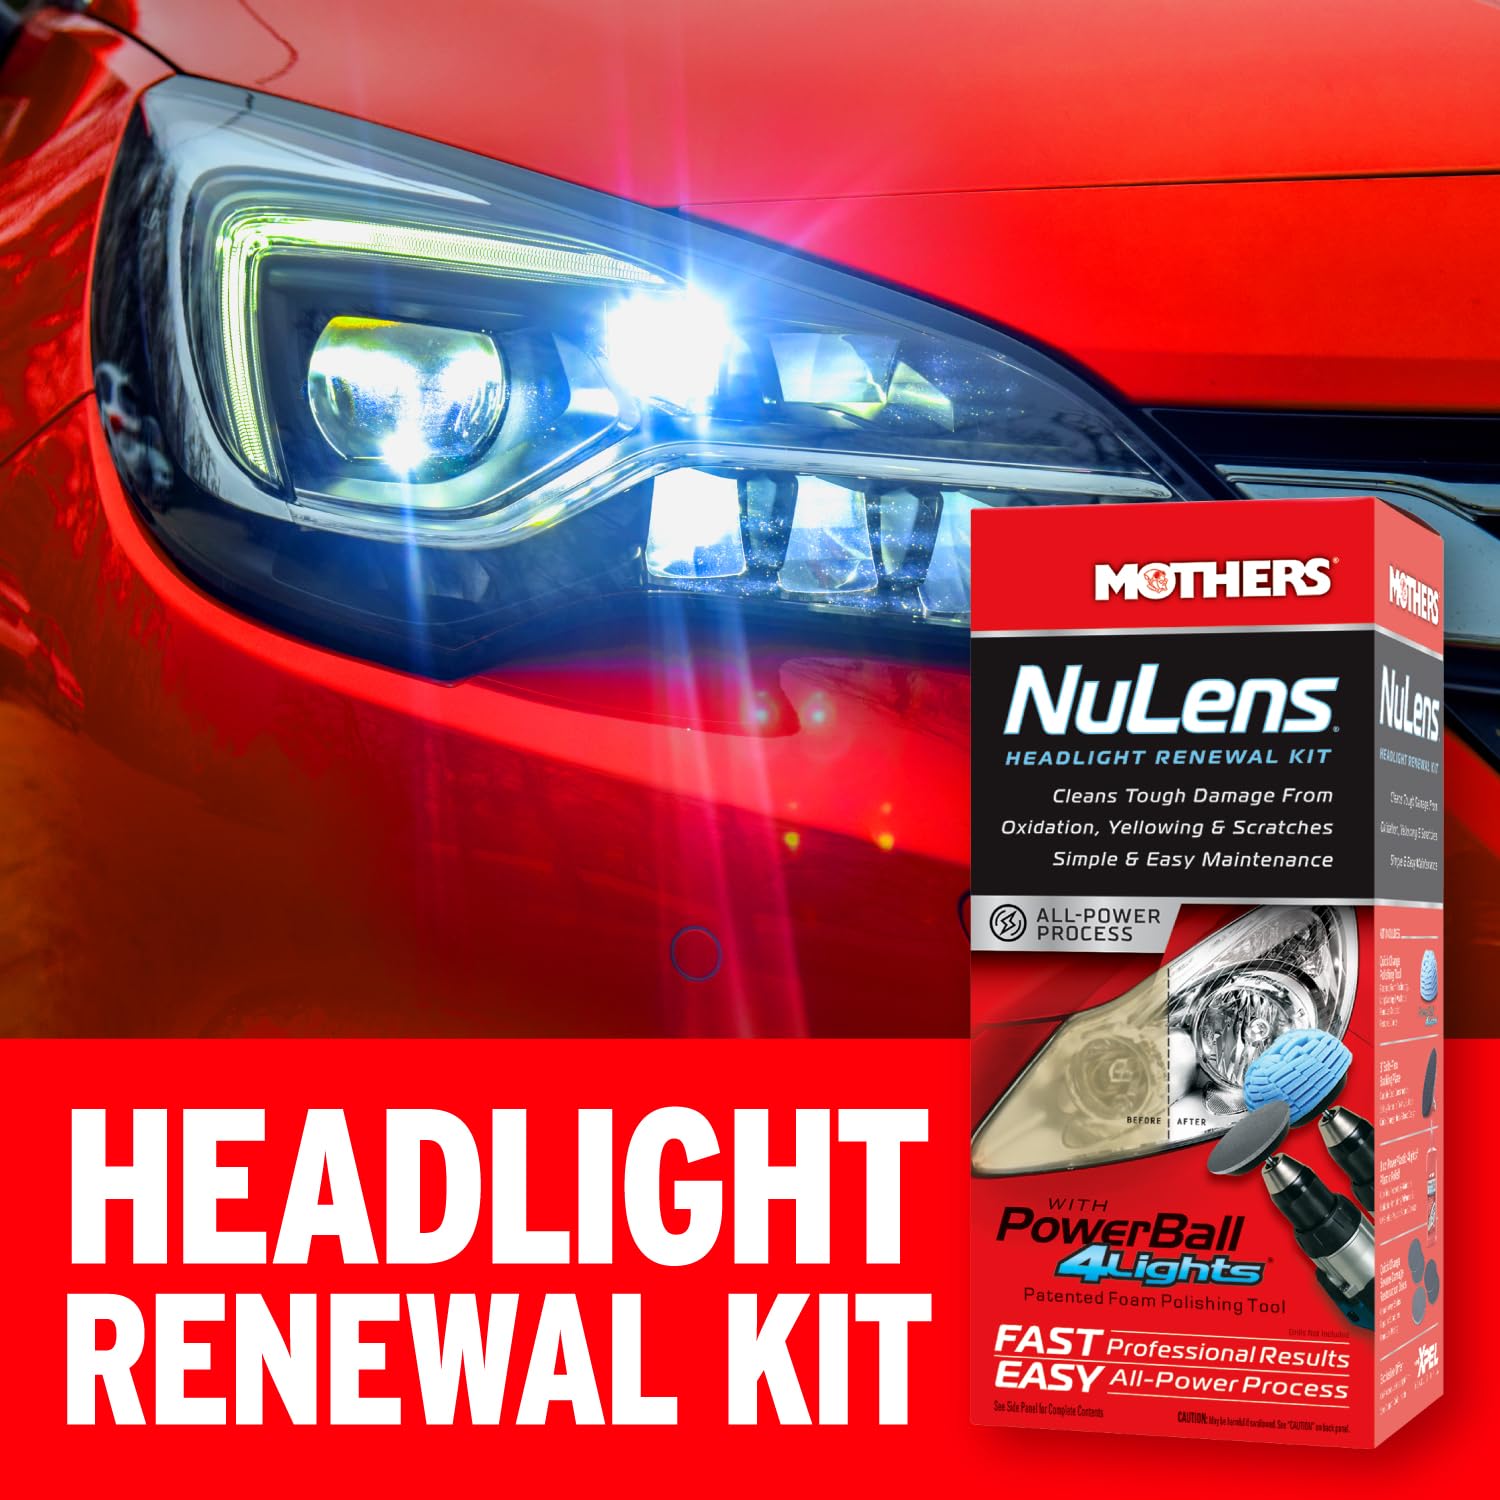
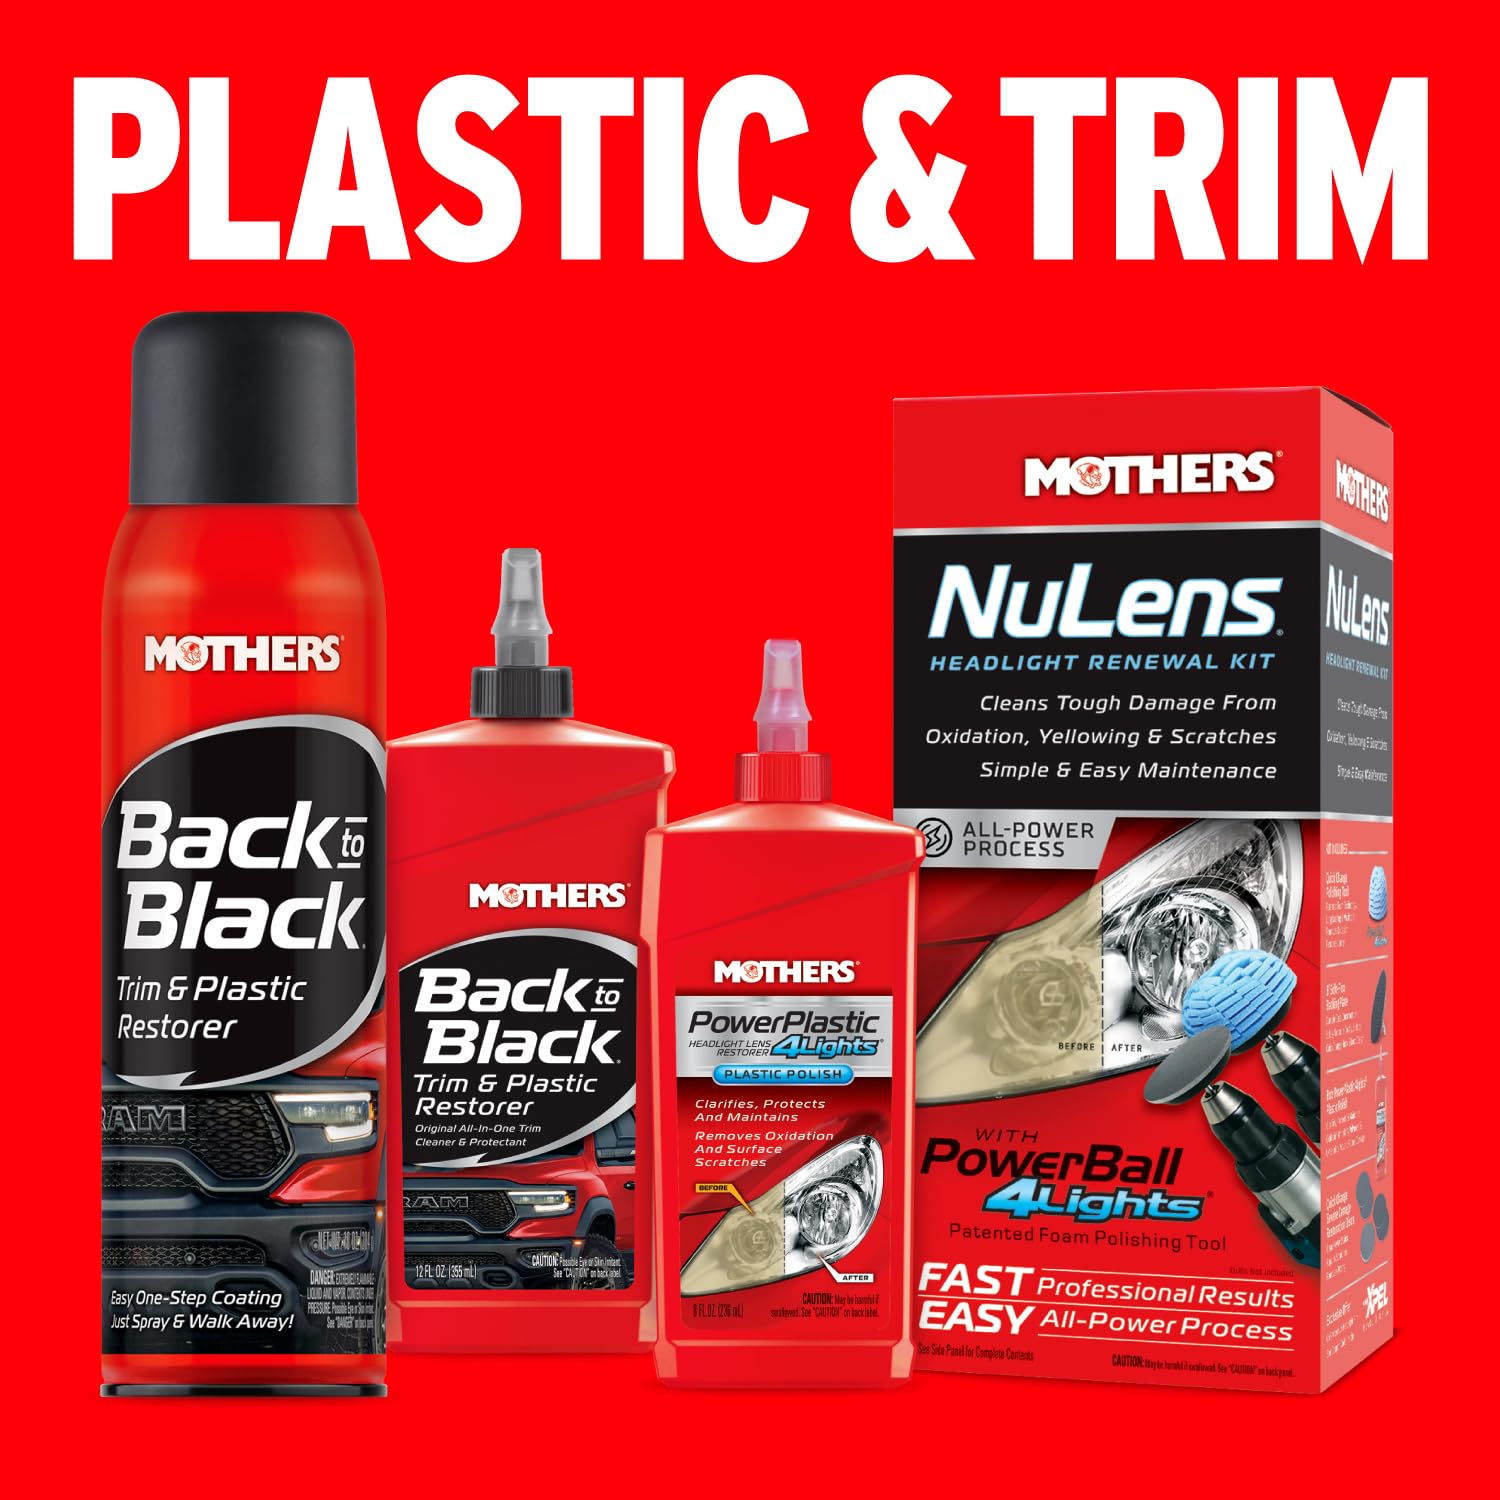
Mothers NuLens Headlight Renewal Kit is a professional-grade restoration system designed to quickly remove yellowing, stains, and minor scratches from all plastic and acrylic headlights. Featuring the PowerPlastic 4Lights Polish, it not only restores crystal-clear clarity but also applies a durable, oxidation-inhibiting polymer layer to protect against future environmental damage. The kit includes a 3-inch backing plate, Powerball polishing tool, and restoration discs, enabling a simple, effective DIY process that delivers showroom-quality results and enhances nighttime visibility.


| ASIN | B00GZLMEPM |
| Best Sellers Rank | #9,537 in Automotive ( See Top 100 in Automotive ) #21 in Automotive Headlight Restoration Kits |
| Brand | Mothers |
| Customer Reviews | 4.2 4.2 out of 5 stars (10,465) |
| Date First Available | November 29, 2013 |
| Is Discontinued By Manufacturer | No |
| Item Weight | 13.6 ounces |
| Item model number | 7251 |
| Manufacturer | MOTHERS |
| Manufacturer Part Number | 07251 |
| Model | 07251 |
| Product Dimensions | 9.4 x 4.1 x 3.4 inches |
| Voltage | 12 Volts |
A**S
To Restore or Not to Restore that is the real question?
This 2007 Honda Pilot, LX model had a problem which needed a permanent solution. The headlight beam wasn’t too visible due to heavy-oxidation and couldn't see the road anymore at night. The solution was that it was time for an HID kit. After deciding that I wanted HID’s I ran into the real problem. The headache of researching it all. I spent hours looking for something like I’m about to write specifically for Honda Pilots’ and the goal of this multi-product review is get the most bang for my buck. Ideally, if this review can help you make a decision rather quickly, and to demonstrate and show you what happens when you combine all three to achieve freaking fantastic results- then I’ve done my job. After hours and hours of researching I realized what the best possibilities were for my situation: 1. Purchasing new headlights 2. Restoring the headlights 3. Purchasing new headlights with expensive projectors on them with an HID kit 4. Installing LED lights Once, I decided It was clear to me that I needed to do, and it was to Create my own kit. I got lucky since the vehicle had stock projectors and immediately gave me a jump-start which made things easy for me- so it should be easy for you. Here’s the checklist of what was needed. My budget was $100 to see this through. 5. Restore the headlights (needed a kit) 6. Install the new Ballast (needed a kit) 7. Change out the old bulbs to new bulbs (needed new pair) Headlight Restoration I used the Mother NuLens kit- and am glad that I used this kit. Excellent product, and for the price, and review it had it was the best choice that I could decide on, and a few other competitors offered similar results, but the reviews left consumers knowing that there was a better product to what they used, so I kept searching. I think I found it honestly. I used an old-hand drill and the attachment that the product comes with and was able to get really good results. Follow the instructions, and if you restore your lights- do this while the car is cool, and in shade if possible. Total paid $9.35, and the lights look brand new. I already did another pair of truck lights, and they look good. It’s a 1999 Ford F150 that’s seen a lot of construction sites, and a ton of oxidation. This product did a fantastic job restoring those as well. Cleaning takes ~15 mins per light if you want to do it right- if you follow the instructions as I did. Selecting Non-Flickering Ballast Next, it was time to select new Ballast. Luckily, my truck was equipped with stock projectors, so check if you have projectors. After reviewing what it seems almost 30-40 products, I ran across the HYB Canbus premium 55W ballast. Based on product reviews, and other YouTube tutorials and before and after’s HID kits I saw-poorly mislabeled all over YouTube; The Canbus ballast were the best choice. Other products seem to flicker after a lot of usage, and I didn’t want to change something in a year or two. The reviews were pretty amazing. The other alternative was to use LED bulb’s which don’t use ballast- but those had negative reviews too and customers weren’t too thrilled. The other alternative was to purchase a complete kit- but there I couldn’t pick out or choose what I wanted, and everything looked cheaply made and reviews were also troubling. So I created this kit instead. I wanted maximum bright white lights, excellent satisfaction, a moderate budget, and something that I could do on my own. I paid a total of $39.99 for the premium ballast. If you see my vid- I included zip ties to the installation- I figured with the vibration of daily usage- based on the place where I could easily get to the ballast, I didn’t want to strain the adhesives, so I backed the adhesives up with a few zip ties to take the weight of the harness/connections. They don’t need to be there, I added those for protection. The Ballast work great- no flicker, and the light output seems to be brighter and brighter. Installation took 5-7 minutes per side, another 3 minutes for zip tying both sides. Choosing new Bulbs The Honda Pilot has regular halogen lights- they worked but due to the oxidation there was a lot of haze and it was filtrating a lot of my light output and the lights were illuminating the street poorly. I chose the Xtreme Vision HID Xenon bulbs. 5000K- which is a pure bright- white color. I didn’t want the blue as they loose Kelvin, so I selected these because it was one of the few companies that offered a 5000K pair of bright-white lights. The other bulb providers had worse to terrible reviews so I selected this company for my lights. The price was decent and there’s a ton of regarding the company products, performance and their overall usage life. Took around 5 minutes per side. Smaller hands have an advantage in changing out the old lights. Final Product Total spent $64.33, the light output seems to be stronger and stronger with more nighttime use. I know that the Kelvin output dropped by selecting the 5000K HID bulbs and I’m not receiving a full 5000K- because I’m running 55W ballast- but I’m okay with that because eventually I will receive a product that I expect, not blueish- but bright white. The light output is great now, the light throw is great, and it’s getting brighter with each night time use. Since I installed, I added around ~5 hours of night time driving and the light out put is at least 15% brighter. Who knows how long it will take for maximum results, but I can’t wait. The final product is short of amazing considering what I originally had and considering that I spent $68 bucks, well then what a great final product? Now, - I’m finding excuses just to drive the car out at night. The combination of all three products worked extremely well for my use. For those heavy DIY guy’s and gal’s, anyone of you can do this, male or female- it’s truly plug and play. If you’re a woman, you’ll probably complete this project faster because getting to headlights can require a smaller hand and there alone you have an advantage over a male. For HONDA PILOT owners, you can access the headlights without taking out the bumpers for this year/generation. Overall, the final product I’d give it 10/10 stars. Here’s the best part- I was actually $32.67 under budget- Heck Yeah!!! as Napoleon Dynamite would say; and the budget part was a little extra for you finance/accounting nerds- you know who you are. Thanks for reading, I hope this helps you with your decision. If you have great products, and would like me to do a thorough review please email me at [email protected] Product Title & Product Links: Xtremevision HID Xenon Replacement Bulbs - H11 5000K - Bright White (1 Pair) - 2 Year Warranty https://amzn.to/3cnuB4T HYB Canbus Slim Digital HID Ballast 55W Error Free Warning Cancel for HID Kit H11 H7 H8 H9 H4 H1 9005 9006 Universal Fit(Pack of 2) https://amzn.to/2wmeB2v Mothers 07251 NuLens Headlight Renewal Kit https://amzn.to/39cMmlE
T**A
Easy to Use and Great Results
The quality of this kit is very good, and it’s easy to use. It doesn’t stick or leave residue, and the process is simple. For the price, it’s a great product, and it leaves your headlights looking like new. Very satisfied with the results.
T**R
It's good but you might need extras
Individual pieces work great but I'm not really happy with the kit my headlights were heavily oxidized the 800 grit just smeared yellow plastic everywhere I had to grab my own 240 grit to clean up and get threw the oxidized plastic mess then used 400 grit to smooth out a bit for the 800 pads the 2 pads of 800 and 1500 grit don't get the job done for heavily oxidized plastic and the single 3000 grit pad was basically pointless the polishing compound came threw and cleared it up nice enough not bad for a starter kit or lightly oxidized headlights but ide suggest getting more course grits for anythimg more than lightly oxidized and possibly going out to 4000 grit before polishing if you do get more course pads be extra careful to not gouge the plastic the foam on the drill attachment really doesn't have enough flex to run more course grits the sponge polisher worked well but I feel cotton would make less mess but I was also running higher than recommend rpm three hours for one headlight had worn threw my patients
M**C
A product that works
I watched a ton of YouTube videos on how to make my headlights clean again and found contradictory information. Finally, I decided to try the product by Mothers NeLens. It was simple, it was easy to use, and the results were amazing. My headlights look fantastic, and I am very satisfied. My headlights are clean and bright, and I can see at night again.
M**1
Ok kit
I bought this kit to use on the fourth headlight restoration I have done in the last 10 years and all four times used a different method or different kit. Of the four times I would say this was the most difficult and hardest overall with the worst results. First of all, it takes forever doing it with this kit. I think I was close to two hours on the Restoration when normally it takes me like 25 minutes tops. There is absolutely no directions except for really bad ones on the back of the box so I started doing what I thought was correct only to discover I was doing it out of sequence about halfway through and had to start over but since they don’t send very much sandpaper I had now burned through my inventory and had to clean the sandpaper off to try to get it to work. Even after working and reworking the headlights, I came to the realization that it simply wasn’t going to take off about 15% of the fogging and issues. It did get the rest and it does look better but now it just looks used instead of extremely used. Out of frustration I switched gears and took some 800 grit wet dry sandpaper from the garage and some Dawn dish soap, water and hand sanded the headlights down until they were a nice smooth fog and then polish them up with 1200 grit wet, sandpaper and then 2500 grit wet side paper, and then polished them And they looked brand new after that. Ironically, I used probably two dollars worth of material that way and the results were much better than this kit.
J**I
Worked great for my trucks lenses that were yellow and dingy
So I was a skeptic for this product, but I carefully read through the reviews and found that this product seemed legit. It is. As long as you make sure to take tour time sanding as rinsing between coat an keeping the lense wet while sanding, it will look really nice when they are completed. It did not take before pictures as I really don't get into reviews and what not, but I have time this Sunday so I chose to right a review. This is definitely a great product for a great price and it comes with 2 800 grit and 2 1500 and 1 3000 grit sanding pad that can be used more than once each, as long as you maintain the sanding pads and clean them between use. I use a tooth brush and Dawn soap to maintain the sanding pads and buffing ball. I think I will be able to use this kit 6 times effectively and for 20 some odd dollars, that's a great deal to me. Takes about 30 minutes to do 2 front head lamps on a dodge 04 ram so do the math. I live on the Mississippi coast where they sun really beats up and oxidizes plastics really fast, especially the lights on my vehicles, hell, especially my kids toys if left out in the yard. Great buy
S**9
Awesome product! Does what it says!
This works amazingly! Just follow the directions on the box first. Then if that doesn't work follow the directions included in the box. I only had to follow the first set of directions on the box. My subaru is 13 years old. I have never replaced the headlights or restored them before, this was a easy process to follow and they look like new! I know you can't tell from the pictures but you could barely see my headlights when they were on at night now it is like I spent 400.00 on new headlight lenses! Now I have to get my headlights readjusted! But I will take that over spending that kind of money on new lenses any day!
R**K
A waste of money
This seems to be a gimmick to sell the large size of plastic polish, because their first instruction is N OT to sand off the oxidation ( like all the other kits i bought) but to just polish the heck out of it using up lots of polish and their poof ball polisher in a rotary drill. First don't buy things that use rotary drills instead of orbital ones -- you can see the nice speckle job a rotary drill does on my car. whatever binder they use in those sanding discs has bonded to the paint on my car - this picture is after 2 times through the car wash. I am going to have to hand remove these somehow. THe instructions for using the discs is poor. mostly they want you to use the poof ball and the plastic polish to restore the lens which for most yellowed lenses is not possible. You need to sand off the discolorations and using the 800 grit is like using hedge clippers on your beard very rough and nasty. The right grades should be 1000, 1500., then 3000 if you do not want to end up spending half the day sanding out the previous scratches. NExt you absolutely have to use some kind of liquid lubricant - water whatever otherwise you can end up burning the plastic instead of sanding it. Take a look at the picture of the lens with the red oval. Even with a lot of sprayed water, and a low speed drill, whatever binding agent they used on the sandpaper melted enough to create this brown gook that simply does not come off when polishing. I am going to have to hand sand with 1000 and do the whole thing over again becasue of this residue. Next they tell you to use a drill. What they don't tell you is that it spatters everywhere. Look at the picture of the hood of my car. This is after both lenses. They also don't tell you it dries like cement on your paint. Lucky for me I am planning to restore the paint any how or i would have been throwing bricks through their windows. FInally they simply do not give you enough sandpaper disks especially the 1500 ( only 2) and 3000 (only 1) to make it through two lenses effectively. one lens perfect the other not enough grit left on anything to clean the surface. How much could it cost to put an extra 1500 and 3000 disc in there? IN conclusion. Obviously they don't care much about lens restoration .They do care a lot about polishing lenses and using up their polishing compound in copious quantities. They give you enough compound to last a few years on 2 headlights, and if you just want to resurface the headlights again you will need to buy another overpriced kit to get the sandpaper or go buy sandpaper and try to cut out the little circles and GLUE them on the holder since you can't buy sandpaper of this grade that is prebacked with hook and loop. I would forget about another kit and just hand sand these in the future - less mess and you still need to use lubricant ( water etc). The more kits you buy to get the sandpaper the more bottles of useless plastic restorer polish you will accumulate. Finally most other kits give you a final surface coating to make believe they are trying to help you avoid doing the job again ( unless your surface coating is a high sio2 ceramic finish you will be refinishing every 6 months any how). This company doesn't even make believe they are interested in saving you work - they do not give you any kind of lens protector,. Instead they tell you to just refinish with their polish- again and again and again. Fooey! THey had a second thought - they include a special offer to save 20% on a lens protector you have to buy separately when it would cost next to nothing for them to put a couple of lens wipes in the package. Buy something else - anything else.
Trustpilot
1 month ago
3 weeks ago