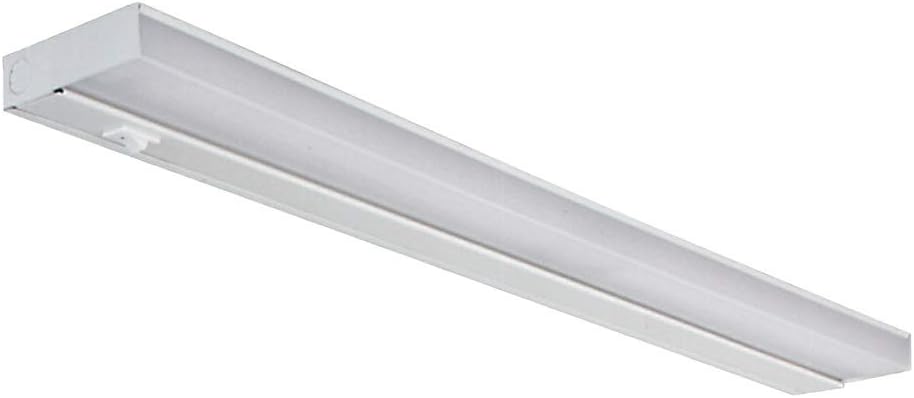

NICOR Lighting 24 inch White T5 Fluorescent Under Cabinet Light Fixture (10366EB)
Product ID: 120977070
Details
- BrandNicor
- ColorWhite
- MaterialAlloy Steel
- Room TypeBasement
- Style16W
Fluorescent under cabinet lighting is one of the best ways to save energy without sacrificing functionality and it is typically less expensive than other energy-efficient options. These fixtures are very effective and are 70% more energy efficient and 80% cooler than incandescent or halogen light sources. For energy efficiency on a budget, this 24” under cabinet fixture is a perfect option for any kitchen, basement or home office. At NICOR, we’re always looking for ways to make your light better. We continue to innovate, challenge our thinking and improve our processes. We look to earn your business by delivering progressive lighting solutions designed to balance value with the highest design performance possible. We’re determined to bring you reliable products that provide real solutions. When you choose a NICOR product, you can rest assured you’re getting a product that has been tested to the highest standards available. Our commitment is to be a leader of reliability, innovation, and excellence because we understand just how important you are. Review: Nice slim line under counter light - This was the third light I purchased. We have them under our kitchen cabinets. They are made so they do not hang down too far below the cabinet. You can use warm white or cool white bulbs in them. Very good buy. We had them installed professionally. Review: Hoping not to find the ballast is having problems this year or the good looks and on time delivery won't mean much - Bought this fixture a year ago. The right side bulb burned out in about 4 months. The second bulb burned out in 8 months. I'm looking for the third bulb and future bulbs to last longer. Hoping not to find the ballast is having problems this year or the good looks and on time delivery won't mean much.


| ASIN | B006T3486E |
| Batteries Required? | No |
| Brand | Nicor |
| Color | White |
| Controller Type | Push Button |
| Customer Reviews | 4.1 4.1 out of 5 stars (98) |
| Date First Available | September 4, 2009 |
| Finish | Steel |
| Finish Type | Steel |
| Fixture Type | Non Removable |
| Global Trade Identification Number | 00767706024487 |
| Item Package Quantity | 1 |
| Item Weight | 2.5 pounds |
| Item model number | 10366EB |
| Light Source Type | Fluorescent, Halogen, Incandescent |
| Manufacturer | Nicor Lighting |
| Material | Alloy Steel |
| Mounting Type | Screw-In Bracket |
| Number of Items | 1 |
| Part Number | 10366EB |
| Plug Format | A- US style |
| Power Source | Corded Electric |
| Product Dimensions | 24 x 4 x 1 inches |
| Room Type | Basement, Kitchen |
| Shade Color | White |
| Shade Material | Acrylic |
| Shape | T5 |
| Size | 24" |
| Specific Uses For Product | Light,Under |
| Style | 16W |
| UPC | 767706024487 |
| Unit Count | 1 Count |
| Voltage | 120 Volts |
| Wattage | 16 watts |
S**H
Nice slim line under counter light
This was the third light I purchased. We have them under our kitchen cabinets. They are made so they do not hang down too far below the cabinet. You can use warm white or cool white bulbs in them. Very good buy. We had them installed professionally.
A**R
Hoping not to find the ballast is having problems this year or the good looks and on time delivery won't mean much
Bought this fixture a year ago. The right side bulb burned out in about 4 months. The second bulb burned out in 8 months. I'm looking for the third bulb and future bulbs to last longer. Hoping not to find the ballast is having problems this year or the good looks and on time delivery won't mean much.
B**W
I or fluorescent 12 inch T5 works as described
Nucor under cabinet fluorescent T5 came exactly as described. Slim and lights up everything
J**D
Don't buy this - it's junk
This is junk. You'll know it as soon as you take it out of the box. And good luck installing it. I'm not even going to send it back - I'm just going to throw it out and find something made by somebody who cares about quality more than pawning off this thing to make a buck.
L**L
Good light, but a little tricky, read the other reviews
Once installed the light is fine. Seems pretty heavy duty, real metal construction. Nice finish. But, First, this is a hard wire, 120V AC direct connection light. There is no power cord. I didn't know that from the description of the light. Minus -1 point. You got to pry the light apart to get at the little bags of accessory screws and connectors. The space is tight inside, but not impossible at for hard wiring. BTW, I spliced in a short section of cheap extension cord to make mine work as a plug-in light, since I wasn't set up for hard wiring. I had to use more tools than I thought would be needed to get it in. This is a good light, but on whole there are some tricky parts for such a small job.
A**A
Very Satisfied
Just what I needed for my bathroom under cabinet.
S**S
A Tension Headache
The size of this fixture was perfect to replace an old, undercabinet fluorescent fixture that died. But it's more difficult to install than it has to be. The fixture is in two main pieces -- the housing that mounts to the underside of the cabinet, and the electrical components or "wireway," which contains all wires, power switch, ballast and bulb sockets. The wireway cover is kept in place by tension only, with the edge of the cover hooking into two tiny tabs on the housing. There are three cutouts in the housing for the wires coming out of the cabinet -- left, center and right. The wires coming out of my cabinet are to the right, but not all the way, and not very long, so I had to drill another hole in the housing to accommodate them. That wasn't too difficult, nor was tying together the black and white wires with the wire nuts. There is also a green grounding wire in the box. The instructions tell you to connect it to the grounding wire coming out of your cabinet and to the terminal on the unit. But there is no terminal to connect it to. There is an empty slot on the reverse side of the power switch. Could that be what the instructions were referring to? I'm not sure, but one end of the green wire is bare wire, and the other is a round metal piece with a hole in the middle, for a screw head to press onto. Neither end fit into the empty slot on the power switch. I attached the grounding wire to a screw holding the bulb socket in place. I don't know if that properly grounded the unit, but there was no other screw to attach the grounding wire to. The black and white wires to be connected to your house wires, and most of the electrical guts of the fixture, are crowded in with the ballast and the power switch on the right side of the wireway. After making all the electrical connections, the wireway cover has to be clicked back into place behind the two tabs in the housing. On the right side, where most of the electrical components are crowded together, that turned out to be impossible. The wireway cover couldn't be compressed enough to get it to click into place, because there was too much stuff inside it. There's enough tension as it is that it should stay in place. I ended up bending some of the metal and scratching the finish trying to reassemble it. Since it's invisible under my cabinet, no one will notice. The instructions are a complete joke and, to the extent they're comprehensible (they mostly aren't) they'll have you install the parts in the wrong sequence. There are some metal hardware pieces in a small plastic bag, along with some wire nuts, but there is no explanation of what the hardware is or what to do with it. The bottom line is that if you can understand how your old fixture is connected, you'll figure out how to install the new one. But good luck trying to close the cover all the way after you've made the electrical connections.
J**A
Did it myself
A good replacement for original equipment
Trustpilot
2 days ago
3 days ago