🎯 Keep control, keep style—upgrade your drive without compromise!
The Metra Toyota 20-pin Steering Wheel Control Add-on Harness with RCA enables Toyota owners to maintain factory steering wheel controls and 3.5mm aux input functionality when upgrading to aftermarket radios. This plug-and-play harness requires no splicing, ensuring a clean, professional installation while preserving original wiring integrity. Compact and lightweight, it’s designed for seamless integration with compatible aftermarket audio systems.
| Brand | Metra |
| Material | METRA 70-8114 Toyota(R) 20-Pin Steering Wheel Control Add-On Harness with RCA |
| Item dimensions L x W x H | 8 x 4.5 x 0.5 inches |
| Item Weight | 1.28 ounces |
| Cable Type | Auxiliary |
| Connector Type | RCA |
| Manufacturer | Metra Electronics |
| UPC | 086429230822 |
| Global Trade Identification Number | 00086429230822 |
| Product Dimensions | 8 x 4.5 x 0.5 inches |
| Country of Origin | China |
| Item model number | 70-8114 |
| Is Discontinued By Manufacturer | No |
| Warranty | Please contact the manufacturer |
| Weight | 0.12 Pounds |
M**Y
Steering Wheel Control for Lexus GX470 No Axxess Box needed, No complicated programming.
My wife has a Lexus GX470 Non Nav / Non Mark Levinson Sound system. I replaced the factory head unit (Pioneer) with the Binize 10.1 inch Android HU. I got the Metra TYTO-01 kit to connect the new HU to the factory wiring harness, but the steering wheel controls for the GX470 (and likely the Toyota 4-Runner) are on a separate 20 pin plug that goes to the factory HU. Thanks to another user's review here, I was able to connect the Android (which has a SW1 and SW2 Wire) to the factory harness. Here's an excerpt of how to do it from the other user's review: For the 6 wires on the white connector, 3 are of interest. Black wire = GND (connect to GND wire of the new headunit - this is steering wheel controls GND not the main GND - you still need to connect the main ground of the HU). Green/yellow = SW1 / KEY1, green/black = SW2 / KEY2. With this, was able to get the steering wheel controls working with a new Android HU, easy as can be. (End Review)From the Binize Android Head Unit, you go to the settings page and there is a button (scroll down) on the left side that says steering wheel settings. Go in there and you will see various settings (eg. Volume Up, Volume Down, FFWD, RWD, GPS, etc.). Select the desired function onscreen and then press the steering wheel control button that you want to perform that function. I programmed Vol + Vol- Next track, Previous Track, and for the mode button I selected GPS (for which I have Waze set as my default GPS Navigator). The steering wheel controls work great and my wife is thrilled!
O**.
Highly Recommended - Read This for Important Installation Details
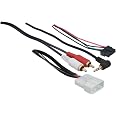
I installed this on a 2007 Toyota Solara, with a Pioneer head unit. This is a great product, but you must also purchase and install the Metra ASWC-1 steering wheel control interface to make this work. I connected the wires from the white connector to the car stereo wires, and in most cases it was a simple color match, but make sure to check your specific wiring diagrams. The white connector on this harness connects to the car's steering wheel connector (formerly on the factory radio). Don't worry about which plug it goes into, because Toyota has made all the connections to their car stereos different, so this will ONLY fit on the steering wheel connector. The male 3.5 mm plug then goes into your new car stereo's wired remote input jack, typically on the rear of your head unit. Next, here's a very important point that no other reviewer has provided, and when I called Metra, they actually gave me the wrong answer - if you connect this harness, you DON'T need to use the connectors/harness that comes with the ASWC-1. Once you connect the white connector of the 70-8114 to the car's steering wheel connector, and the 3.5 mm male plug to you car stereo, you then plug the black 12-pin connector (shown in the lower left of the picture) directly into the ASWC-1 (purchased separately). One connection/plug to the ASWC-1 and you're in!! In my case I then turned the car key to the accessory position, powered on the radio, watched the LEDs on the ASWC-1 go through their initialization, characterization, and setup, and within 15 sec or so I had the steering wheel controls working - volume, up/down channel, and mode select. Works perfectly! Another lesson learned in my case was that the power antenna cable from the stereo needed to be connected to the blue cable on the 70-8114 even though my Solara doesn't have a power antenna (antenna is in windshield), it turns out that the Solara has an antenna amplifier that needs to be switched on with the stereo. Once connected, the antenna (and FM reception) was as good or better than the OEM radio. I highly recommend this 70-8114 harness along with the ASWC-1 for Toyota vehicles, when replacing an OEM car stereo.
W**S
easy to install
awsome
W**N
Very helpful but incomplete
This beats making a harness from scratchBut it is incomplete in at least two ways1. your aircon/climate system won't function unless you hack a resistor onto the back of the factory harness. That is very silly; the car-facing jack should contain at least pigtails for pins 9 and 10 (TX1+ and TX1-) if not a pre-installed bridging resistor2. Modern wireless CarPlay head-ends require a VSS signal; the harness should include a pigtail for pin 3 (SPD)I fabricated the necessary Dupont pin connections and that worked, and was more fun than wiring up a connector from scratch, but it would be very helpful if this harness was "all you need", which it is not
Z**H
Did not work for my vehicle even though it said it does
Make sure it will actually work on your vehicle. It does not cover mine as the ad says it does.
D**N
Time Saver and Sure-thing Install! Love It!
We used this with a Pioneer AVH-X3800BHS and a Toyota Sienna LE (standard non-JBL, 4 speaker radio). I can say that this was well worth the price in terms of simplifying the installation. It really did make the install "plug and play" once you wire the power and ground. It wasn't clearly noted in the instructions, but the absolute best way I found was to tap directly into the radio wire harness for both connections. I did that at the same time I used the Metra wiring harness for the radio (that allowed me to use the existing Toyota wiring harness). Watch out if you use a t-tap type connector - the wiring on this, the Metra harness, and the car (Toyota) harness are all 18-guage. We initially tried a blue t-tap that claimed it went down to 18-guage but that didn't pierce the wiring properly and the AXXESS device is very sensitive to a clean and constant power and ground. USE the RED t-taps! Yes - very happy with the effort this saved, would like a bit more clarity in the directions but they are as good or better than most I have seen so just note the details above and best of luck!
A**R
Good
Good. Does the job
Trustpilot
2 days ago
2 months ago