
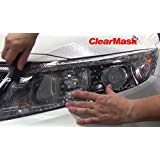
ClearMask Llumar 10 Mil Headlight Protection Film Kit with Self Patterning Liner (2) 15 inch by 30 inches Bulk Sheets
| Product Dimensions | 76.2 x 38.1 x 0.03 cm; 227 g |
| Item model number | 5 |
| Country of Origin | USA |
| Item Weight | 227 g |
G**E
The solution to improperly used plastic is this properly applied plastic!
To start with let’s all agree plastic headlights suck! That said, I just finished wrapping the headlights on my 97 Civic which are curved and have a seam between headlight and turn signal. Took my time and followed directions-in fact I read them start-to-finish three times-and at least so far they look beautiful! I’m impressed with the quality of the wrap, it should last several years. If I were keeping the car I would apply two layers but as it is going to be sold I just used one but I did leave a tab at the top so the owner can just peel it off in the future easily if it gets cloudy. I have a few small spots around the assembly edges that I am sure will lay down and adhere tomorrow-they aren’t on the lens, just on the flat part around the light reflector, out of view once assembled and protected from car washes etc. that might cause edges to lift. Actually I’m so impressed I may just buy new lenses for my Volvo 245SE and another set of these. Mine are cloudy as heck and new plastic costs 1/3 what glass lenses do so even adding this cost makes it more economical. And I don’t drive a 30 year old car because I’m a car nut(although I am) but because I’m a cheapskate! This old Volvo is one of the most dependable, least expensive to maintain and safest cars on the road, It has 400,000+ miles and engine and transmission have never required repair. I drive around 475 miles round trip to the VA hospital and average 85MPH and 28MPG when roads are clear-3 passes twixt here and there. On the other hand I am beginning to like this Honda and I was a Honda factory tech before I retired so I am certain this one has another 200,000 miles in her before major before she dies, at least!
I**O
Feels like it should be good protection
I applied this to two new headlights, I didn't want to have any pitting or yellowing. I was a little hesitant to try it because I have very little patience. I tried the first one out with the headlight on a bench and I used warm soapy water and a little heat gun and it wasn't too bad. It came out pretty smooth I didn't have any bubbles but heat will be your friend. The second one I tried with it on the car and it didn't come out as well as the other one. I was trying to stretch it and there's little marks on the film which you'll notice if you look close. If I had to do it again I would definitely take the one out of the car, it was easier for me to get around the corners. Try to use some heat and a lot of soapy water and have patience
K**B
Easy enough
Some reviewers have posted detailed experiences which I found helpful. I would like to add some tips for after after you read and reread the directions.There is one more tool I found extremely helpful: a burnisher. Mine is a small chunk of ebony about a quarter inch thick with rounded corners on flat and curved edges. Anything hard with very smooth edges will work. There’s probably something in your kitchen utensils you can use.The instructions say not to install in direct sunlight. That’s probably true, however, I installed the second side in the late afternoon and the headlight was quite warm. It was ten times easier than the one I did earlier under cloud cover. I used a lot soapy water and made sure it wasn’t drying up before I started to peel the backing.The instructions say to keep your hands and the film backing dry. Not true. I sprayed everything. It washes away any dust or particles that were attracted by staric.When you cut your piece, give yourself a good inch. Clean the car well and you can use the car to help hold the piece while you figure out where to stretch and shape the film for a clean fit.When making your template or drawing your lines, do leave extra on the “other side” of the hump. The flattest part is easier to trim close, but as you stretch around the most convex parts, it will change where the line is.I used an xacto blade to trim the film after it was installed. It was a bit squirrely before the film had time to cure in place. Give it a few hours before you try to trim close to the light.
C**S
Not specifically made for headlights.
This is a clear protective film, but not specifically for headlights. The instructions tell how to install on door or hood edges to protect the paint. Nothing about headlights. It works, but you have to cut them to shape yourself (a given of course since it's not made for a specific vehicle so not a negative) and we'll see how well the adhesive holds up to the heat given off by headlights (on vehicles with LED headlights it won't be as much of a worry).
D**J
The good stuff
Just go for the 3M material. You won’t regret it. Great quality, outstanding transparency for your headlights. If you like your car this is a must with today’s plastic headlight covers.
Trustpilot
1 week ago
1 month ago


