🚗 Protect Your Ride in Style!
The 3M 8 Mil Headlight Protection Film Kit includes two bulk sheets measuring 15 inches by 30 inches, offering superior thickness, optical clarity, and flexibility for easy installation. Designed to keep your headlights looking new, this film is a must-have for any vehicle owner.
Material | Tempered Glass |
Screen Surface Description | Glossy |
Screen Size | 15 Inches |
Item Hardness | 9H |
Special Features | 550% Flexible Elongation |
Number of Items | 2 |
Item Dimensions L x W | 30"L x 15"W |
Unit Count | 3.13 Square Feet |
D**K
Excellent Thickness 3M Brand Film
The product was exactly as described, a thicker 12mil 3M brand film, LLumar. I used it to protect my glass headlight lenses and it was very easy to install once I got the hang of it. The film is very durable but doesn’t appear to be very stretchy, although if you applied heat I bet it would be better. It comes with instructions and tips and tricks as well which was unexpected. Be sure to read them thoroughly and mix up a good slip solution as directed.I have yet to drive the vehicle but the intent was to prevent rock chips from breaking the glass headlight lenses. Hoping this will do the trick
G**E
The solution to improperly used plastic is this properly applied plastic!
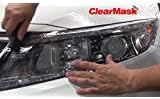
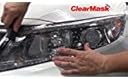
To start with let’s all agree plastic headlights suck! That said, I just finished wrapping the headlights on my 97 Civic which are curved and have a seam between headlight and turn signal. Took my time and followed directions-in fact I read them start-to-finish three times-and at least so far they look beautiful! I’m impressed with the quality of the wrap, it should last several years. If I were keeping the car I would apply two layers but as it is going to be sold I just used one but I did leave a tab at the top so the owner can just peel it off in the future easily if it gets cloudy. I have a few small spots around the assembly edges that I am sure will lay down and adhere tomorrow-they aren’t on the lens, just on the flat part around the light reflector, out of view once assembled and protected from car washes etc. that might cause edges to lift. Actually I’m so impressed I may just buy new lenses for my Volvo 245SE and another set of these. Mine are cloudy as heck and new plastic costs 1/3 what glass lenses do so even adding this cost makes it more economical. And I don’t drive a 30 year old car because I’m a car nut(although I am) but because I’m a cheapskate! This old Volvo is one of the most dependable, least expensive to maintain and safest cars on the road, It has 400,000+ miles and engine and transmission have never required repair. I drive around 475 miles round trip to the VA hospital and average 85MPH and 28MPG when roads are clear-3 passes twixt here and there. On the other hand I am beginning to like this Honda and I was a Honda factory tech before I retired so I am certain this one has another 200,000 miles in her before major before she dies, at least!
S**U
Thick film, hard to curve and cut with blade
Film is thick and strong and clear, perhaps a little too thick for easy maneuverability and application, or perhaps just due to my inexperience.I refinished oxidized headlights on a car and applied this film to the end product. These headlights had some curves to them, and despite using a heat gun to help stretch the film over curved surfaces, I had great difficulty.The film has been on the outdoor-parked car for slightly over a year now and seems to be holding up well. There’s a little bit of rainbow stretch distortions if you look at the headlight directly when they are on. This may be due to how much I had to stretch the product or my own heat application.
B**E
Increase the longevity of headlights
In the Florida heat headlights take a beating. Add road construction and all kinds of debris getting the front of your car headlights get scuffed and damaged quickly. Headlights still look prestine. Easy to put on if you use the soapy water method.
C**S
Not specifically made for headlights.
This is a clear protective film, but not specifically for headlights. The instructions tell how to install on door or hood edges to protect the paint. Nothing about headlights. It works, but you have to cut them to shape yourself (a given of course since it's not made for a specific vehicle so not a negative) and we'll see how well the adhesive holds up to the heat given off by headlights (on vehicles with LED headlights it won't be as much of a worry).
K**B
Easy enough
Some reviewers have posted detailed experiences which I found helpful. I would like to add some tips for after after you read and reread the directions.There is one more tool I found extremely helpful: a burnisher. Mine is a small chunk of ebony about a quarter inch thick with rounded corners on flat and curved edges. Anything hard with very smooth edges will work. There’s probably something in your kitchen utensils you can use.The instructions say not to install in direct sunlight. That’s probably true, however, I installed the second side in the late afternoon and the headlight was quite warm. It was ten times easier than the one I did earlier under cloud cover. I used a lot soapy water and made sure it wasn’t drying up before I started to peel the backing.The instructions say to keep your hands and the film backing dry. Not true. I sprayed everything. It washes away any dust or particles that were attracted by staric.When you cut your piece, give yourself a good inch. Clean the car well and you can use the car to help hold the piece while you figure out where to stretch and shape the film for a clean fit.When making your template or drawing your lines, do leave extra on the “other side” of the hump. The flattest part is easier to trim close, but as you stretch around the most convex parts, it will change where the line is.I used an xacto blade to trim the film after it was installed. It was a bit squirrely before the film had time to cure in place. Give it a few hours before you try to trim close to the light.
A**S
This would take one person, three children and a monkey to install!
I want to install this on my new replacement headlights. The instructions are excellent. However, the installation is very, very, very difficult. The curvature of the headlamp requires a lot of stretching and this product is quite thick. I did want the thicker product because of stone and bug strikes. But you have to get it on first! Holding and stretching was not an option by yourself. Even when I had two of my kids helping I still could not get it to stretch uniformly around the curvature of the headlamp. Friends of mine told me you need to use a heat gun well that would dry out the water/soap and the water/alcohol solution. So the headlamps went on without the protecting film. I will use this after the truck is repainted four spots at the doorhandles.
D**J
The good stuff
Just go for the 3M material. You won’t regret it. Great quality, outstanding transparency for your headlights. If you like your car this is a must with today’s plastic headlight covers.
Trustpilot
1 week ago
1 month ago