Desertcart purchases this item on your behalf and handles shipping, customs, and support to Senegal.
🏡 Elevate your backyard game with Gotland’s sleek, secure, and spacious metal shed!
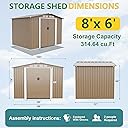
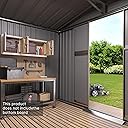
The Gotland 8FT x 6FT Metal Storage Shed offers 314.64 cubic feet of waterproof, weather-resistant storage with lockable sliding doors and a sloped roof. Designed for durability with reinforced supports and corner guards, it provides easy access via a ramp door ideal for wheeled equipment. Perfect for backyard organization and outdoor workshops, this compact shed combines functionality with secure, smooth operation.
| Base Material | Metal |
| Brand | Gotland |
| Color | Brown-1 |
| Door Style | Sliding Doors |
| Floor Area | 48 square_feet |
| Item Dimensions D x W x H | 72"D x 97.2"W x 72.4"H |
| Item Weight | 95 pounds |
| Material | Metal |
| Material Type | Metal |
| Product Dimensions | 72"D x 97.2"W x 72.4"H |
| Style | Garden,Outdoor,Patio |
| Style Name | Garden,Outdoor,Patio |
| Top Material Type | Metal |
| Water Resistance Level | Waterproof |
W**N
Terrible quality
This is a terrible product. Poor installation instructions, I’m pretty handy at building things with good instructions. I’ve built many things over the years, but this thing is a different class of awful. Parts arrived damaged. Metal so flimsy it had several dents upon arrival. Cheap connectors, doors impossible to install. The metal is so thin it will be very susceptible to any wind. I would highly recommend anchor straps. This is a piece of junk. You get what you pay for!
D**K
Good shed
The shed was easy to assemble and seems to be structurally sound for its purpose. I would recommend.
S**9
Good value, satisfied with result. Good project for two handy people, not for the uninitiated...
This was a PITA and took two handy guys two days to accomplish but I’m pretty satisfied with the result. Overall: Not bad for under $300 including cost of the deck… I scanned the installation instructions to which the comments below are linked but couldn't upload them. Google "Hoggar Caseta Gotland User Manual" for a similar version. Comments and Recommendations (Picture: 8 x 6 Shed 1) Item arrived in two relatively heavy boxes delivered to the front door. A light duty hand truck/dolly was sufficient to move them single-handedly to the construction site. Parts were complete and undamaged in the boxes, logically bagged and banded together, and clearly labelled with part numbers (Picture: Shed 2) for relatively easy identification (more on that later). Sufficient screws, nuts and washers were provided to accommodate ~5% loss during construction. A parts inventory sheet and two sets of assembly instructions were included along with two flat wrenches, a #2 Philips screwdriver, two sets of cotton gloves, hold-down brackets which extend inside the building, and very good quality concrete anchors. If you intend to construct the building on bare earth you will need better building anchors than those provided in the kit. Choose a suitable location to construct the shed realizing that you will need ladder or step-stool access to all 4 sides of the shed during construction (I had to change my build site when I realized I couldn’t access the sides or back for construction at my intended concrete slab close to the house). I also recommend you have sufficient flat space adjacent to the build site to open the boxes and lay out their lids side-by-side for easy identification and grouping of parts during assembly. The shed base when assembled measured a nominal 8’ wide by 6’ deep. Using 2’ x 4’ lumber and 4’ x 8’ OSB sheeting, we first constructed and leveled an 8’ x 6’ elevated platform upon which to construct the shed. Recommended tools for assembly include a tape measure, bubble level, light-duty powered screwdriver with a magnetized #2 Philips bit (sheet metal screws and assembly bolts are small) and a 5/32” nut driver. For wood base construction add a heavier duty drill/driver with appropriate bit, a Skil-type saw, and a chalk line. Construction instructions (Scan attached) are complete and logical but proper parts orientation can be a challenge and require considerable thought, trial, and error. Frequently, it is useful to pause and scan ahead to see how subsequent items are added to facilitate prior part orientation. You will also encounter some odd terminology. Note: The edges of the sheet metal panels are sharp and will cut you if you’re not careful. Wearing gloves won’t really work because the screws and nuts are very small so be careful (I only cut myself once!). Assembly diagrams are presented from the perspective of the front (door side) of the building and this convention is generally adhered to throughout. Procedure is base frame, uprights and associated cross-members and supports; front, right-hand side, rear, left-hand side panels; front and rear triangular support plates; main roof beam; roof deck; roof-edge protectors; roof ridge cap; and, doors. Note: Most drill-drivers are capable of stripping sheet metal holes when driving the small sheet metal screws so run them down quickly with the driver but snug them by hand. Note: The frame and components will be very wobbly and susceptible to wind gusts until the side panels and main roof structural support beam are installed. Rigidity improves steadily as construction progresses. Step-by-Step comments: • Step 1 – L052 has an oval that aligns with the slots in L001 when properly oriented. A-screws are driven directly into the plastic L052 in the pre-drilled holes in L001. • Step 2 – Self-explanatory. • Steps 3 & 4 – (Picture Shed 3) Brackets L006 are oriented toward the interior of the shed. Install them to the frame rails but don’t anchor them to the slab/platform/ground yet. • Step 5 – Square the frame by measuring diagonally, corner to corner and adjust frame as required to make the numbers match, then anchor them carefully to maintain square. • Step 6 – Self-explanatory. • Step 7 – Note that lip of the slot in the L008 and L009 channel fits into the groove in the wheel of the L071 rollers, and that the flat side of the L071 with the 6 holes faces in the direction of the slot (Picture: Shed 4). The screws in L023 will not interfere with the rollers when the doors are installed. This piece will install atop the L007 uprights on the front wall with the slot in L008/L009 facing the inside of the building. This piece will be weak and flimsy until the front wall panels are installed. • Steps 8, 9, and 10 – The pieces must be installed in the order presented (i.e., on the right-hand wall L010 is to the rear of the shed but on the left-hand wall L010 is to the front of the shed. Similarly, L012 is to the left of the rear wall and L013 to the right). Note that surfaces containing the small holes are aligned to the top and to the outside of the building and that the larger holes are oriented toward the inside of the building. At this point I recommend you refer to Steps 11 through 18 for informational diagrams that will help you determine how many holes and relative spacing and orientation on the outer side of the piece. Roofing panels will attach directly to the small holes in the top side of each piece (Picture: Shed 5). The larger holes on the inside of the piece are for the L065 panel clips depicted in Step 16 (Picture: Shed 6). These clips will install in between the screws on the side panels and the raised detent will “snap” into the large hole on the inner side. Please note that no L065 clips are applied to the front wall panels. • Step 11 – The L046 (and L047 in Step 15) “mount” is a short piece of sheet metal fashioned into a L-shape with two punched clips on one side. It rocks into place in the channel to assist in guiding the lower end of the side panels into the channel in the base rail and is removed after the panel is set. The L046 (and L047) have a rolled edge which tends to stick in the base channel frustrating removal. No problem, just press lightly against the base of the panel to allow the seam to become unstuck and remove it. Note that L046 is shorter than L047 as there are two widths of side panels employed. Note: L061 A-screws set the base of the panel but access holes were not provided in the channel of the base strip to permit screwdriver access. The base channel is made of aluminum and this problem exists all around the structure. A 3/8” brad point drill bit makes short work of making required access holes (Picture: Shed 7). • Steps 12-18 – Please note the material table at the top left-hand corner of the diagram indicates three A-screws, one D-screw and four nylon washers—accordingly, each fastener uses a washer. Please note this amplifying detail in subsequent steps. Please also note that the depiction of how many A-screws are installed at the top of each panel--this indicates the relative number and spacing of small holes that should face outward on each top beam and assist in determining proper orientation in Steps 8-10 above. I recommend you proceed in the order of top of panel, bottom of panel, middle of panel working front wall left, front wall right, right side wall (front to rear), rear wall (right to left when viewed from the front), left side wall (rear to front) as depicted in the instructions. Note: Be patient and methodical when installing wall and roof panels. You may find it useful to initially set the A-screws loosely to permit you to jiggle or expand/contract the panel (by pressing or pulling) to get the appropriate hole aligned and then returning to “set” the screw once all screws are started. This only takes a minute and will incrementally “square” the upper structure. We found that nearly all A-screws aligned with their hole if you adhered to this procedure, and drill a new hole as a last resource (we did find a few holes out of expected position). • Steps 13-14 – L026 reinforces the wall edge at the door opening (Picture: Shed 8). • Step 19 – The L065 clips reinforce the tops of the wall panels. The large holes facing inward on the top beam align with the flat portion of the wall panel and the clips lock in easily (Picture: Shed 6). Only apply clips to the left and right walls at this step—the front wall has no clips and the rear wall clips will install later with the rear triangular support plate. • Steps 19-20 – The triangular support plates are very, very fragile and prone to bending so be careful. Attaching L020 and L021 and L018 and L019 intuitive after you figure out that L018 and L019 are the triangular supports depicted in Step 24. L020 and L021 reinforce the sheet metal at the juncture between L035 and L036. Insert them and snugly fasten the upper D-screw that holds the two triangular support plates together. The L020 and L021 have a square/rounded end and a triangular end. The square/rounded end gets sandwiched between the two haves of the triangular support plates at the lower hole. It will subsequently be attached to the bottom of the main roof beam as depicted in Step 24. Once attached, go back and tighten the two D-screws at each end panel seam. (Pictures: Shed 9 and Shed 10) • Steps 21-22 – At this point you will secure the end caps to the upper support beams at the front and real walls with A-screws. Be careful not to bend the sheet metal of the tringles. Note that in Step 22 you will also apply L065 clips to reinforce the rear wall only. (Picture: Shed 11) • Step 23 – Self-explanatory. (Picture: Shed 12) • Step 24 – Self-explanatory, but don’t “shrink it” with A-screws—“set” it. • Step 25-26 – Panel L063 is narrower than panels L062 and overhangs the front wall slightly (a couple of inches). Loosely assembling L030 and L032 in Step 28 will enable you to measure the length of the trim and determine how much overhang you will have. You will then note that the A-screw holes in the panels align with those of the upper wall support. Note that the outer (lower) end of the roofing panels have two screw holes every sixth rib (Picture: Shed 5). The upper hole is to attach the panel to the upper support beam of the wall. The lower hole will be used in Step 28 to set the edge trim for the roof. • Steps 26 and 27 – Ignore L079 for now—you will install it in Step 30. • Step 28 – You can’t really “connect L030, L032 with L075” which is a slip fit. Set L072 at the front left corner with a B-screw. Working front edge to rear, insert L030 into L072 then move left, insert L075 onto the end of L030 and anchor it in the lower hole provided on the roofing panel and set with a B-screw (Picture: Shed 5). Then insert L032 into L075, move rearward, and insert into another L072 and set it with a B-screw in the hole provided at the back panel of the shed. • Step 29 – Self-explanatory. I forgot to install Part G on the screw ends—will have to go back and do that. • Step 30 – Working front to rear, set L027 on the ridge, even with the front edge of the roof, and fasten with two A-screws in the holes provided. Place L073 onto the forward end of L027 and set with a single A-screw in the hole provided. Center L027 on the ridge and insert rearward end into leading edge of L079 then set L079 in the screw holes provided with two A-screws and washers. Insert L028 into L079, center on ridge, and secure end to roof with two A-screws and washers in the holes provided. Insert L073 over the end of L028. Insert an L034 into each corner cap at lower portion of roof then up and into L073, then secure L073 with two A-screws in the holes provided. • Step 31 – Align parts and panels and assemble as indicated. Note that the two doors will mirror but not replicate one another. (Pictures: Shed 13 and Shed 14) • Step 32 – No access hole is provided to enable fastening the door handles to the doors. I inserted a D-screw from the inside of the door through the handle and placed the nut on the handle side of the screw. This enables you to secure the door handle, but don’t think about a lock providing security—it will only keep the lazy thieves out! • Step 33 – From inside the building, insert the L069 door guides into the track on the floor and tilt the door up into place (Picture: Shed 15). Slide L071 rollers to align with the holes in the L037 upper door reinforcement members. After this step, check for ease of sliding the doors and completeness of closure. My doors fully closed at the top but had a 1 inch gap at the bottom so I simply re-attached the doors to the outer rollers at a lower hole and everything closed up nicely. This was a PITA and took two handy guys two days to accomplish but I’m pretty satisfied with the result. Sorry for missing some logical photos and for the arcane notes—pay me more next time and I’ll do better! Not bad for under $300 including cost of the deck…
E**A
Not worth it
Material wasn’t sturdy some parts came bent and it’s was cheap material easily bendable had a few missing parts, the instructions wasn’t detailed enough on what parts go upright or outwards had to unscrew and flip over multiple times to see what parts go upright for the rooftop and on the side part was not worth to buy
J**N
Convenience
It was easy to put together one person can do it but easier with two
J**N
Toy house, I wind will blow it away.
I was excited about the storage shed. Finally got it and I was disappointed. 1. The material is so cheap and weak. 2. Some of the steps in the instructions are confusing. 3. Isn’t not durable, stable. 4. Came with several dents. I was going to return it after I finally put it together. Half way I gave up taking it apart to return it, a lot of hassle. No worth the money or effort. Wouldnt recommend it.
T**Z
Beware
The metal is very flimsy. It's difficult to put is when there's any wind because the frame beams are so weak. It's hard to finish when they did not send all parts. I'm missing a panel. I read that a few didnt receive a complete kit but I figured it was a broken box or some rare occurrence. My mistake. I'm waiting to see if they'll respond and ship the missing piece. That really delays my project.
B**.
It's a shed, plan for time
After weeks of deciding we bought this shed in 8x6 brown. It comes in 2 boxes, one is pretty heavy needs 2 people, the other is not too bad for one person. We read the reviews and knew what we were getting into. Yes it's metal, not it's not thick. It will serve its purpose for the mower and various yard tools. The reviews are real about time. Plan for a weekend day build. It took my wife and I 4 hours to assemble from carrying out boxes to lawn to fully put together. We are both diy fix it ourselves people. Wasn't hard but the directions are not great. Anyone with a brain can fill in the gaps in the directions and see how it goes. All parts were there, screws, pannels everything. Comes with "tools" but a power drill will be your friend in this along with a ladder. You will absolutely need to stake it down, it will blow away. For the price it was ($199) it will work fine until we need to upgrade to something more permanent.
Trustpilot
2 weeks ago
5 days ago