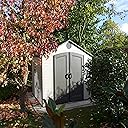
Desertcart purchases this item on your behalf and handles shipping, customs, and support to Senegal.
๐ Elevate your outdoor storage gameโwhere durability meets daylight!
The LIFETIME 6405 Outdoor Storage Shed offers a robust 8x10 ft footprint with 71.3 sq ft of organized space, featuring four skylights and a shatterproof window for natural illumination. Engineered with steel-reinforced doors and UV-protected polyethylene panels, it delivers weather-resistant, low-maintenance durability. Its customizable shelving and ventilation system make it the ultimate year-round storage solution backed by a 10-year limited warranty.


| ASIN | B0015MF8O0 |
| Base Material | Plastic |
| Best Sellers Rank | #1,157,519 in Patio, Lawn & Garden ( See Top 100 in Patio, Lawn & Garden ) #4,499 in Storage Sheds |
| Brand | LIFETIME |
| Brand Name | LIFETIME |
| Chamber Depth | 304.8 centimeters |
| Color | Putty/Brown |
| Customer Reviews | 4.4 out of 5 stars 431 Reviews |
| Door Height | 183 centimeters |
| Door Style | wood |
| Door Width | 121.92 centimeters |
| Frame Material | Wood |
| Global Trade Identification Number | 00081483064055 |
| Item Dimensions D x W x H | 120"D x 96"W x 96"H |
| Item Type Name | Outdoor Storage Shed |
| Item Weight | 527 pounds |
| Manufacturer | Lifetime Products |
| Manufacturer Part Number | 6405 |
| Manufacturer Warranty Description | 10-Year Limited Manufacturer Warranty |
| Material | Plastic |
| Material Type | Plastic |
| Model Number | 6405 |
| Number of Items | 1 |
| Product Dimensions | 120"D x 96"W x 96"H |
| Style | Outdoor |
| Style Name | Outdoor |
| Top Material Type | Polyethylene |
| UPC | 081483064055 |
| Ultraviolet Light Protection | UV Protection |
| Unit Count | 1 Count |
| Water Resistance Level | Water Resistant |
S**E
Attractive, almost indestructible shed for a "do-it-youselfer!
I'm a 62 year old female, and I put 90% of this shed together by myself. I had a little difficulty putting the walls into the floor slots because weighing only 140lbs and being 5"4" tall made it a little difficult because I just didn't have the weight or force required. Other than this I found it easy to assemble and it's quite roomy on the inside. I store all my garden equipment (including a push lawnmower), tools, seasonal decorations, and I have room for more stuff. I reused 2 shelving units, and a Rubbermaid triangular garden tool organizer that I had in my previous shed (which was eaten up by termites and had to be torn down). It comes with 1 wall to wall shelf, 2 smaller shelves plus, 2 small corner shelves, and 2 strips that hold clips? for somewhat smaller tools. I hang my weed eater and the 100ft electrical cord on these, along with some hand tools/garden tools. It does now have any electrical outlets in it, so I put up a Mr. Beams battery operated motion detector light on one of the sides of the roof and this seems to be ample enough for finding something at night. It is water tight, that is, I have found no leaks after a heavy rain, and it rains a lot here in Louisiana. I chose to use a base of pea gravel under the flooring, rather than a wooden or cement base, just because it was easier for me and this seems to be working out just fine-I feel it offers a lot of support under the flooring. It has a neat and attractive appearance, although I think the colors are rather drab-like beige walls and dark gray roof and doors. If you need a larger shed, they sell an expansion kit. So far, I love the shed and find it roomy enough for my needs. I would recommend it for anyone who likes "do-it-yourself" projects. And even a women can do it. Amazon quotes the shipping weight as 220lbs, but a freight company delivered the shed and they put in on their scales prior to delivery and it weighed 573lb. I mention this because the weight of the delivery determines how many men they send out for delivery of the product. So one man was sent out with the delivery and he struggled a little. Although they weighed the 2 large boxes, they have to go by what the seller tells them-the 220lbs. That's the only glitch in the process-Amazon needs to change their shipping weight to a more accurate account, because the delivery person could have hurt himself, while struggling with the 2 large boxes. Overall, I'm very pleased with the product and would do it all over again, knowing the end results.
G**S
Lifetime 6405 8' x 10' storage building
The building came in two large cardboard boxes (each one probably 200 pounds). It came on a small trailer truck, but the driver had a very poor handtruck with small wheels rather than large rubber tires. He had to leave it in my driveway, because his handtruck wouldn't roll on soft ground. I had to wheel it to the backyard on my own much better handtruck. The building is a very good product, and the price was much better than at big box stores. I assembled it by myself (74 yr old man) in a few hours each day over a period of several days depending upon the outdoor temperatures. I built a substantial treated lumber platform resting on concrete blocks to assemble the building on. Constructing the base took the most time and effort, because I carefully leveled its supporting blocks. I used five 10' treated 4 " x 4" posts as sleepers on the blocks, and then topped those with eleven treated 8' 2" x 4"s laid flat and then covered with two and a half 4' x 8' sheets of 1/2" treated plywood. I used the dimensions suggested in the instructions except for the length. I used the full 10' length to afford a step at the front door of the building. I assembled all of it with torx head screws - 2 1/2" for the dimensional lumber and 1 1/4" for the plywood. 1 5/8" screws would be better for the plywood, because treated pine is soft and the longer screws would pull the plywood down snugly. The 1 1/4" screws don't have enough threads to adequately pull the plywood down snug in some places. Assembly of the building itself did not take a lot of time or effort, but the assembly instruction booklet is almost entirely pictorial without any textual explanations to speak of. The packets of hardware are poorly labeled, and that caused unnecessary expenditure of time. The hardware packet labels depicted in the booklet are missing on about half the packets, and some unlabeled packets are included inside of other packets. But if you persevere, you will eventually find all of the hardware screws and parts in one packet or another. Careful observation of what size screws are needed will help you to find them. The description of screwing the floor panels together and the screws supplied for the job are ridiculous, but the rest of the assembly isn't so bad once you find the proper screws. Using the word divot to describe where to put the screws in the floor panels is confusing and misleading. They need to rethink the fastening of the floor panels together. The corner wall panels are the most difficult to install; don't try to keep the corner folded and push all the tabs into place at once. Push the tabs on one side into place, fold the other side around the corner and push it into place. A block of wood and a rubber mallet to pound the panels downward are good tools for doing the job alone. The piece of 1" x 4" block to put under the tabs is necessary to lift the flexible floor up to present the slot to the tab. Installing the gable end over the double doors is the trickiest task to do by yourself. It can be done with some clever planning, but having an assistant for that job would save time. The roof can be installed from the inside of the building by standing on a short step stool. There is no need to work from the outside. You can stand inside on the stool and push the roof panels down into place after placing one or two screws from below. It is a good practice to start a screw into each of the holes to tap the threads before hoisting the panels into place. That makes the screws easy to start with one hand while holding the panel in place with the other hand. Aligning the double doors so that they close properly after assembly of the building is better done with more substantial shims than the ones provided. I used pieces of the treated plywood that I trimmed from the base that I built, and I put them between the base and the blocks it rests on rather than inserting them under the rubber floor of the building. That makes the job a piece of cake, and actually works. With all of that said, I would recommend the 6404 building rather than the 6405, because it has large skylights in a couple of the roof panels. The skylights in the ridge of the roof supply some light, but not nearly enough. The increased cost would be worth it. I might order a couple of replacement roof panels with these skylights to retrofit my building. It shouldn't be a difficult task to take the old panels out and substitute skylighted panels.
H**E
Temporary Star rating for (yet) another year
Update as of Jan 10th, 2023: The shed is standing strong. The door latch assemblies could be better but no complaints overall. Previous review: I hope to update the reviews for this shed in a year or two to provide a slightly longer term experience. This review is based on initial impressions as I just finished it yesterday (happy Father's day everyone). I am also thinking how do I compliment all the helpful reviews that are already here for this shed. In my case, I was looking for specific advice on how to install the foundation and less shed so hopefully what I write below helps. I stay away from competing products review, how good this plastic is versus product from other vendor (because I really don't know). Looks - great. It is definitely not an eyesore which I was afraid of. It is however plastic and doesn't have the "character" and at the same time maintenance requirements of a wood shed. I have an old brick house and this is in my backyard across so I would never be looking at both of them at once so who cares. Bottom line, I am pleasantly surprised and like the looks. Build quality - I was impressed but my friend who was helping me felt that we have been making plastic parts for a long time so whoop dee doo. Bottom line, connecting points and holes land where they should so you can screw easily. Platform, base - More important than you think. I had planned to use 4x4 skid foundation method. With advice from my friend, at the last minute I decided to use concrete paving blocks (10x7x3.5) across the entire would be perimeter of the shed with a 3" reveal (to spread the load on the paver and a nicer looking finish) with another row down the middle of this rectangle. I dug about 2" of soil so the paving stones are about an 1.5" above the ground level which keeps the wood off the ground as well. The original plan called for three 4x4's 10 foot lengthwise on 9 concrete blocks (front, middle, back times 3) and then put my 2x4 wall frame on top of it but this would have made a nice crawl space underneath for animals. Now I was able to eliminate the 4x4, lower the shed by 3.5" and still use the advantages of a skid foundation. This will ensure a lower ramp for my motorcycle for the winter (to be built). Then I put the 2x4 frame (with 3/4 treated plywood to create a platform) directly on top of the stone. Now there's no opening for any animal either (except the pesky diggers like chipmunks). Lastly, the middle row gave me the horizontal stability across the 8 foot span of the shed. Plan on spending $250-$300 for this method. Please know that platform squaring is more important than leveling (unless you are pouring concrete) at this stage of the install. The ground will settle (eventually) so you'll be shimming in a few weeks (maybe again in a year) again depending on what you put in this shed. My friend and I had this leveled extremely well only to find out that the shed wasn't level by about a half inch. So, do the best you can at this stage and fix what you need once assembled towards the end. The platform alone took us the whole day but my friend is a yapper and must have thought he was getting paid by the hour (he wasn't). In a way, we both focused way too much on leveling (wasted time) and ended up shimming this towards the end so hope you understand my point. Do it right but don't go crazy if it's off by 1/4 of an inch here and there. Bottom line, if you have all the supplies, you can get it done in four to six hours max if you quit yapping (but that's the fun part), know what you are doing. My new mantra, less yacking and bickering, more doing. Shed Assembly - Lots of Youtube videos. Do not put the nuts on the trusses on the inside. I don't know how many times I read that in the reviews here and sure enough I had mine backwards because it's easier to do it the wrong way!!! Where are these divots to nail the floor to the platform? Mystery to me as well. For those who did this by themselves, I bow to you but I think it's impossible unless you are indoors and a controlled environment. This thing is flimsy till it all comes together, throw in a bit of wind and counter pushing and prodding needed to screw this or the other correctly - bottom line, hire a friend for a few hours at a minimum. Do the prep work first if you want to maximize your friend's time - assemble the trusses, gables, doors in advance. My pre-work took me about 4 hours. My friend helped me for another 4 and then I spent another hour or two putting up shelves and hand tightening the screws. By the way, I freaked out when I only saw 2 trusses, the third one is packed along with the door hardware. So, before you hop on the call with customer service, ready to give them an earful, lay everything out and organize yourself. As for drill, we used it on the lowest clutch setting but go easy. Unless you have a drill with a clutch, use your screwdriver. I like that they give you a bag per project. After everything I have screws left over due to redundant packaging. I put the long 8' shelf and two smaller shelves in the back. I put the peg board thing on the right wall but couldn't find a way to align with holes on the wall so I just created mine (instructions are vague here so don't scratch your head on this one too long). The corner shelves went on the front two corners towards the middle from top to bottom, I did it that way for stability than function. Instructions for the most part are very good, videos help but nothing specific for a few sections of this shed (model) anywhere. For example, the front gable has a bar that screws in with one side dimpled and the other flat (you want dimpled down as they say). I think I did it right and the latch on the door fits into it so oh well - as others said, the latch design is stupid and won't last. Same with the Window. If I did it right and if I understand the design, it only opens half way. Also, best to have two ladders on each side of the shed with a stool in the middle when you are doing roofing or just move ladder from side to side. On a perfectly level platform, the doors were not lining up. My carpenter friend was complaining how bad the door jambs were but remember this is plastic and not wood or harder materials. A lot of building principles apply however so take a level to the front and see how it is (in our case it was perfect). Then we took a level to the left wall, sure enough it was leaning slightly to the right. We looked at the right wall and again leaving to the right but more towards the back. So, we shimmed a 3/4" leftover plywood piece on the three blocks (roughly 36") from back right to back front, voila. This does mean that one day I will have to jack this up slightly and add some base layer to the patio stone but I am going to wait for normal settling to occur before I do that. Don't get overzealous with leveling! Do what's needed and count your lucky stars that doors line up. Admire your work and call the wife (or husband) and kids (or pets) over to show off your accomplishments. As for anchoring, I will wait a few more weeks for stuff to settle and bolt it to the frame below. I am more convinced my shed isn't going away with the weight (this thing weighs 400 pounds plus 750 pounds I plan to put in it - ex. Motorcycle plus). I have houses all around me and not an open field so consider what you need for your application. Was this helpful? Also, a special thank you to Rick whose review I read here and who followed up with emails on questions I had. And, my buddy Roger who helped me put this together.
S**S
A good choice for several reasons
We had to hire someone to assemble it because my husband is 73 and has COPD and several other health issues. It is a replacement for a metal 10' by 10' shed that we got when we moved in here over 7 years ago. At the time we did not know the requirements that our township has for sheds beyond 32 square feet, which is it has to have a rat wall and a concrete pad, so that one had to be rolled off it's place while the garage guy did the concrete work for the shed and then it was rolled back onto it's place. We were never happy with the metal one because you had to bend down to get in it and could not stand up even in the middle of it, and I am or was over 5 feet 6 at the time we moved in here. Plus it got rusty and it was either paint it or replace it, and my husband wanted to replace so I came to Amazon and looked at everything I could. We really wanted the Suncast 10' by 10' but I was concerned it may be more difficult and because we would not be doing the assembly, we would have pay someone for any extra time, so we decided to give up the extra 2 feet and go for this Lifetime 8-by-10 footer. It was delivered around 10:30 this morning and our assembler called before the delivery to ask if he could come out today to do the job, so of course we went with it all. He was out by 11:30 and they had completed it by 6 tonight. It was two guys that did it, he said there was some challenge, but the fact that they got it up so quickly speaks for how well it went together. When it was delivered they used a delivery company called Pilot Freight Services, and I was walking my dog around the I96 service drive like I do every morning, talking to my husband on the walkie talkies. He told me that they had to bring it up in pieces because the top box was opened, I did not understand what he meant until later and what happened was the guy in charge had a new assistant and he had cut the bands on the top box not knowing that what he was supposed to do was cut the bands that held the two boxes together so the top box popped open and they had to carry the panels up to the yard one at at time. I was on the other side of the freeway and my imagination ran wild, but when I got back I saw what happened and all was okay. The panels are screwed together so that part looked like it would not be too complicated. They did have to put the skylights on and the window in, so maybe that made it a little more trying, and that part took the two of them to complete it. It is a great improvement over our metal shed, and we will not miss the extra two feet too much because we had a sort of work bench made out of 2 y 4's and OSB that took a lot of space in the first shed, we gave it to the assembly guy. We used the bench for two window ac's that we got rid of earlier, and also some mulch bags. We could probably put some of the bags in the new one, but will be getting a small horizontal storage cabinet to put alongside this shed to hold the bags in the future. It does feel very sturdy and now we can just hose it down when we hose down the house once or twice a year. The house has vinyl siding. So as far as assembly time, that would be around 6 hours and 30 minutes, which includes taking down our metal shed. They had to unscrew that and load it up in their van, we had emptied it out before they got here except for the work bench that was inside. They took about half an hour to go to Arby's in mid afternoon as well.
N**P
Solid product, Assembly time consuming but directions are dead on
This shed is a well engineered, solidly constructed, reliable product. I'd recommend it to family. The assembly instructions are detailed and understandable to the average weekend warrior (me). What parts and pieces to use for each step are easily identifiable. Reason is, each step has what is being assembled and what bag of hardware you'll use for that task..... not the part AA and screws BB with washer CC... bla, bla, bla, like everything else I've assembled... then you have to go back and figure out which screws, what nuts and what part they are talking about before you can even start the assembly of that piece! With this product it says part B36 (B36 is on a sticker on that piece, easy enough) but the hardware is also easy to id.... hardware bag B37, you open the bag and you know you have the right stuff... good to go. Let me say, there are a hundred screws of the same type that you'll use all over this thing but that doesn't matter because you'll open the bag they tell you and you know you have the right screws and the right quantity... genius! Follow the illustrations, don't skip steps, don't rush and it will all come together just as you hoped it would. Now, rant... I'm not saying it's impossible, but if you said you assembled this thing yourself, with no one to "push a wall here while I get this screw in" or "hold this in place while I screw it together", etc, etc, then you're not a weekend warrior, you're some kind of alien with super long arms and incredible strength! It took my wife and I a full Saturday, good 10 hours putting it together. That was after we dug and laid the foundation the previous day.... dug up grass, created level base with sand, laid pavers (large), filled around pavers with sand, covered with 3/4 inch plywood. Second, some people/directions say don't use a drill..... HA!! Are you crazy? Yes people, USE A DRILL. That being said, don't strip out the holes, remember what you're drilling in to, plastic! So gently snug up each screw nice and tight... you'll know what tight is, it's going all the way then a half turn more without stripping the hole and rendering the screw useless. If I didn't use a drill I'd still be out there, half way done! Get my point? Drill.... gooood. As literally everyone else has said, level it, level it, level it. Oh yea, and level it. It will save you from having to do it later anyway and creating a lot move work than necessary. So all that being said, go buy this shed. I think you'll be glad you did after it's all put together and you realize how well constructed this thing really is. Now it's ready to house all the junk in the garage so you can go out and buy more junk to store in the garage! ;-)
R**T
Love it!
This thing looks great and feels pretty sturdy after you get it all together. Probably not much I can add that others have not touched upon. For the base I built a ladder frame on 16" centers using PT 2x4's and topped it with 1/2" OSB that I treated with a sealant. I set this on Deck Blocks so I can move the thing if I ever wanted to (a concrete pad was too much of a commitment for me). The shed went up quite easily, and yes, you CAN do it yourself if you have a little patience. They only real tricky part when doing it alone is getting the doors up, but it can be done (clamps come in REAL handy). Just to touch on the important things others have said that cannot be stressed enough, have a good solid LEVEL base! Read the entire instruction book before you start assembly. Check out the online videos (there are some helpful ones on Youtube). Don't reverse the nuts/bolts in the trusses. If you have the nuts on the inside of the trusses, the roof panels won't go in right. Follow the instructions to the letter! Use that piece of wood they give you to set under the floor when snapping the walls in place, if you don't, it's gonna be a long day for you. If your doors don't line up, use the shims they send you. One of my doors was about 1/4" higher than the other, I put the shims where the instructions said to and they lined up perfect. Absolutely have another person help you if possible. This was not an option for me. Don't be in a big hurry to get this thing up. Take your time. I put it up over two days in between snowflakes, so I really don't know the total hours it took, but I did take a few beer breaks. Overall I am very pleased with this shed, looks great, easy to put up and looks SO much better than my old tin shed. Feel free to contact me with any questions or to see pictures of different stages of progress from base to finish. Hope this helped is some small way. Rick
A**M
Difficult to put together, floor doesn't go together as easily as some models, roof much easier.
While I'm not an expert at putting Lifetime Sheds together, this is my third shed from them. I have two 7x4.5 ft and this 8x10 one. I'll try to cover the main points that I had trouble with in both sheds with emphasis on the 8x10. It took us about a day and a half to put it together, we were able to do the smaller one in a day. We did 80-90% of the shed the first day, the second day was spent finishing everything up and making it pretty. The floor is supposed to have divots at certain areas so you can put screws in to help keep the floor joints together. There were absolutely no divots to be found. I had to just put the screws in the approximate areas as shown on the instructions, I have no idea if they will have any impact on the flooring. The walls just snap into place. If you are doing it on a dirt floor that is remotely uneven, this will never work. (To be fair it tells you to build a floor/foundation for the shed and not to just put it on bare ground. On the 8x10 shed this is extremely important, on the 7x4.5 shed, this is merely a suggestion.) There are 4 slots per wall section and as soon as you get one or two tabs in, they come out whenever you try to get the remaining tabs. The smaller sheds have holes and the tabs just go into, and then you use a rubber mallet to slide the wall section over so that it locks into place. We eventually just put the walls together and placed them on top of the floor without actually connecting the two together. After the shed was built we bought some L brackets from Home Depot and attached the walls to the floor. It appears to be pretty sturdy, but there's a gap between the floor and the walls that could be problematic when it rains, however it is nice when you have a breeze. The ceiling is amazingly easier to put together. The smaller shed has a bunch of L brackets that you have to put together and line up and the larger shed just has holes that you line up and drill in. Sounds similar in the theory, but amazingly easier in practice. The sunroof in the smaller shed is one 4.5ft white opaque strip at the apex of the roof. The larger shed has 5 thin brown covers that do allow some light in, but not as much as the white ones. You can also unscrew the sides of the sunlights to let a breeze in or more sunlight, but honestly it's a lot of work and probably not something we would do often. The window is nice, however you can only open it 1/2 way or the plastic "window glass" comes out. There are locking mechanisms included, but they are beyond my skill set to install without preventing the window from being able to open. I love all the shelves and hooks that come with the unit, however for the hooks/pegboard it seems like they were trying to give you a variety of hooks to show you possibilities rather than actual useful hooks. Be prepared to buy more to fit whatever you intend on hanging. Overall I love these sheds. They are easy to put together, they fit together well (for the most part) and they seem like they will last a long time. They have stood up to my cow scratching herself on it (that was before we added the brackets) and holds all our horse tack and supplies. The plastic is very similar to the "Little Tykes" quality. Thick double walled plastic that stands up to most everything.
B**A
Lifetime Shed Model 6405
Purchased 7/6/17 and received 7/14/17 from a freight company. Came in two long boxes on one 6 foot pallet. It weighed over 500 lbs. Driver very professional. He put crate in garage. Shipment very well packed. Several large torn areas/holes on boxes but everything inside okay. All parts okay. Many extra screws and other items - some that are not even mentioned in the manual. I built pad as instructed by Lifetime and even put blocks under corners and down the middle from front to back. Absolutely level and true. It was ready when shipment arrived. Instructions are very poorly written and many details left out. Whoever wrote them has no clue or training in writing instructions/manuals. Had to review many videos on internet and Lifetime website. All helpful but still missing the detailed information that would make this shed easier to put together. Videos show how easily (ha ha) the walls and corners are to put together with each panel 'snapping' loudly together. I had three actually make a 'snapping noise' during the assembly. (Note: if walls male plugs are fitted into the wider end of slots then slide forward, no Snapping Noise will result. Had to cut out excess plastic in some holes in order for wall to fit.) First corner put in okay and long side with window panel okay until I tried to put in second corner panel. The slots for the male end of panel to snap into the female floor holes were 11/2 inches too short. In other words, the top male plug needed a longer/wider hole to fit into. Took wall apart three times and used rubber mallet to make sure the panels were tight together (per Lifetime customer service). Most panels DID NOT snap into slots as instructed by Lifetime. Using a mallet I was finally able to put second corner piece in floor section. So far, just for the shed assembly, three hours with wife helping. Finished all walls and had a friend join us (who had previously put one together) to put in roof and door. Pad and floor still perfectly level and true at this point. This is important as this is the last time the shed is level. Many holes for screws were not finished. For example, many still had hard plugs in the area where it should have had a hole. Quality control seems lacking at factory as processing equipment is not producing product correctly. Had to drill, punch out and cut out these plugs to assemble the trusses and roof. Started assembling shed 6 a.m. and finally finished around 2:30 p.m. This plus about six hours, minimum, to build pad for shed. Some problems with trusses but relatively easy to fix. Roof was difficult to assemble as many holes did not match up when attaching the shingle panels. Remember, the shed pad and floor were level and true after walls were put up. But, the roofing material and trusses had to be pulled and pushed around to fit the walls thus moving tops of wall panels in and out. This caused everything to no longer be level or true as the walls were now not true and when roof was put on, the floor rose up a very small amount on outside edges causing everything not to be level. The two biggest problems are one; putting the doors on and making sure that they fit and are level. The other problem is that whenever you put something relatively heavy (25 lbs. for example) in the shed the floor is no longer level and the doors are no longer level and true and will not close until adjusted. This requires continued application of shims under certain areas of floor (per Lifetime instructions). With this being a forever problem, I will not be able to anchor shed to platform as the shed will not be level and the doors will NOT close. The doors are poorly constructed. There is no real door frame built in to keep the doors level and true so the doors never close easily or in many cases at all. The tops of the doors are either out of level and have to be continuously leveled with shims (as instructed) and are always too close together where the edges are supposed to meet at the door locking mechanisms. Additionally, the bottom of the doors cannot and have never been straight and level. The bottoms always bump into each other making it very difficult to close together. Without a true door frame built in (and it would be easy to make this at the factory) and the gap between the doors where they close not adjustable (only tops and bottoms can be adjusted not the width between the two door panels) because the roof assembly has caused the walls to bow in and out a little, thus lifting the edges of the floor a fraction of an inch off the pad/platform, there will ALWAYS be problems with the doors. A hard door frame would alleviate this problem. The vertical gap between the doors is also very small (wider at the top then at the bottom) making the doors difficult (sometimes impossible) to close. Additionally, the door handle locking plates stick out more than 1/4" on each door edge (right door and left door where they come together) preventing one from either closing the door (when doors are out of level daily) or having to slam door while pushing/pulling right door to the right. These two plates always bump into each other and never slide by each other as they should. (Again having a true door frame would prevent this problem.) I want to anchor the shed to platform (per Lifetime instructions) but am concerned that by doing so I will NOT be able to put shims under shed to keep the doors level. I might try to anchor shed in the future and hope the doors work afterwards. I'll update this review when/if I do. Hopefully, this shed will not melt in our hot climate, sometimes to 105 degrees. Pros: Shed looks good. Has good indoor height making it easy for six foot person to stand upright without bumping head. Plenty of room for storage. Better than the typical thin metal sheds that are really flimsy. Cons: Not a very strong shed so don't put anything of real value in it. Poor assembly instructions. Walls bulge in and out easily (but do spring back) if they are touched or even if a light weight item is leaned against them. Has not rained yet, but there is NO way that this shed will not leak. Even the instructions emphasize drilling multiple holds in platform/deck to allow for drainage. Doors are hard to use/close and need constant adjustment and are very poorly designed. Skylights are odd. Not transparent and same color as roof. If these are not skylights, then they are not needed and roof should be redesigned for easier assembly. Need minimum of three people to assemble and even then not easy to assemble. I've tried to make this an honest review with the goal of explaining problems and providing possible solutions.
B**R
Great shed
Looked at a lot of sheds, came down to this one. A friend had bought one from a big retailer, paid more but likes what he has. 1ST Amazon.ca excellent to work with and shipping was early and very convenient ( they called with date options and whenever my time would work) The shed went together like a dream, 4 guys at the lake, so beers may have been involved, but really follow the directions to the tee and there are no worries. I built a 2x6 deck for the shed, leveled it and threw it up. Look great, seems great, we'll see after a Manitoba Winter, I will be getting the snow load kit for the hell of it. Hopefully I can update this review in the spring:)
C**T
I like it but the roof has gotten all warped or ...
I like it but the roof has gotten all warped or wavey, don't like that and it doesn't look good.
P**L
It does what I need it for, it has ...
It does what I need it for, it has lasted a couple winters now and is showing sings of stress. The roof could be build to take a heavier load.
A**R
Doors donโt close
Shed would be perfect if the doors lined up and closed. Erected by a building firm who say a door is defective
Trustpilot
2 months ago
1 day ago