


Desertcart purchases this item on your behalf and handles shipping, customs, and support to Senegal.
๐ก Elevate your outdoor game with storage thatโs as tough as your hustle!
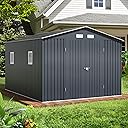
The Breezz Outdoor Steel Storage Shed offers a robust 10x12 ft galvanized steel structure that resists rust and weather damage. Featuring lockable double doors for enhanced security and a sleek midnight blue design, it combines durability with style. Easy to assemble with comprehensive guides, this shed maximizes your outdoor space with 120 square feet of organized storage, perfect for garden tools, bikes, and seasonal gear.
| ASIN | B0DJNCKLYN |
| Base Material | Alloy Steel |
| Best Sellers Rank | #18,535 in Patio, Lawn & Garden ( See Top 100 in Patio, Lawn & Garden ) #46 in Storage Sheds |
| Brand | BreezZ |
| Brand Name | BreezZ |
| Chamber Depth | 11.67 feet |
| Color | NightBlue |
| Customer Reviews | 3.9 out of 5 stars 787 Reviews |
| Door Style | Outward-opening doors |
| Floor Area | 120 square_feet |
| Frame Material | Metal |
| Item Dimensions D x W x H | 140"D x 115"W x 88.5"H |
| Manufacturer | BreezZ |
| Manufacturer Part Number | BreezZ |
| Material | Metal |
| Material Type | Metal |
| Model Number | 10 x 12 Shed |
| Number of Items | 1 |
| Product Dimensions | 140"D x 115"W x 88.5"H |
| Style | Classic |
| Style Name | Classic |
| Top Material Type | Metal |
| Unit Count | 1 Count |
| Water Resistance Level | Water Resistant |
M**R
Good for the money
Mostly no complains. All the parts,we're there, with extra screws and even a drill bit in case you need to drill holes. The instructions are ver clear. Only areas of concern are the film that covers the panels is hard to remove (use a thicker film. Also, it takes more than 4 hours to assemble (8 hours is about right)
Y**.
Great for its price
I am finally ready to provide a review of the shed. Overall, this is a decent product for its price, and the overall quality is quite good. Approximately 98% of the holes were matched. A few holes were slightly out of line, but I am not certain that this was not due to an imperfectly leveled floor/base on my part. The main negative is that skilled assembly is required. I have significant experience in furniture assembly due to my work, so it was not overly complicated for me, although the process was time-consuming. It took me and my mother, acting as a helper, approximately three days (about six hours each) to complete the assembly. Here are some key insights from the assembly process: - Good Leveled Base is Essential: You must create a good, even, and leveled base. Without one, you will not be able to assemble this structure. I used pallets for my base. - Follow the Instructions: Please follow the instructions meticulously and do not try to deviate from each step. - A Helper is Required: You will not be able to assemble this by yourself. Get a buddy who can help hold parts steady or pass you the correct tools and parts. - Right Tools: A cordless powered screwdriver is the only efficient way to handle the assembly. - Good Weather: Plan this purchase for a dry, warm season. Doing the assembly in the rain and wind significantly delayed our process. Despite the fact that each individual part seems flimsy, the shed is sturdy enough once it is fully built. However, be aware that you cannot lean anything heavy against the walls, as they will instantly bend.
K**L
DO NOT BUY THIS!!!!
I am only giving this 1 star because it won't let me leave negative stars! What a POS! first, not 5x3. Much smaller!! Also, so flimsy, it won't hold itself up when assembling. I'm reminded of the first house in the 3 Little Pigs!! Also, the instructions suck! Even after reading through them first, you still have to look 5 steps ahead or you're taking stuff apart and reassembling! Also, put the hardware on FIRST! And the latch on the door has metal edges that are SO SHARP, you WILL slice your finger if you're not careful! My advice is go with ANY other brand. Or one made in the U.S.!! China builds crap!!! Period!!
P**S
Small details count
Im trying to clean out and organize the garage and wanted a shed to put the garden tools and swimming pool stuff in. Kinda everything that will survive getting flooded and if a hurricane comes and the shed goes flying it wont be a huge loss. Ordered this 5x3 shed and put it together. This Is what I've learned! 1. 4 hours to put together is a lie! It takes 4 hours just to sort out the million pieces!! ๐คฃ 2. My square and level Is not their square and level! 3. Its easier to put together by yourself!! 4. 5x3? Nope! The interior dimensions are 52x28 inches. So more 4x2 which is really really small! Maybe the roof is 5x3 but not the shed itself. 5. Thats a mighty big lock, considering one person can lift the shed up and just walk away with It 6. The color Of the shed Is One Of them trick questions. Its supposed to be blue but most people see It as gray 7. Whenever I get another One, I wont be using their hardware anymore. I would have saved 4 hours If I just would have gone to the store to get sheet metal screws with a washer head! 8. Them panels are covered with a clear film. Like a wrap. I cant peel that stuff Off! I tried the sun, heat gun and acetone. I gave up! 9. The holes will line up! The trick is to not tighten the screws all the way so you have some "give" and can pull the parts in place. 10. Take your time! Its not a competition!! Dont work on it when you are in a bad mood. Make sure you have some spring clamps and if you have corner clamps to put the foundation together you are golden! 11. Female, 52, 105lbs and 5'2. Ladies, dont be intimidated! You can do it! But you need steps or a ladder lol 12. I give it 4 stars. I knew it would be a pain to put together. They are all like that! But Im subtracting a star for the fact its closer to 4x2 and not 5x3
E**4
Worth it, level foundation!, 2-3 days w 2 ppl
This is for the 10x12 gray shed with two opaque windows and and two plexiglass ceiling panels. This went pretty well. In great part because I read lots of the reviews for this shed and other sheds and took the advice to heart. Buy your own roofing screws that have the rubber washer already attached. I think ours were 1 in number 9, but I would suggest 3/4 in if you could find it. Also you need way more screws than you think. Between 7 and 800 I would estimate. Like others have said building the platform level is *vital*. Almost all of our holes lined up. There were a few here and there that didn't line up. Including the cross/support beam of the doors. And where the the locking mechanism was supposed to go on the top. We had to drill a hole with the step bit there. (And it's still possible these issues were user error). We spent an entire day with two people peeling the plastic on a Friday. And it was probably 9 hours honestly. And we were even lucky that a chunk of the panels didn't have the plastic on it. It says to wear gloves, and they do provide relatively decent ones, two pairs. However it's impossible to grip the plastic when you're peeling it or the screws when you're screwing it together so better one person handle the panels putting them in (wearing gloves) and the other person handles the screws. I did get my finger sliced open once. You'll need a ladder. After peeling the plastic on Friday we spent about 10 hours Saturday putting it together although we were interrupted in the middle to go buy more screws. On Sunday we spent probably 3 hours finishing it. We were missing one piece, part of the locking mechanism. I'm going to reach out to them. Of course we may have just missed it in all of the packing material. If you have two relatively handy people you can build this. Having two drills and four batteries would be handy. We had one drill and two batteries though and it still went pretty smoothly. Like others have said do not do this on a windy day. Follow the instructions. Follow the instructions. I'm saying it a second time. Even when they don't seem to make sense. My husband would look ahead in the instructions and say oh okay, realizing why they told you to do it that way. Follow the instructions. It came out great. We received very little damaged pieces, hardly anything really. And we did have a wind advisory tornado watches the day after putting it together. 20 to 25 mph sustained winds with 40 to 45 mph gusts. The building was untouched. I typed most of this up and saved it in my notes app and I'm just now getting around to posting. The shed has been up for a couple of months now. It's doing great. No issues. So glad I got the two clear panels for the roof. Between the shed and the materials for the foundation (plywood, 2x4s, concrete blocks, paint for the floor, screws with washers already on) I did probably spend nearly $1,000 total. So keep in mind all the involved costs before you start. I was worried about spending this much money sight unseen on such a large purchase. I'm glad I took the chance, I think it's well worth it. If I had paid somebody else to put up a shed for me it would easily have cost twice as much.
T**S
Expected Better
Assembly is intermediate If you don't have a level floor to build on just throw holes lining up out the window, Appearance isn't bad though easily scratched. My order is missing 2 roof panels, and the entire base for the shed; Normally this wouldn't bother me too much but there is no customer support and no replacement option. I now have to spend time taking the shed apart (over 2 days of building) to return it. Would not recommend this purchase.
P**.
Once its built, its reasonably rugged. Great shed!
The product arrived quickly. The materials are good quality if you know what your expecting and everything was there. Nothing was missing, infact, there was lots of extra parts like screws, panels,etc that were appreciated. Nothing was damaged and everything was in great condition. This is not meant to be a rugged, hurricane proof, Alaskan snow bearing shed. If you have expectations based in reality, you will enjoy/appreciate this shed. Once its all built, its pretty rugged considering the metals lite guage. I bought this to use as a chicken coop, to house 20+ birds. I used real gasketed roofing screws for the roof panels. Be sure you build this on a level platform or base and be sure its all square or the parts may not line up correctly or the doors may not close perfectly if your out of square or not level. I built a marine wet ply platform on repurposed, plastic pallets. 95+ % of the screw holes lined up during the assembly. Having a background or experience in construction or assembly is helpful and will save you time. Myself and 2 other experienced people built this in 5.5hrs. You'll want a 6ft step ladder. The directions we're terribly complicated. I live in New England, so I will reinforce my roof with 2x3s inside to hold more snow weight. Id say it could potentially hold 4-6" of snow as is before reinforcement. It came out really nice and as I said, once its together, its pretty strong. Its lite weight so you'll definitely want to secure it to the ground or platform. My platform was about 1/4-3/8" out of level so I had to shim one side to make the doors close perfectly. All in all, for the price, its a great shed and id buy it again. I hope this information helps your decision to buy it or not.
M**L
Very nice shed, seems sturdy and well built
I bought this particular shed because of the door width and also the height, glad I did, it turned out really well. I assembled everything I could (the doors, base, screwed the base into the pad, caulked the base, assembled the peaks and all three beams, the mid and top rails) beforehand, as I had plenty of time before I was going to start actually building the shed. This to me about 5-6 hours working slowly. my son and I assembled the rest of the shed on a perfect day with no wind, it took us an additional 7 hours from start to finish. we had no problems, the directions are 100% correct if followed. the holes do all line up perfectly, we did have a few on the roof there were off a little bit but that was because it became a little unsquare at the end. I would say 98% of the holes lined up. I only use the small screws that came with for the base, the doors, the beams, peak, and rails. I bought 1" #10 roofing screws for the side panels and the roof panels, this worked out perfectly as I had no leaks. I used about 550 of these roofing screws and maybe about a hundred of the little screws that came with the shed. my shed only had the annoying plastic film on the peak, and other parts but not the roof panels or side panels thankfully. it does take a couple hours to get this stuff off. FYI, this shed is the same as the Mistmo brand of looking for videos. I read the instructions many times beforehand, made notes on it and highlighted things that I didn't want to mess up, I highly recommend doing that. I definitely would not try to build this all at once, building in stages was much more manageable and worked out very well. I highly, highly recommend buying the roofing screws, picture of the screws included below.
Trustpilot
2 weeks ago
2 weeks ago