Desertcart purchases this item on your behalf and handles shipping, customs, and support to Senegal.
โป๏ธ Turn waste into gold with the JK 270 โ compost like a pro, all year round!
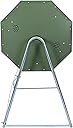
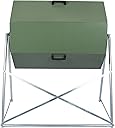
The Jora Composter JK 270 is a premium outdoor dual-chamber compost tumbler with a 70-gallon capacity, crafted from galvanized steel and insulated with food-grade materials to maintain composting temperatures above 160ยฐF. Its side vents optimize airflow for faster decomposition, while the dual chambers enable continuous composting cycles. Designed for easy manual rotation and built to withstand all seasons, itโs the ideal solution for eco-conscious professionals seeking efficient, high-volume backyard composting.


| ASIN | B004U7LXHS |
| Best Sellers Rank | #108,751 in Patio, Lawn & Garden ( See Top 100 in Patio, Lawn & Garden ) #61 in Outdoor Composting Bins |
| Brand | Jora Composters |
| Brand Name | Jora Composters |
| Capacity | 70 gallons |
| Color | Green |
| Customer Reviews | 4.1 out of 5 stars 517 Reviews |
| Item Dimensions L x W x H | 44.5"L x 28"W x 50"H |
| Item Weight | 52 pounds |
| Manufacturer | Jora Composter |
| Manufacturer Part Number | JK 270 |
| Material | Metal |
| Material Type | Metal |
| Model Number | JK270 |
| Number of Items | 1 |
| Product Dimensions | 44.5"L x 28"W x 50"H |
| Shape | tumbler |
| UPC | 013964468595 |
A**O
The build can be tough, but its worth it.
So for my wife's birthday, she decided she wanted to start composting after talking about it over dinner with friends. I decided given our suburban neighborhood that a tumbling composter would be best, and after some research and given we are in the Northeast, the Jora insulated composter. So I got the JK270, which might be too big for our needs, but it has been working like a champ. In 3 months we have produced one huge load of compost (which we combined with some potting soil for our strawberry and lettuce bed) and now have the second chamber going strong at 140F this morning when its 40F outside. I am still learning to get the moisture levels right, let it get to wet during the first batch at one point and it reeked a little then and had the dripping out the bottom, but doing better this time. I use mostly wood bedding pellets for the browns, occasionally paper shred. The best part though is since the JK270 is steel construction, and insulated, we are able to throw pretty much everything in it. Expired eggs, sauced vegetables, anything really is working well. We avoid bowls of liquid, but other than that, everything goes into the kitchen counter composter and then into the current chamber in the composter. Since its gets to 140F+ and holds that temperature, it kills anything of concern, and we havent had any issue (yet) with critters due to having meats/cheese in it. Yes, it was a PITA to put together, but it appears to be worth it and working very well. Sure we coulda gone cheaper, but this works for our lifestyle and location and the fact we can keep going during the winter is even better. Here are the extra things I got to support this in addition to the JK-270 Gorilla Carts GCR-4 4 Cu. Ft, 300-pound Capacity, Poly Yard Cart, Black/Yellow - Fits perfectly under the JK270 on its stand. Easy to wheel around. Holds a bag of soil + load of compost. Tierra Garden GP104 2-in-1 Galvanized Woven Wire Garden Sieve, Soil Sifting Pan - Perfect for sifting the compost into the Gorilla Cart and then dumping unfinished stuff back into the other side. This lets the microbes carry over and makes the compost fine enough for ready use. Reotemp 20 Inch Fahrenheit Backyard Compost Thermometer with Digital Composting Guide - Keep it in and check temperature each morning before rotating (though you have to remember to remove it or you end up losing it in the compost, and no, it hasnt happened more than 2x, really. American Wood FIBERS PELLETS PinePellet Bedding, 40 lb - Working well, no additives, great Brown part and also helps control odor. Jobe's Organics 09926 Fast Acting Fertilizer Compost Starter, 4 Pound - Not sure this was needed, but used some in the first batch and havent needed to since. Rust-Oleum 7701830 Stops Rust Spray Paint, 12 oz, Gloss Crystal Clear - I had seen some issues with the JK's having rust forming, so i got this and used it to coat anywhere i accidently scratched the paint putting it together, or where screws went through. Maybe not needed, but for the cost i want the JK to last. EPICA Stainless Steel Compost Bin 1.3 Gallon-Includes Charcoal Filter - Our kitchen counter bin for the kids and us to dump into and empty into the JK every day or so. Has a charcoal filter on lid to minimize odors
L**S
A Very Solid, Well-Engineered Product. Excellent Swedish Engineering -- Enough Said. Assembly Required.
This is a really solid, well-designed piece of equipment. I was concerned about the stability of the steel tubing stand, but it is rock-solid when assembled, thanks to the cross-bracing on the bottom and back side of the stand. The materials used appear to be very high quality. The bolts are stainless steel, and all the metal tubing appears to be as well. The main drum is made of galvanzied steel sheets that have been powder coated (a low-visibility sage green color). The handles are solid molded plastic, and are pre-attached to the side panels. Not all side panels have handles on them, so pay attention to which panel goes in which location while you are assembling the unit. The compost tumbler was shipped and delivered much faster than the "advertised" time -- a Fedex Ground truck showed up at the door two days after I ordered, a pleasant surprise. It comes in two large boxes, and everything is double-boxed to prevent damage during shipment. Assembly instructions are sparse, with a number of small illustrations and almost no text. The manufacturer has an online video to guide assembly. I found it unnecessary. If you pay attention to the drawings, the unit goes together well. The assembly instructions strongly advise having two persons available for the assembly job. This is good advise, although I was able to do the entire job myself, using one tool (a 3 foot pipe clamp) that is not specified in the assembly manual. Assembly is straightforward and fairly easy until the last step, which is to assemble the 8 sides onto the two end panels to make the 'barrel." The side panels are lined with stiff plastic foam (insulation to keep the compost mixture warm as it "cooks"), and that foam must be compressed with a good deal of pressure to bring the pre-drilled screw holes into alignment for each panel. (Two stainless steel M3.5-15 sheet metal screws are used to hold each end of each panel in place.) I found the assembly went much easier if I used a pipe clamp (a woodworking tool) to hold the side panel in place while inserting the screws. It's tempting to use a power drill with a Phillips-head bit to drive those sheet metal screws into their holes. Don't do it. Stainless steel is not as hard and strong as carbon steel, and it is very easy to strip the heads on the screws with a power driver. I stripped several screw heads in the process and had to buy replacements. The only other "trick" in assembly is used in attaching the two end panels to the hexagonal sheets of foam that go on the ends, and similar assembly of two sheets of solid plastic to form a "sandwich" with the foam sheet in the center partition that separates the two sides of the composter. These sub-assemblies are held together with nylon bolts. There are no holes in the foam sheets (about 1.5" thick) so you have to push each bolt through the foam. I found it easier to push the bolt part way through one direction, then remove it and push it all the way through the other side. One could use a power drill, but it is not necessary. The sparse assembly instructions assume a certain basic knowledge of mechanical systems. They do not, for example, say which size wrench to use for which bolts.The 9/16" wrench is used on the head of the six metric bolts that attach the cross-braces. The 1/2" wrench is used on other nuts. (Metric equivalent wrenches would be 14 mm and 13 mm.) The instructions also don't describe the orientation of the self-locking (aircraft type) nuts that are supplied for application to the six M8 bolts and two long steel shafts at the top and bottom rear of the unit's stand. If you are not familiar with these nuts, the plastic "rim" that is visible on one side of the nut points out toward the thread end of the bolt (away from the head). Read the assembly instructions carefully and make sure all the parts are in their correct position before bolting things together, and you'll do well wih assembly. At the time of this review, I haven't actually started composting with this product, but it certainly looks like it will do the job well. The heavy duty components and thick foam insulation should help to retain heat in the composter and speed the composting process.
O**T
Well worth the price!
It has been almost 3 years now since I purchased this composter. It has held together well, and in good conditions it still composts well, however, the foam insulation has shrunk somewhat and now that there are gaps between the pieces the insulating value has dropped. It is not possible for me to keep the unit composting through the winter unless I have a perfect combination of greens and browns and rotate every day, sometimes twice. Currently, despite a relatively warm Ohio winter, I have a full, frozen and unusable composter. I'll be happy again once spring sets in, but in the winter, after a year or two, you will need to keep this thing in the sun as much as possible. One tip: If you find you don't have enough "browns", go to a store where they sell bulk wood heating pellets and purchase a bag. I have a bin that holds 20 lbs right by the composter and I can throw in a handfull with each load of kitchen compost. Since the pellets are compacted it doesn't take many of them to balance out your compost. I felt it necessary to review the delivery and assembly of the JK270 due to many of the negative reviews about past problems. The JK270 came to my doorstep in two boxes, on two consecutive days, in perfect condition and DAYS earlier than expected :) I unboxed everything and immediately went to YOUTUBE to watch the assembly videos referenced here. They make the process quite simple. All the parts were there, everything went together nicely (it does take some effort to install the panels while the tumbler is standing up (in hindsight I would do the panels with the tumbler tipped over onto the floor). I assembled it in our living room (after making sure the front door was wide enough to move it through AFTER assembly) and have not used it yet. We've been having record cold temps and I thought I'd wait until the thermometer got above freezing to get things started. In the mean time we are putting composting materials into our freezer in plastic containers, so by the time the temp rises we should have a good quantity to start. Even though I have plenty of leaves on our lot, I bought cheap wood pellets for the carbon end of things (under $4 for a 40 lb. bag) just to make it easy to get the mix right. So far this looks like a VERY durable and reliable mechanism for composting. I'll follow up with a comment about how it works once we get going! March 16 update: I finally "pitched" the first load into the Jora on March 6 (44 degrees outside). After a few days I realized I had gone overboard with the "browns" and added too many wood pellets. I have purchased a 2.5 gallon plastic container (like you would put cereal or flour in for your pantry) to contain the daily compost material until it is full, then I take that container to the Jora outside. In the meantime I keep the container in the freezer and take it out each time to add material from meals, etc... When full, I take it out all day to thaw and then dump it in the composter. Anyway, I start by putting a handful of pellets in the bottom of the container, but I quickly realized that our waste (napkins, paper towels, pizza box, etc...) has enough browns without the addition, so for now I'm leaving them out. After about a week I was a little discouraged. The temperature had dropped several times and I simply wasn't seeing any "movement" in the composter. Today that all changed! I just went out to empty the container and when I opened the Jora STEAM CAME OUT :) It's working away perfectly and I couldn't be happier. In only 10 days with NO compost starter and a difficult start with too many browns, I've already corrected enough to have this thing cooking away (I might add that the temp was in single digits this week!) If I could add a 6th star at this point I would do so. April 18th update - It has now been nearly 6 weeks since I started using the Jora. Despite the fact that I empty a 2.5 gallon container into the Jora, on average, about every two days, I can still see the center post in the one side I've been using, so I've put about 50 gallons of material in a 35 gallon pot... it's been composting down quite nicely. Every once in awhile I'll find it's too wet and smells bad, but after adding a few more browns it's corrected the next day. Yesterday I ran my lawn vacuum and placed several handfulls of yard scrap into the container so that it would be "full" - now I'll start using the other side. I've really done nothing to make extra work for myself (no cutting up fruit skins, etc...) and have simply dumped things in. SO EASY to use! Assuming it takes me 4-6 weeks to fill the other side, I'll come back and update with pics of what I get out of the first side.
S**E
Composts well, but extremely difficult to assemble
In terms of composting well, the Jora Composter (mine is a JK270) does a good job. It makes heat well and holds it well due to the thick insulation, and it comes with good instructions for maintaining a good carbon:nitrogen ratio. I replaced an Aerobin 400 with the Jora, and so far the Jora is much better and solves a couple of persistent problems I had with the Aerobin: there was always a constant trail of ants going to and from my compost, and black soldier fly larvae regularly ruined my compost. There is absolutely nothing that would keep them out of the Aerobin. On the Jora, the only place they could possibly enter would be the air vents on the ends, and I made that impossible by attaching pieces of old window screen over the vents. I suspect the heat the pile produces mail also be enough to kill them; my Aerobin never made this kind of heat. However, the Jora is really, really, REALLY hard to assemble. I'm a reasonable amateur mechanic, do a lot of my own work on my autos and nearly all of it on my motorhome, and when I was young and a hotrodder, I did all work that didn't require a machine shop. Neverthless, I found this thing to be a total pain. The video they have on their website showing one guy easily putting it together has to be rigged, probably by using a Jora with thinner than standard insulation, so that the pieces just fit together. On mine, fitting the panels into place requires an extreme amount of force to compress the insulation enough to get the screw holes lined up. My two teenagers together weren't strong enough to be the "second person," not even with me helping with one hand and starting the screws with the other hand and a magnetic screwdriver. We got a few of them, but many were simply undoable. Enter my friend, who is a construction worker. He came over on a Saturday to help me with it. The two of us, even with the assistance of a couple of heavy duty ratcheting tie-down straps, weren't enough to compress the insulation enough to line up some of the holes, or even get close. He finally said that the only way we were ever going to get it together was to compress it as much as we could, then drill new holes, which we then proceeded to do. It's tight enough to not leak (just a little, sometimes, but the instructions say that it will, so I'll call it normal leakage), and works well now that it's done. Overall, I do recommend this composter, however: -As described above, the difficulty of assembly means a minimum of two people are needed to assemble the panels (you can do the frame by yourself; I did), and three people would be better. Heavy ratcheting tie-downs are also very helpful - I wish it were made of plastic rather than metal. Even in my fairly dry climate (southern California) I expect that after 5 years of standing out in the weather, it's not going to look so good. My Aerobin is plastic, in the neighborhood of 10 years old, has always been in full sun, and still looks great. Also, if they made it of plastic, the insulation could be encapsulated in panels and it would really be as easy to assemble as they show in the faked video -Finally, the way they show the panels going on in the paper instructions that came with the composter is different than the video on the Jora website. I started off following the paper instructions before I was aware of the existence of the video, and had to remove some of them and re-do them the way it's done in the video. So, ignore the paper instructions and go watch the video on the Jora website. -I think it would be worth it for Jora to provide options of shipping a fully assembled composter or having on-site assembly where possible. Knowing what I know now, if that were a $200 option I would gladly pay it. That's what a pain this thing was to assemble. If this thing were to break, I would buy another brand of rotating drum composter rather than hassle with putting another one of these together. Never again.
V**A
Works great. Assembly was somewhat challenging
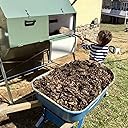
Works great. Assembly was somewhat challenging, but not too much so (make sure to watch video on YouTube first). Composts very well, minimal leaking, takes about 4-5 weeks for a chamber to ripen fully. Terrific solution for kitchen waste. We bought two, so in winter, when composting will slow down, we will not run out of space. Built well, solid and sturdy. Very, very happy with the purchase. Update after almost three years of use: Well, these composters are one of the best thing we ever bought. We live in climate zone 5a, so winters are somewhat harsh and rather snowy. Our composters work year round without fail. All kitchen scraps, food leftovers, some (but far from all) garden waste, paper towels and napkins are now turned into prime quality compost. There is minimal leakage from the bottom of the barrels, but since they are located outdoors, it is not an issue. In winter we can see steam rising from the venting holes, that is how hot it gets inside the chambers. I have been playing with different proportions of the brown/green waste. Sometimes I add peat moss, sometimes alfalfa (buy it in the farm store, where they sell it as food for rabbits), sometimes just shredded paper (checks, documents etc) from our shredder, sometimes shredded leaves. It always, always works. A couple of times felt that it would be beneficial to use compost accelerator. Just so the chambers get somewhat of a "do over". Used it, again results were great. We are now never without compost. With four separate chambers in different stages of ripening I always have some compost ready to add into the planting hole or just spread around. The paint on the composters faded a little bit in the sun, but they still look pristine. Rain washes them, wind dries them off, no other maintenance is required. Also worth mentioning. I have two old metal wheelbarrows (got one at a yard sale for $1 and another came with the house). They are beaten up, but I will never get rid of them, since they fit perfectly underneath the composters for emptying. These wheelbarrows have low profile and are entirely made out of metal. I just roll one of them underneath the chamber to be emptied (right to the cross on the back), open the chamber door and rotate the composter. Works like a charm. It sounds ridiculous, but these composters now are one of my most prized possessions.... Yeah, I know, gardeners are nuts..... Update after 7 years of use: Still using this composters and still loving them! Came to check if these were still available beacause I just recommended them to someone. Was astounded to see a negative review (with photos). I do not know who these people are, I do not know what their deal is, but their composters had to be fully submerged in acid to look like they do. Here are pictures of our composters, located outside (no protection) in zone 5, after seven years of use. I rely heavily on reviews when purchasing new items, hopefully this will help.
S**G
Assembly Not Awful
Instructions for 1-person assembly. 1. Watch the assembly videos with the assembler placing the drum on the ground to force the side panels into place. Then open the box. All the pieces make sense when you've seen them in the videos. 2. After assembling the frame and installing the octagons, you'll need to tighten the nuts on the threaded rod. If that's too much of a stretch, lay the frame on the ground and use your foot to hold one wrench in place while you tighten the opposite nut. Then switch. 4. Keep the octagon framework on the ground and, noting the location of the open frame piece (not the piece with the center holes for the x-support) install the door piece first, then the door latch piece. 5. Stand the composter up at this point and double check the door opening compared to the open part of the frame. The doors should open up away from the open frame. Then lay it back down. 6. Install the rest of the side panels. By install, I mean lean on the piece with all your weight, have a screw ready in an electric screwdriver and, as soon as the holes line up, drive it into place. You may not be able to get it in straight the first time. That's OK, start it crooked as a placeholder; it will hold that corner stable while you push and screw the other 3 positions. Then remove and re-drive the crooked one. Aside - I do not know how anyone can assemble this alone without using their body weight and an electric screwdriver or drill with a Phillips screwdriver bit. By design, it's a bear to compress all that foam and line up the screw holes. One video even shows the assembler sitting on the drum to get the panels into place. 7. The x-support may take some maneuvering to get into place; that is, 3 of the holes will line up and the 4th will be off a fraction. It helps if you leave the other 3 loosely connected until that 4th one finally slides into place. 8. Stand the composter up and double-check the door placement. By now, you're an expert at fitting the side panels so the 50/50 chance that you need to reposition the door and latches isn't awful. The doors open up and away from the open side of the frame so you can roll a cart underneath to empty. I'm an old woman and, working alone, it took me about 2 hours to assemble. That's a lot of tedious nut and bolt installation, a coffee break, 30 minutes of serious muscle to get the side panels attached, and 10 minutes to remove and re-position the door and latch panels that I did backwards the first time. I used my little 4v Ryobi electric screwdriver for the panel screws, 2 box end wrenches for the metal nuts and bolts, and a flat-head screwdriver for the plastic screws.
A**K
Works but requires help and doesnโt hold up over time
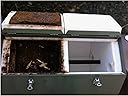
Iโve had mine for 3 years now. As you can see in my photos it does rust and the paint has bubbled up all over the exterior despite their galvanized steel claims. Inside the thick slabs of foam that insulate it have shrunk up to the point that I had huge gaps between them and was having trouble with heat retention in cold weather and the compost drying out in hot weather. I tried to contact the company for help but their email address (on their website) bounced. I had to buy a can of waterproof spray foam thatโs safe for ponds to spray into some of the gaps. During the winter (in the Boise Idaho area) I have to use multiple hot water bottles in both sides to keep it cooking enough. These have to be retrieved, dumped and refilled all the time. This requires more maintenance than they suggest. The compost that it produces, when you use horse bedding pellets as your brown, is beautiful! Truly exceptional (although I canโt vouch for the amount of microorganisms and nutrients in it). Does this work well? Yes. Does it hold up well for the price? Unfortunately, no! UPDATE Huge rust holes have formed and the other day when I went to spin it, an entire panel fell off! This is too expensive for this to be happening less than 4 years in! They need a redesign. Do Not Buy until they resolve design problems!!!! FYI I live in a low humidity area with only 12 inches of rain a year!
R**V
Steam coming out of vents within one day!
I had a poor experience with one of the sellers (Plumstruck) who canceled my order without notice after they were delayed in shipping by over 15 days. I contacted the US distributor (composting warehouse) who was extremely helpful and shipped out my order within hours of placing it just before the labor day weekend. The composter arrived 1 day ahead of promised schedule. (5 stars for prompt service) The composter arrived in perfect shape. There was no damage from shipping. The product was very well packaged and it seems that the dents and dings I see that the others posted about are a thing of the past. (5 stars for packaging and overall quality) As recommended by others, I threw out the instructions and followed the youtube videos on putting this together. The first part of the installation went very smoothly. However putting the panels on was extraordinarily tough. There was no way me + my wife could even compress the panels enough to align the panels so that the sheet metal screws could be started correctly. We spent a whole frustrating day and gave up in disgust. (2 stars for difficulty in putting this together) I went back and read some other reviews. One of them had suggested the use of a large wood clamp (48") to tighten opposing panels to get it to compress. This trick worked and we finally got all the screws in. Some of the screws arent exactly perfectly straight but the composter is now put together fine. I had saved up some coffee grounds, some kitchen waste and had copious amounts of yard cuttings (spent flowers, dead stalks) I also had a bunch of fallen leaves. I mixed them all up and filled up one of the composter compartments. It was saturday evening. The temperature inside the composter was 70F. Next morning I went to check on the composter. It was still 70F and nothing seemed to be happening. I thought it might be because the contents were too dry. Added some rain water from my rain barrel until it was moist like a wrung out sponge. Good call. By Sunday evening the pile was hot (100F) and I could see steam coming out into the cold 50F night! By Monday morning it is already 110F. The pile is only 1.5 days old now. I see steam condensing on the vent holes now.
D**M
Easy to use.
I love my Jora Composter. It took a little work to assemble. Review online Youtube videos before to orientate. It robust, and rotating and aerating is a breeze. No smell. I enjoy it a lot.
D**D
Instructions came in Swedish!
We've just started using our composter. It seems to be great - I have high hopes of great easy compost for the garden. It took two grown men over 3 hours to assemble - it's fiddly and the assembly instructions aren't IKEA standard. The instructions on how to use were in Swedish (not super helpful for non-Scandis). However, I found the instructions on-line and downloaded.
M**T
Disappointing product
Had high hopes of this product, it arrived well packaged and I and a couple of friends set about assembling it. Very disappointed to encounter problems with panels that didn't go together as expected, the insulation seemed to be proud on a number of panels and only through brute strength did we manage to get the self tapping fixings in place. Noticed that there was daylight between most of the panel joints and wasn't overly surprised when water ingress through these ill fitting panels made the proposed compost very wet. Used a silicone sealer on the ill fitting joints and things are better but I will wait and see how things develop. Perhaps I just got a 'Friday afternoon' unit or maybe it's a very good idea poorly executed ( and I speak as someone who built up an engineering manufacturing company from scratch such that I was able to sell it for many millions and retire at 56 I.e. I am not a mug punter when it comes to manufacturing and engineering) Overall I would think that caution should be exercised if you buy a Joraform, at the first sign of ill fitting parts, package it up and send it back, I should have !
Trustpilot
2 weeks ago
1 day ago