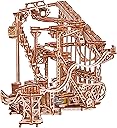
![Wood Trick Spiral Wooden Marble Run 3D Wooden Puzzles for Adults to Build | [558 Parts] Electric Motorized - Interactive - Marbles Included - Engineering DIY Wooden Model Kit for Adults to Build](https://m.media-amazon.com/images/I/81ZfCLSYrDL._AC_SL3840_.jpg)

Desertcart purchases this item on your behalf and handles shipping, customs, and support to Senegal.
🌀 Build. Watch. Repeat. The wooden marble run that never quits.
The Wood Trick Spiral Wooden Marble Run is a sophisticated 3D puzzle kit featuring 558 natural wood pieces assembled without glue. Designed for adults, it includes an electric motor powered by 4 AA batteries (not included) to create a perpetual motion marble roller coaster with 9 metal marbles. This high-complexity model takes 6-8 hours to build, enhancing fine motor skills and engineering curiosity. Its interactive design and eco-friendly materials make it a standout gift and a captivating desktop centerpiece.


| Age Range Description | Adult |
| Asin | B0BS6WCRGW |
| Best Sellers Rank | #104,508 in Toys & Games (See Top 100 in Toys & Games) #108 in Marble Runs #582 in 3-D Puzzles |
| Brand Name | Wood Trick |
| Color | Brown |
| Customer Reviews | 4.0 4.0 out of 5 stars (331) 4.0 out of 5 stars |
| Educational Objective | Problem Solving Skill |
| Included Components | 3d wooden puzzle Marble Run Spiral Electric, Illustrated Step-by-Step Assembly Instructions |
| Indoor Outdoor Usage | Indoor |
| Item Dimensions | 13.07 x 12.44 x 0.04 inches |
| Item Shape | Spiral |
| Item Type Name | 3d wooden puzzle Marble Run Spiral Electric |
| Item Weight | 1.87 kg |
| Manufacturer | Wood Trick |
| Manufacturer Maximum Age Months | 999 |
| Manufacturer Minimum Age Months | 168 |
| Manufacturer Part Number | 3d wooden puzzle Marble Run Spiral |
| Manufacturer Warranty Description | New |
| Material Type | Wood |
| Model Number | 3d wooden puzzle Marble Run Spiral |
| Number Of Batteries | 4 AA batteries required. |
| Number Of Items | 1 |
| Number Of Packs | 1 |
| Number Of Pieces | 558 |
| Number Of Players | 1 |
| Operation Mode | Automatic |
| Play Activity Location | Tabletop |
| Power Source | battery |
| Product Style | Spiral Marble Run |
| Puzzle Type | Assembly & Disassembly |
| Set Name | Spiral Marble Run |
| Size | 12.6 x 13.1 x 12.6 inches |
| Skill Level | All |
| Supported Battery Types | AA |
| Theme | Wood |
| Unit Count | 1 Count |
User
There are NO design flaws. Everything works.
This was my second kit from Wood Trick. I assembled the Galaxy set a few months ago, and wanted to try this Spiral kit. I read reviews calling out "obvious design flaws" in the cam system that moves the stairs up and down. Cam shaft breaking, wire modifications to the lifting rods, etc. So, I paid maybe some more attention to that part of the kit. I smoothed the stairs, the connecting rods and the lower "forks" that ride on the cam wheels. Smoothed the cam wheels and waxed everything well. After assembly, I tried the cam set-up by hand. It turned and worked smooth and easy. When I completed assembly, there was no hint of a problem with the stairs.The problem I had, was with the outer return run from the trap, back to the pick-up deck. The ball was just coming down too fast and would often jump the last corner. I lightly sanded the top inside corners of the rails, to let the ball ride deeper between the rails and that slowed it down just enough to where it "almost" never jumps the track anymore.Running this kit for an hour or so, you may still find some places here and there that may need a little tweaking or smoothing, but right from the first start, it worked fine. All in all, I am very satisfied with the kit, impressed with the way everything fits together, and the clear instructions. (And I did not break a single piece while removing or assembling it).
User
Good time!
Assembly was a challenge, broke a piece or two. Instructions are CAD generated diagrams, looks complex but easy to figure out. Takes some tuning when completed. Be sure to sand any friction surfaces, especially the cam end of the pushrods for the marble ladder. Once tuned and leveled mine ran over 10 minutes with no intervention from me.High quality plywood and a very high end laser make this a great kit and a good time!
User
Fatal Design Flaw
I'm a pretty avid marble run builder. Prior to this kit I've successfully constructed 11 marble runs: by ROKR, UGears, iDventure and Wood Trick, so I consider myself fairly accomplished at this hobby. The Roller Coaster marble run by Wood Trick was just amazing: perfectly designed, a joy to build, and worked the first try with no "tweaking". So I was pretty excited, to say the least, when the company offered another kit.This Wood Trick kit uses a "stair-step" method for raising the marbles to their highest points (as do two of the ROKR kits) and when I looked at the design for the mechanism, I was concerned about design flaws in the system which could lead the mechanism to self-destruct (I'm a retired engineer).The design uses rotating cams on a camshaft with push rods sitting on top of the cams which drive the pistons up and down in a cage (at least in theory) as the camshaft rotates. My take on the design was that any substantial friction experienced by the pistons would cause the push rods, instead of being pushed up and down to be forced laterally compromising the integrity of the mechanism. I spent two weeks carefully constructing the kit working a little each day (the joy is in the building!). Recognizing the problems with the design I was careful to sand and wax all the moving parts as well as the cage through which they moved.Sure enough, when I started the motor one or more pistons jammed, the push rods were deflected sidewise, the resulting lateral force on the cam created a torque on the camshaft that completely splintered the camshaft. The only outcome that was different from what I had anticipated was the camshaft broke instead of the push rods. Ack!This is an expensive kit and I truly expected the same level of engineering put in to their previous kit. The rest of the kit is mostly well-designed and it's still a joy to build but I'm left with a completed run that can't be used. The stair-step mechanism can work, if engineered properly. The ROKR design for the same mechanism worked flawlessly.UPDATE: I was able to reconstruct the cam shaft and after significant "tweaking" the model works as designed. NOTE: It's critical that parts 87, 88, 89, .... are waxed thoroughly where they meet part 43 (see diagram) to make this assembly operate smoothly. This isn't mentioned in the instructions.
User
Disappointed
This is terrible. The base isn’t aligned. Needs an independent base. The parts don’t fit, on page 20 everything fell apart. Pieces don’t align properly. Broke seven pieces and i’m only on pg 30. Disappointed with this product. This is not like their other products. The amount of sanding, gluing afterwards is insane. The stairs are completely blown out. Has never worked. I’ve added wood filler, sanding everything, and somehow it still catches on something and throws everything off.The stupid ball trap at the top doesn’t work. The ball slide per say doesn’t work. This thing is a nightmare waste of money. Poorly engineered/ designed. A month of owning this, im still trying to fix everythingSave your money and buy something else. This is trash. At least i have fire wood.
User
Getting it to run smoothly is a challenge but when it does it is remarkable!
First thing I noticed when I saw this was the stair-step method used to take the marbles upward. That was not only one of the highlights of this run but also the most challenging sections to make run smoothly. I've done several smaller Wood Trick and other puzzles. This was my fifth level 5. I stayed away from this one because of the reviews. Especially when it came to the pistons and the push rods. I over waxed the first try with the steps. I used a 400 grit sand paper. The surfaces were smooth as can be. The first try everything was too tight. The steps would go up but were far too tight to come back down. I removed the wax from the steps,(that was really fun!), and then I sanded the heck out of them all with 150 grit to remove enough of the material so they would sit in the frame and move freely. Once I got that taken care of I was really nervous about the rods jamming or failing as I had read in the reviews. I took the "unit" and just played with it for about an hour or so. I did that till it moved smoothly in both directions. Then I snapped it in and turned the page. There were some tricky sections to work with but none as difficult as the stairs. Once I finished the build I just put it down. I started fresh the next day. It took a bit of tweaking but it was mostly lining things up or a tight area here and there. After about 45 minutes or so it was up and running. I can watch it run for hours. The designers really know what they are doing. The way all of this comes together is amazing to me no matter how many of these puzzles I work on.As usual with this type of "Puzzle", I would not recommend this for a child. As many say the fun is in the build so TAKE YOUR TIME, "the fun lasts longer". If details is not your thing, this puzzle is not for you.While I'm waiting for the soreness in my fingers to go away from working on this thing I'll start looking for another puzzle. This was a great project to work on. I would purchase this again.
User
Challenging and fun, but also frustrating and infuriating
Challenging, frustrating, and fun. Whether you consider it mostly fun, or mostly frustrating, is going to depend a lot on your personality, mechanical skills, and tolerance for dealing with problems. I was debating between rating this a 4 or a 3, but after a few weeks I'm now debating between 3 and 2. Read on for why.UPDATE: After 3 months of use, I have some additional thoughts. Sorry this is so long, but if you really want to understand what you're getting into, it will be more useful than a review that say "This is really cool." Anyway, the update is at the bottom.Let me start by giving an idea of my experience and skills. I've built several wooden marble runs before this one (not from Wood Trick). I've also rebuilt car and motorcycle engines, built computers from parts, and I've got adequate carpentry skills. Not bragging, just want to make it clear that the issues I ran into aren't because I'm a total klutz.To start with, this kit is pretty straightforward to assemble. Wood Trick rates it 5 out or 5 for difficulty, but I thought it was easier than the other kits I built. The instructions are mostly good, although sometimes the dashed lines that show where parts are supposed to fit together are pretty hard to see. And pay close attention to the gray arrows that show the order of assembly. Sometimes they're right to left, top to bottom, but sometimes they're zig zag, or circular. Easy to get things wrong if you miss the sequence.EDIT: I find a continuing problem with both the Wood Trick kits I've built. Everything is a friction fit, and over time the wood seems to dry out and shrink, and parts that originally fit tightly are now loose. Pieces have literally fallen off in normal use. I'm going to have to glue some assemblies to keep them together. A bit disappointing.Like every other marble run kit I've built, there seem to be tolerance or QC issues. Some pieces almost fall out of the boards, and since the pieces themselves aren't numbered you could lose track of them. When one did fall out, I put in back in the board with some tape to make sure I didn't lose track of it. But some pieces are virtually impossible to break loose. I had to use an X-Acto knife to remove many of them. DON'T force them: you will break some if you do. I broke a few that had spares provided, but one with no spare. I was able to glue it without much issue. And like the other kits, once everything is assembled and turned on..... It didn't work right! Balls got stuck in places there were supposed to roll or drop. Balls would sometimes fall or fly off the run and bounce off the table and across the floor. Balls would fall off the lift arm near the top of its motion constantly - the design is flawed - or sometimes not get picked up at all. And balls flying down the outer ramp would fly off coming out of the last curve. I had to analyze each of the problems and figure out solutions. In all, I've made something like 10 or 12 modifications to the design or assembly to make it work right. In some cases I had to glue extra pieces of wood to force the balls in the right direction, or to keep them from falling off. I attached "guard rails" to 3 places on the outer "roller coaster" track. In other places I had to shave away some wood where it was blocking a ball from moving. And the lift arm still occasionally fails to pick up balls without me doing a little tweaking, and occasionally still drops balls even after I modified the end of the arm. Oh, and the stairstep mechanism to raise balls to the top? The vertical rods only have guides at the bottom, so at the top the steps drag against each other and some wouldn't fall down to accept the next ball. I took that mechanism apart and polished the rubbing surfaces until they were glass smooth, and they still hung up I had to put weights under the first three steps: two steel nuts under step one, FOUR nuts under step two, one under step 3. Those rods need a guide at the top to keep them going straight up and down.I finished the assembly and troubleshooting / fixing a couple of weeks ago. Everything seemed to be working. But now things are starting to not work again. I think that as the moving pieces wear a bit, problems occur. And some of the pieces have loosened up and allow parts to get out of alignment. Everything is supposed to be a press fit, and I think as the wood dries out, pieces shrink and no longer fit as tightly as necessary. I've had to glue a few pieces together that would no longer stay in place. (I first wrote the above about a week ago - since then even more things have continued to need "fixing.") And it's inconsistent. For example, I ran it for about 10 minutes earlier today showing it to a neighbor. Shut it off. Several hours later I turned it on again. NOTHING had changed. The A/C is on so temperature and humidity are consistent. Nobody touched it. Heck, nobody even looked at it. But the lift arm wasn't picking up balls. Infuriating that I never know if it's going to work or not. Sometimes the arm will pick up 10, 15, 20 balls in a row without any problem, and then suddenly fail to pick up the next one. It might fail as many as 3 or 4 times and then suddenly pick up the ball. Or it may never pick up another one until I intervene.There are also a couple of things I consider to be design flaws. The other kits I built use a metal axle for rotating or pivoting parts. This one only uses wooden pieces cut out of the flat boards. Most of us learned when we were toddlers that square pegs don't go in round holes, but this kit does that for multiple pivoting pieces. I'm not surprised they don't always rotate smoothly, even with a coating of wax. The other flaw is that significant parts of the run are inadequately supported, allowing them to sag or twist, and leading to balls falling off or stopping in the track. A good part of the center serpentine run is unsupported - it eventually drooped enough that some of the run was flat, not downhill, and balls wouldn't roll down. The outside "rollercoaster" downhill is sagging and twisted sideways. Both would have been relatively easy to fix with another support structure. I find the engineering, design and assembly of this to be really interesting, if flawed. But compared to the other kits the entertainment value of watching it operate is weak. There is a long period where the balls S-L-O-W-L-Y get moved to the top, but nothing else happens. Then a quick action where three balls get released and travel quickly to the bottom. Followed by another S-L-O-W wait before the next three balls come down. On other kits there's almost constant action, with multiple balls in motion most of the time. A motor that turns faster, or different gearing, (or maybe just a better power supply than 4AA batteries) would make this much more fun.EDIT: I replaced the 4AA cells with a 6 volt, 600 mA power supply: MUCH more fun. The motor runs much faster, and still doesn't overheat. Wood Trick should do this from the factory.In the end, it was both fun and frustrating. Whether you find it mostly fun, or mostly or totally frustrating will depend on how you feel about problem solving and engineering, testing and applying your fixes. If you feel you should be able to follow the instructions, put things together, and everything fits and works perfectly, buy Legos. If you enjoy problem solving, developing solutions to problems, and using your mechanical skills to fix those problems, you may have a great time with this. And given that things that work for a while suddenly stop working, it could be a long term hobby. I enjoy analyzing the issues, designing solutions and testing them and solving the problems. Even so, this one is very close to being much more frustrating than fun.If you decide to build this, you'll want a few tools: An X-Acto knife. Some good wood glue (please, not Elmers generic school glue). A pair of fine needle nose pliers. A fine screwdriver for prying things apart when you realize you just mounted something backwards. A bright work light. And a solid, flat surface to work on that you don't care about cutting into accidentally with the X-Acto knife. Don't build this on mom's heirloom dining room table! Also, test every moving part as you go. Make sure the balls roll, drop, or fall smoothly. Make sure rotating parts rotate easily. Make sure the stair steps rise and fall without getting stuck against other parts. If you wait until everything is finished to test you may have to disassemble a bunch of pieces to get to where the problem is.UPDATE: After 3 months, problems still occur. I think the biggest issue is that everything is supposed to be a press fit, but over time the wood dries out and shrinks a little bit, and parts that originally fit tightly no longer do. Today one of the pieces that cups the ball at the end of the lift arm (and gets pressure with every ball picked up), just popped off, and balls started flying. I'm going to have to glue it. And some of the upright supports for the serpentine run no longer fit tightly and the vertical support just popped out of the base. I think over time I'm going to find myself gluing a lot of this back together.
User
Challenging
This is my second WoodTtrick marble run puzzle/maze. Like my first the "roller coaster" it was challenging and fun to assemble. The use of a watchmaker's hammer definitely helped. Some of the parts are quite fragile and I broke a couple removing them from their respective sheets, fortunately spares were provided for the few i broke. After completing the maze a few days ago I am still tinkering with the arm to get it to pick up the steel balls. It seems as if this maze's operation is susceptible to "tweaking" when picking up and moving it that can disrupt it's smooth operation. However, overall very satisfied with the kit and quite frankly amazed with the design and engineering that goes into it. I highly recommend.
User
Great 3D wood puzzle
I have assembled many 3D marble run puzzles and this was one of the best. Have plenty of patience and don’t force parts together. They are made to fit well and snug. Save your fingers using long needle nose and regular pliers to push the parts all the way together. Sand all parts especially the front and rear of the elevator boxes and their stems. Wax all parts well that move against each other. Study the instruction pictures closely to get your parts in the correct position. Look closely as there are very small numbers and letters on the parts showing their proper connection to another. With my 80 yr. old eyes I needed a magnifying glass to see these letters and numbers. After proper assembly the puzzle will like all others need some adjustments for the marbles to run through the puzzle without getting stuck or coming off the marble runs. The only thing I really needed to fix was the problem of the marbles coming off the track at the turn at the bottom of the last long downhill run before the marble collection area. The marbles pick up speed on this steep downhill run with some ending up on the floor. As seen in the video I constructed fences out of the scrape wood and attached them to both sides of the marble track before and after the last corner. Using the scrape wood I was able to make these parts and stain them to look like they came with the puzzle. You can use anything to make a fence that will just keep the marbles from leaving the track. Over all this was a great puzzle for anyone to add to their collection. Have plenty of patience, don’t rush to finish it, and you will be extremely satisfied with the workings of this project.
User
Remplacement de la pièce numéro 87 de la planche numéro 4
Dans cet article la pièce numero87 de la planche numero 4 s'est cassée...est-il possible de remplacer cette pièce ? Sinon je ne pourrai pas faire fonctionner ce jeu qui a quand même coûté un certain prix...merci d'avance à vous de me dire ce qui est possible de faire...cordialement...alain godoffe...
User
Tolles Teil, funktioniert einwandfrei.
Habe es verschenkt und der Empfänger war sehr glücklich darüber, kleinere Anpassungen musste getätigt werden aber die sind nicht der rede wert.
User
OK
Had some trouble putting it together. Had to sand a lot of pieces. Marbles come off in wrong places sometimes.
User
Wood puzzle
Very beautiful puzzle
User
Bellissimo
Istruzioni x il montaggio facili da capire
Trustpilot
1 week ago
2 months ago