Desertcart purchases this item on your behalf and handles shipping, customs, and support to Senegal.
🏡 Elevate your outdoor oasis with the ultimate hardtop gazebo experience!
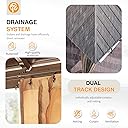
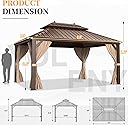
The YOLENY 10' x 13' Hardtop Gazebo features a galvanized steel roof and rustproof aluminum frame designed for superior durability and weather resistance. Its double-vented roof enhances airflow and stability, while zippered netting and curtains provide UV protection and privacy. With a smart eaves drainage system and powder-coated finish, this gazebo is engineered for long-lasting outdoor enjoyment on patios, gardens, and lawns.


| Asin | B08CRD9V7Y |
| Brand Name | YOLENY |
| Color | brown |
| Customer Reviews | 4.5 4.5 out of 5 stars (335) 4.5 out of 5 stars |
| Floor Area | 120 Square Feet |
| Frame Material | Alloy Steel |
| Item Weight | 136.08 kg |
| Manufacturer | YOLENY |
| Manufacturer Part Number | GA001 |
| Material Type | Galvanized Steel Roof |
| Model Number | GA001 |
| Required Assembly | Yes |
| Shape | Rectangular |
| Style Name | Garden |
| Ultraviolet Light Protection | 99.99% |
| Upc | 030391783114 |
| Water Resistance Level | Waterproof |
User
Very nice Gazebo
I am impressed with the overall design and sturdiness. Assembly instructions were clear enough, even though they are pictorial only. I advise looking ahead a little to check next steps. I disagreed with the steps when it came to the roof. instead of laying out all the roof panels and putting the clips on, I found the panels I needed for the next step and put the Z clips on as I put the panels up and I put one or 2 screws in the panel to hold it in place while we put the other panels up.I was able to do most of the assembly by myself. I built the first part upside down with the legs up in the air. Then I needed some help to turn it over (wife and 13 year old grand daughter). I also needed help putting roof panels on (one more person). One person cannot reach far enough to align the top of the panels and put the nuts on the screws or tighten them, it takes 2.The manufacture did provide a few extra screws, spacers and Z clips. Apparently in case of loss or other problems. This was nice. I did have trouble with a couple screws out of a couple of hundred. One cross threaded (probably my fault) and I couldn't straighten it out. Where it was, I was able to drill next to it and put in a bolt and nut all the way through a roof support brace. Another acted a bit like it may have stripped or the captive nut spun. But, where it was, I felt it was good enough as is. All of the holes lined up well and alignment was not a problem. If they don't you may just need to make sure the unit is square.My only criticism would be: 1.) there seem to be no written instructions anywhere and no contact or customer service number to call if you need help or replacement parts. Possibly the seller would be the contact. 2.) the lower drip edge does not have enough support in my opinion. It is only held in the middle and and at the corner of the roof and is pretty thin metal. Living where it snows I was concerned that snow would push the edge off and bend it. So, I added two sheet metal screws for each piece. So 16 screws. I got painted #8 x 1/2 stainless steel screws (for windows) at the local hardware store. Drilled through the trim and roof and screwed them in from underneath. They are hidden from by the trim on the topside and dark brown from the lower side. This made the trim much more secure.
User
Very nice Gazebo
We were going to build a wood gazebo but given the cost of lumber these days, going with a pre-made unit made sense cost wise and time/effort to install. I looked at a lot of different ones and ended up going with the Yoleny based on the reviews here on Amazon.Was a bit concerned with the manpower requirement (3people) and the picture only instructions to assemble this unit, but it turned out to be a non issue. My wife and I were able to put this together in two evenings of work and a few adult beverages and not requiring any help from others.The gazebo arrived over several days in 4 large boxes, 3 for the frame and 1 for the roof panels. The frame boxes are long but not that heavy, for the roof panels we had to open the box in the front of the house and carry the large panels to the backyard individually as the box was too heavy for us to carry in one trip.The instructions looked a bit lacking at first, but it ended up being a non issue for us. The best advice I can give, is to do a full inventory and lay out all the parts first. This really helps with knowing what all the parts look like so you can match them up with the illustrations. The long boxes have all the parts for the frame, so you could start once you have those as roof panels go on last.Only tools needed are a good Allen wrench, as the one provided in the kit is crap. To make things go a bit quicker I also used an electric screwdriver with both Philips and Allen bits. When assembling leave most of the screws loose to help fit things together, then go back and tighten things up once the frame is together. The roof panels are the biggest challenge as you are working on a ladder and the larger roof panels are awkward and take some tweaking to get all the holes to align, but not that bad really.This unit is well designed and looks pretty strong, but definitely needs to be anchored down. We installed ours on a concrete slab near our pool and I drilled holes in the concrete with my hammer drill and used screw in anchors from Lowes.Overall its a solid, good quality nice looking unit which should hold up for years
User
Great Quality and Style
Shipping:FedEx tracking only showed a single number. Only 2 of 4 boxes arrived. Contacted seller who responded within 24 hours with the remaining 2 tracking numbers. This was not a fault of the seller, but FedEx who was understaffed at the time. All 4 boxes were received within 4 days.Assembly:I found it rather easy, but have assembled MANY of these flat pack-type products. I would say it took around 3 hours. Help is needed to raise the roof while preventing unneeded stress on the legs. I had one person which worked, but 3 would be ideal. Securing the roof panels REQUIRES more than one person as any bolt not right on the edge would be impossible to install. Someone needs to insert roof spacers and hold the nut while someone drives the bolt. Instructions were word-less but easy to follow. All parts were there with added hardware where you would expect to see it.Quality:Purchased in order to leave up in a New York winter. While it has not seen one yet, i am not worried about its ability to hold a moderate snow load and take heavy wind. The cross braces that hold the legs to the roof are surprisingly sturdy for a flat pack product like this. The coating on the entire thing has a great finish and seems really thick. As in some other reviews, i agree some parts can seem flimsy when on their own, but the finished product is plenty sturdy.UPDATE >> One winter season behind us. This handled snow loads of just under a foot with no issue, but not to say you should not keep it clear (would handle heavy winds better with no snow load). We did have a full day storm with wind gusts of up to 60 miles per hour and it is not rated for that. It is tapconned in and still standing. We do bunch up the curtains into the top corners under the roof and bungie them there to reduce anything the wind could get a hold of (in the winter season and if we know a wind storm is eminent).Mounting:It came with concrete expansion anchors that seemed a little weak, but this is not the reason i opted to NOT use them. There are no "foot" caps. So whatever you use to mount it can be seen. Some have a cap you can put on before building and lower it over after mounting. their mounts use a lock and normal washer and a bolt that even if you cut remaining thread off seems like a toe's worst nightmare if barefoot and kicked it. I opted for 2.5 in x 1/4 tapcon, hex top. It has a low profile and holds more than it needs to.
User
Sturdy structure
Me and my spouse put it together over 5 days, about 2 to 3 hours each day to completion. Day 1: standing frame. Day 2: roofing frame to top roof. Day 3: small roofing panels and one roof side 13’. Day 4: finished roof up leaving all screws finger tight. Day 5: tightened all screws and completed structure and curtains. Start roofing panels from middle, as someone mentioned in a review, and work your way outward. Prior to putting middle panels on we taped the Y blocks to match the holes. Also the R3/R4, can’t remember which one, didn’t fit right. Would not line up with holes. Took tin snips and clipped about 1/8” of an inch off the top portion that went against the E1 pole. This corrected it. One of the brass fittings in an E1 pull was not tight and it spun (E/E1 are the brackets that make up the roof to the top). Outside of these things and a few of the screws not going all the way, but were tight. Pleased with the outcome of product. 2 people, one 5’1” and one 5’11” put it together so not all that bad. If get frustrated give it a breather and come back. We also found it helpful to slightly loosen brackets under panels if holes not lining up. Can re- tighten after panels screwed in.
User
Not an easy task but great product and support!
Just finished erecting my gazebo and thankfully all parts were provided! Waited until I completed it before writing this review (and no I’m not sponsored). Initially started with 1:4 boxes missing and support quickly rectified issue and sent a replacement box out. After a couple of weeks of taking up room in my house I began my mission and boy was it a mission! Between battling Florida rain and sun it took approximately 3 days to complete with 2 people and 2 - 8 foot ladders. Could’ve been done in 2 good days of work but it’s exhausting being outside building… Definitely have a drill or electric screwdriver with hex bit ready to assemble. Other than that and a screwdriver you don’t need anything else.Instructions were on point but vague in some areas. Check YouTube for other similar gazebos under different name brands and it’ll help tremendously.** Biggest tip is to not tighten down anything until you’re fully completed with one full step. If you don’t follow that tip you’ll be fighting trying to fit panels and pieces together for hours. Fit everything and lightly screw in screws and come back later for them, you’ll thank yourself I promise. Great sense of accomplishment once completed and seems like a really solid product once all bolted down. Great product like I said, but be ready for at least 2 days of building if it’s just 2 people and it’s definitely not a 1 person job at all.
Trustpilot
1 month ago
2 weeks ago