💖 Elevate Your Nail Game – Because Your Nails Deserve the Best!
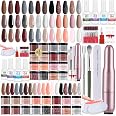
The Morovan Dip Powder Nail Kit is a comprehensive starter set featuring 54 pieces, including 18 vibrant dipping powder colors and an electric nail drill. This kit is designed for both professionals and beginners, offering a toxin-free formula that ensures nail health while providing long-lasting results without the need for curing lamps.


E**E
In depth review and directions
First of all, yes I need a manicure but this is about this polish, not the condition of my nails 😆IMPORTANT-Do not be scared of bad reviews. Patience during the application and removal process equals better results. This is more time consuming than regular bottle polish.If you have shaky hands this may not be the best for you.So I bought a $20 powder dip kit from WM. The top coat takes FOREVER to dry. WORSE than any bottle polish. Like impossible wait time for a perfect look. Easy to mess up the top coat because it's like oil for a long time after application. And there is only one color in the kit.So I ordered this $22 fall-ish color kit from Amazon after reading a bunch of reviews on this and other brands. Selling point was the quick dry top coat, and- Such a better deal! The powder containers are much smaller but still enough for multiple uses. And I did mix colors to create my own. There was no extra container to put powder in so you can use your own small dish, a cap, or the powder container itself. I'm sure that's not recommended but... whatevs 😀.Having a nail grinder tool thingy would be easier for better results than just a nail file. The end result is like gel polish or hard plastic- if you've never tried a dip. The powder containers I got are not marked with any color name or way to tell which is which, but the jars are clear so you see the powder. Just remember- the powder color will be a bit deceiving because generally they darken as the powder gets wet with the layering formulas.Powder dip- the more you do it the better you would get as you get comfortable and learn tricks. It really is like hard plastic on your nails.so if you put the base on thick or put 3 coats on it will be really durable. Making sure you have completely buffed and cleaned your nails helps alot with the durability of the polish. The left hand I did more carefully is still in great shape after a week. (Pink nails pic) although I was still pretty "fresh" in learning to dip. thinner layers and multiple layers works best.Directions-Lightly file your natural nail before the base coat for better adhesion.you paint base coat (#1), dip, base coat, dip. Then you can do one more brush and layer for thickness and color saturation if you want. You have to brush off excess powder between dips and always wipe the bottle brushes on a napkin or something before sticking them back in the container to avoid cross contamination. If this happens that is what the brush cleaner bottle (#4) is for. Brushes may get hard with the gel if they are not wiped properly between steps. Sometimes you get some color transfer to the brush as well. BUT the brush cleaner makes them good as new, you just put the bad brush in the cleaner bottle and shake/ swirl it a bit and leave it sit a few min.(The base coat smells like super glue. I bet it's pretty close to being super glue but since it can come off nice it's no biggie. But there are fumes.)The more carefully you apply the base layer so it doesn't touch skin and the whole nail has a buff to rough them a bit, the better it will last. Smooth nails or overlapping skin with the base coat is where air can get under edges and cause chips or peelingNext, Then you apply an activator (#2) after you're done with dipping layers and wipe the brush off before putting it back in the bottle.After applying the activator, you file and shape the nails. Do ALL your nails with the activator BEFORE you go to file. They get super hard, but they need more than a second or two for the activator to get through the powder layer.If you do one nail at a time, you may get some streaks or less than perfect results.If any spot gets to thick for your liking or they don't seem smooth enough, just keep filing til it's the right shape. Like I had mine too thick for my liking on my nail bed area so I filed that more to have it thinner as the nail grows out. Of course they won't get super smooth, that's what the top coat is for, so don't worry too much about how smooth they are- just file so there aren't any weird lumps or contours if you got them in the dip process.Once you have your nails how you want, you use the activator again. If any spot gets to thick for your liking or they don't seem smooth enough, just keep filing til it's the right shape. I had mine too thick for my liking on my nail bed area, so I filed that more to have it thinner as the nail grows out. Of course, they won't get super smooth, that's what the top coat is for, so don't worry too much about how smooth they are- just file so there aren't any weird lumps or contours if you got them in the dip process.Wipe the nails really well at this point. The activator can harden the top coat bush so you want any excess off the nails first. (Again, no worries, you do have a brush cleaner if you do start getting a hard brush)Last add the top coat (#3). This does dry pretty fast, maybe slightly faster than bottle polish or about the same. For best results, apply a second top coat after the first has dried.Sooooooo.... This top coat does dry much faster, but doesn't give as much of a professional shine to it.Removal-You have to file off the top coat with a rougher nail file (or grinder tool) then soak the nails in acetone or use a special remover that I didn't buy. I used "professional strength" acetone nail polish remover from WM I've had for like 2 years 😆 I didn't "soak" them either I dipped a cotton pad in the remover and put it over my nails and wrapped them in foil. Then it kind of peels off if you have something to help scrape them.The longer you can soak them the more rubbery it becomes and peels nicer and easier. The pic of my bare nails is not nail damage but impatience with soak time. I did maybe a min, probably less, in the foils.The white streaks on my pinky nail are just a slim line of residue that I need to file off, but for the most part is clean. My ring finger didn't soak as long and has more residue to file off. Or I could just soak hem again or longer.If you don't let it soak long enough- you could damage the nail when trying to peel it off, just like gel would if you've ever just peeled gel polish off. Or like some of the bad review pics. Professional strength acetone polish does make a difference.After a couple minutes soaking I could use just my finger to rub it off instead, and then scrape the excess that may be left behind.Also- if it sits too long after soaking it gets hard again, so you have to take it off right away.But my in depth review and opinion is that it's cheaper than the salon and for patience it will look ALMOST the same. Most people won't inspect or scrutinize your hands that much anyway, so it would look the same to them (I think) As salon.As a practice my hubby said I should do his toes (toe pic) Toes are alot harder cuz you can't angle them right for the dip. You can Lightly dust the powder over the nail instead of dipping into the powder. The results are not as good that way (it's how I did his toes)Also, since it's a powder you can't really add good graphics unless they are simple and well contrasted. That is why his shark he wanted me to do is awful looking. lolHe was laying down on the couch with his feet on my lap. If I had him sit I a chair and I sat on the floor it might have been easier.A nice thing is you can mix powders to make your own color. I had a dark graphite I mixed with white to get a more contrasting gray for the shark.Ps- thanks to the awesome hubby who was a guinea pig and now has his foot posted on the web. He did get a manicure and out massage in exchange for a little anonymous embarrassment 😀
L**S
Gracias
Compré este producto en Amazon con la intención de evaluar su calidad antes de considerar una compra mayor con proveedores, y la verdad es que me sorprendió gratamente. Desde el empaque hasta el funcionamiento, todo estuvo impecable. La entrega fue puntual, el producto llegó en perfecto estado y tal como se describía en la publicación.La calidad es superior a lo que esperaba por el precio, lo cual demuestra que se puede encontrar una excelente relación calidad-precio si se eligen bien los proveedores. Lo he estado usando durante varios días y hasta ahora no ha presentado ningún problema. Además, el material se siente resistente y duradero, lo cual es ideal si estás buscando opciones para revender o usar a nivel empresarial.Sin duda, esta compra me ayuda a tener mayor confianza para futuras negociaciones con proveedores. Recomendado 100%.
I**O
Solid Dip Powder Nail Kit – Great for Beginners, but Needs Better Packaging and Instructions
This dip powder nail kit is SOLID, especially the drill! My friend, who’s been a professional nail tech for over five years, taught me how to use it, and I’ve been loving it ever since.What I Love:The Drill: According to my nail tech friend, the drill is surprisingly decent for the price. She did mention that the metal bits aren’t super useful. She recommended the plastic bit (outside of the little pack) as it works much better for shaping and prepping. She also liked that it came with sandpaper bits, which are always handy.Extras: The kit includes numbered bottles (activator, top coat, etc.), extra brushes, and a brush cleaner, which is so convenient! The variety of dip powder colors is great, too.Beginner-Friendly: With a little guidance, this kit is perfect for amateurs looking to save money and do their nails at home.Room for Improvement:Packaging Issues: I had to return my first kit because the charger was broken and one of the dip powders spilled. Even with the replacement, some jars had leaked, so they definitely need better packaging.Dip Jar Size: The jars are pretty small, so you’ll go through them quickly. It’s disappointing that some were already partially spilled or not full when they arrived.Instructions: The included guide could use more detail. It would be amazing if the company provided a step-by-step video specific to this kit—covering everything from using the drill for shaping and removal to proper techniques to avoid thinning your nails or damaging them.Pro Tip:If you’re new to drilling, take some time to research or watch tutorials before diving in. My nail tech friend taught me some essential tips, like not drilling in the same spot too long, how to shape nails after applying the dip, and how to avoid over-thinning your nails. These little details make all the difference!Final Thoughts:This kit has a ton of potential for anyone wanting to do their nails at home and save some cash. Despite the minor flaws, I think it’s worth it—just be prepared to do some homework and handle the packaging quirks!
B**Y
Nice Kit
Very nice kit! Be sure to look up a few videos before attempting. All the products were packaged nicely and the nails last a long time.
K**F
Messy
The media could not be loaded. When I got my package there was powder all ll over the inside of the box cause one of them werent closed all the way.
K**I
Everything you need!
I'm in love with this dip set!!! Comes with everything you need except a nail buffer! The drill is fantastic. Beautiful colors. Comes with instructions, although I would recommend watching a few YouTube videos. This is my first dip nail set and it's 10/10. I've been having so much fun!! 😁
A**R
Garbage
This brand is garbage. I’ve been doing dip for years now very successfully, and thought I’d try a new brand for the colors; this polish is the worst I’ve tried. In the two days I’ve had it on, I’ve broken three nails. It cracks under the slightest strain and destroys your nails with it. Don’t waste your money on this
A**
Everything you need!
This item is everything I wanted it be! Excellent!
Trustpilot
2 months ago
3 weeks ago