Desertcart purchases this item on your behalf and handles shipping, customs, and support to Senegal.
๐ Fuse your filament, fuel your creativity!
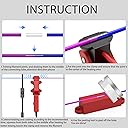
The VIT SPORT Filament Connector is a precision-engineered splicer designed for 1.75mm and 2.85mm filaments, including PLA, ABS, PC, PETG, and TPU. It offers an easy, tool-free operation that ensures seamless, durable filament joints, reducing waste and enhancing print quality. Backed by a full year of customer support, this all-in-one kit is a must-have for professional and hobbyist 3D printing enthusiasts aiming for flawless results.


| Asin | B091Y9WSH6 |
| Best Sellers Rank | #302,809 in Industrial & Scientific (See Top 100 in Industrial & Scientific) #2,122 in 3D Printing Materials |
| Brand Name | VIT SPORT |
| Colour | Red |
| Country Of Origin | USA |
| Customer Reviews | 4.0 4.0 out of 5 stars (824) 4.0 out of 5 stars |
| Item Weight | 150 Grams |
| Manufacturer | VIT SPORT |
| Manufacturer Part Number | 5267 |
| Material Type | Polyethylene Terephthalate Glycol Thermoplastic Polyurethane Polylactic Acid |
| Model Number | 5267 |
| Number Of Items | 50 |
| Unit Count | 1 Count |
| Upc | 734257461375 |
User
Excelente
Este empalmador funciona excelente, unรญ dos filamentos y con la herramienta de lijado queda bien unida y al grosor estandar del filamento. Estoy muy satisfecho con este empalmador
User
I'm glad I got this - it's not that hard to use and works really well if you do it right.
I own a 3D Printing business running 30 printers pretty much non stop 24/7. I've been wasting a TON of filament as most of the products I sell use more than 50g of filament. So when a roll get's low I just chuck it. while I do have a lot of prints that use less, it's just too big a hassle to swap out a running roll for a roll that is low for a short and quick print. Over the last month I've been setting aside the low rolls with the intention of figuring out a way to reuse them. In the last day I was able to take the scraps and turn them into 2 full rolls ready to go. This was the solution. Not only does this save some money, but it's sooo much better for the environment.I've tried other DYI methods of splicing filament and am a bit familiar with how it works so I knew what I was getting into with this. I was pleasantly surprised with how well and easy this worked.I'm using mostly Duramic PLA Pro that prints well at 215-220C, and that's what my experience is based on so far, but I suspect my method will work for any filament that prints between 200-220. Here's how I do it:Turn on the splicer and let it warm up for 3 minutes. while it's warming up, cut both ends of the filament to be spliced nice and square and straighten out the ends of the filament with about 1" straight on both. Once 3 minutes is up, turn off the splicer and immediately open the clamp and put one end of the filament in the middle of the clamp (in the center of the metal heating part). Close the clamp and then push the other filament end into the other end of the clamp till you feel it touch the clamped filament. With both hands push both ends of the filament together about 1mm, you'll feel them mushing together, you don't need to push mush, just making sure they're well contacted. Now let everything rest and cool. Be sure the clamp doesn't move around (I just use a vicegrips on the base to weight it down and position the rolls so they're not pulling on it, this takes a little fiddling but isn't hard). Cooling is the key, let it cool for like 8-10 minutes. Then just open the clamp, pop out the line and you can tear off the little wings that might be there with your fingernails. Then a little sanding (I use 220 grit) and you're good to go.So far this has worked great for me. I'm hoping the splicer holds up, and will update the review if it doesn't.
User
ใจใฆใใใใไฝฟใๆน็ฐกๅ
ๅใใฆไฝฟใฃใใฎใงใกใใใจใใไฝฟใๆนใใใใใใใชใใฃใใใไปๅฑใฎใใฅใผใใฎไธญใซใใฃใฉใกใณใใๅ ฅใใๆๅใซใใผใใฌใณใงๅใใชใใใใใซไปใๅใใใชใใๆบถใใใใใใใใใฎ่ตคใใฏใชใใๅผใซๆใฟใ120็งใง่จญๅฎใใฆๅฎ็งใซใธใงใคใณใใงใใพใใใๆๅใใใฏใชใใใงๆใใงใใงใใใจใใใใใใใฎใใๆนใฎๆนใไธ็บใงๅคฑๆใใใงใใพใใใ
User
It works great.
There's a learning curve to every filament splicer I've ever touch. It always takes a while to get the process down. I've got it working really well for me. If you get this, follow the instructions, and practice a bunch of times. I've finally got it making splices that are almost perfect every time.
User
Works Exactly As Described!! PETG Confirmed
I'm not quite sure why people are saying that it doesn't work well or doesn't work at all with PETG filament. I followed the incredibly easy 5-step instructions and I was able to splice a piece of PETG with zero effort. I powered it on, set the timer for 3 minutes, once the timer went off I removed power and opened and inserted one end in the middle of the clamp and closed, then I inserted the other end to be spliced through the opening and pushed together with very little force. After about 4 minutes I opened the clamp and BOOM, perfectly spliced PETG rolls.My recommendation for getting a perfect splice with little touchups needed is to use very little force when pushing the to ends together. On my first attempt, I pushed both ends in with a fair amount of force because I was worried that the reviews were correct about PETG so I wanted to give it the best possible chance. Well, it turns out that I used too much force. When I removed the splice I had a beautifully splice, but there was a thin pancake of filament around the splice from where it began to push out of the clamp. Nothing ever leaked and the pancake portion was incredibly thin so it was easily removed with a craft knife and 5 seconds of sanding. On my second attempt, I pushed with far less force and this time it came out perfect. Pulled on both ends with a LOT of force and they stayed together with ease.Very easy, very efficient, and HIGHLY recommend.Thank you!
Trustpilot
1 month ago
1 month ago