
DOWNLOAD THE APP


Customer Services
Copyright © 2025 Desertcart Holdings Limited
DOWNLOAD THE APP
🕰️ Build Time, Own Time: Craft your own gravity-powered masterpiece!
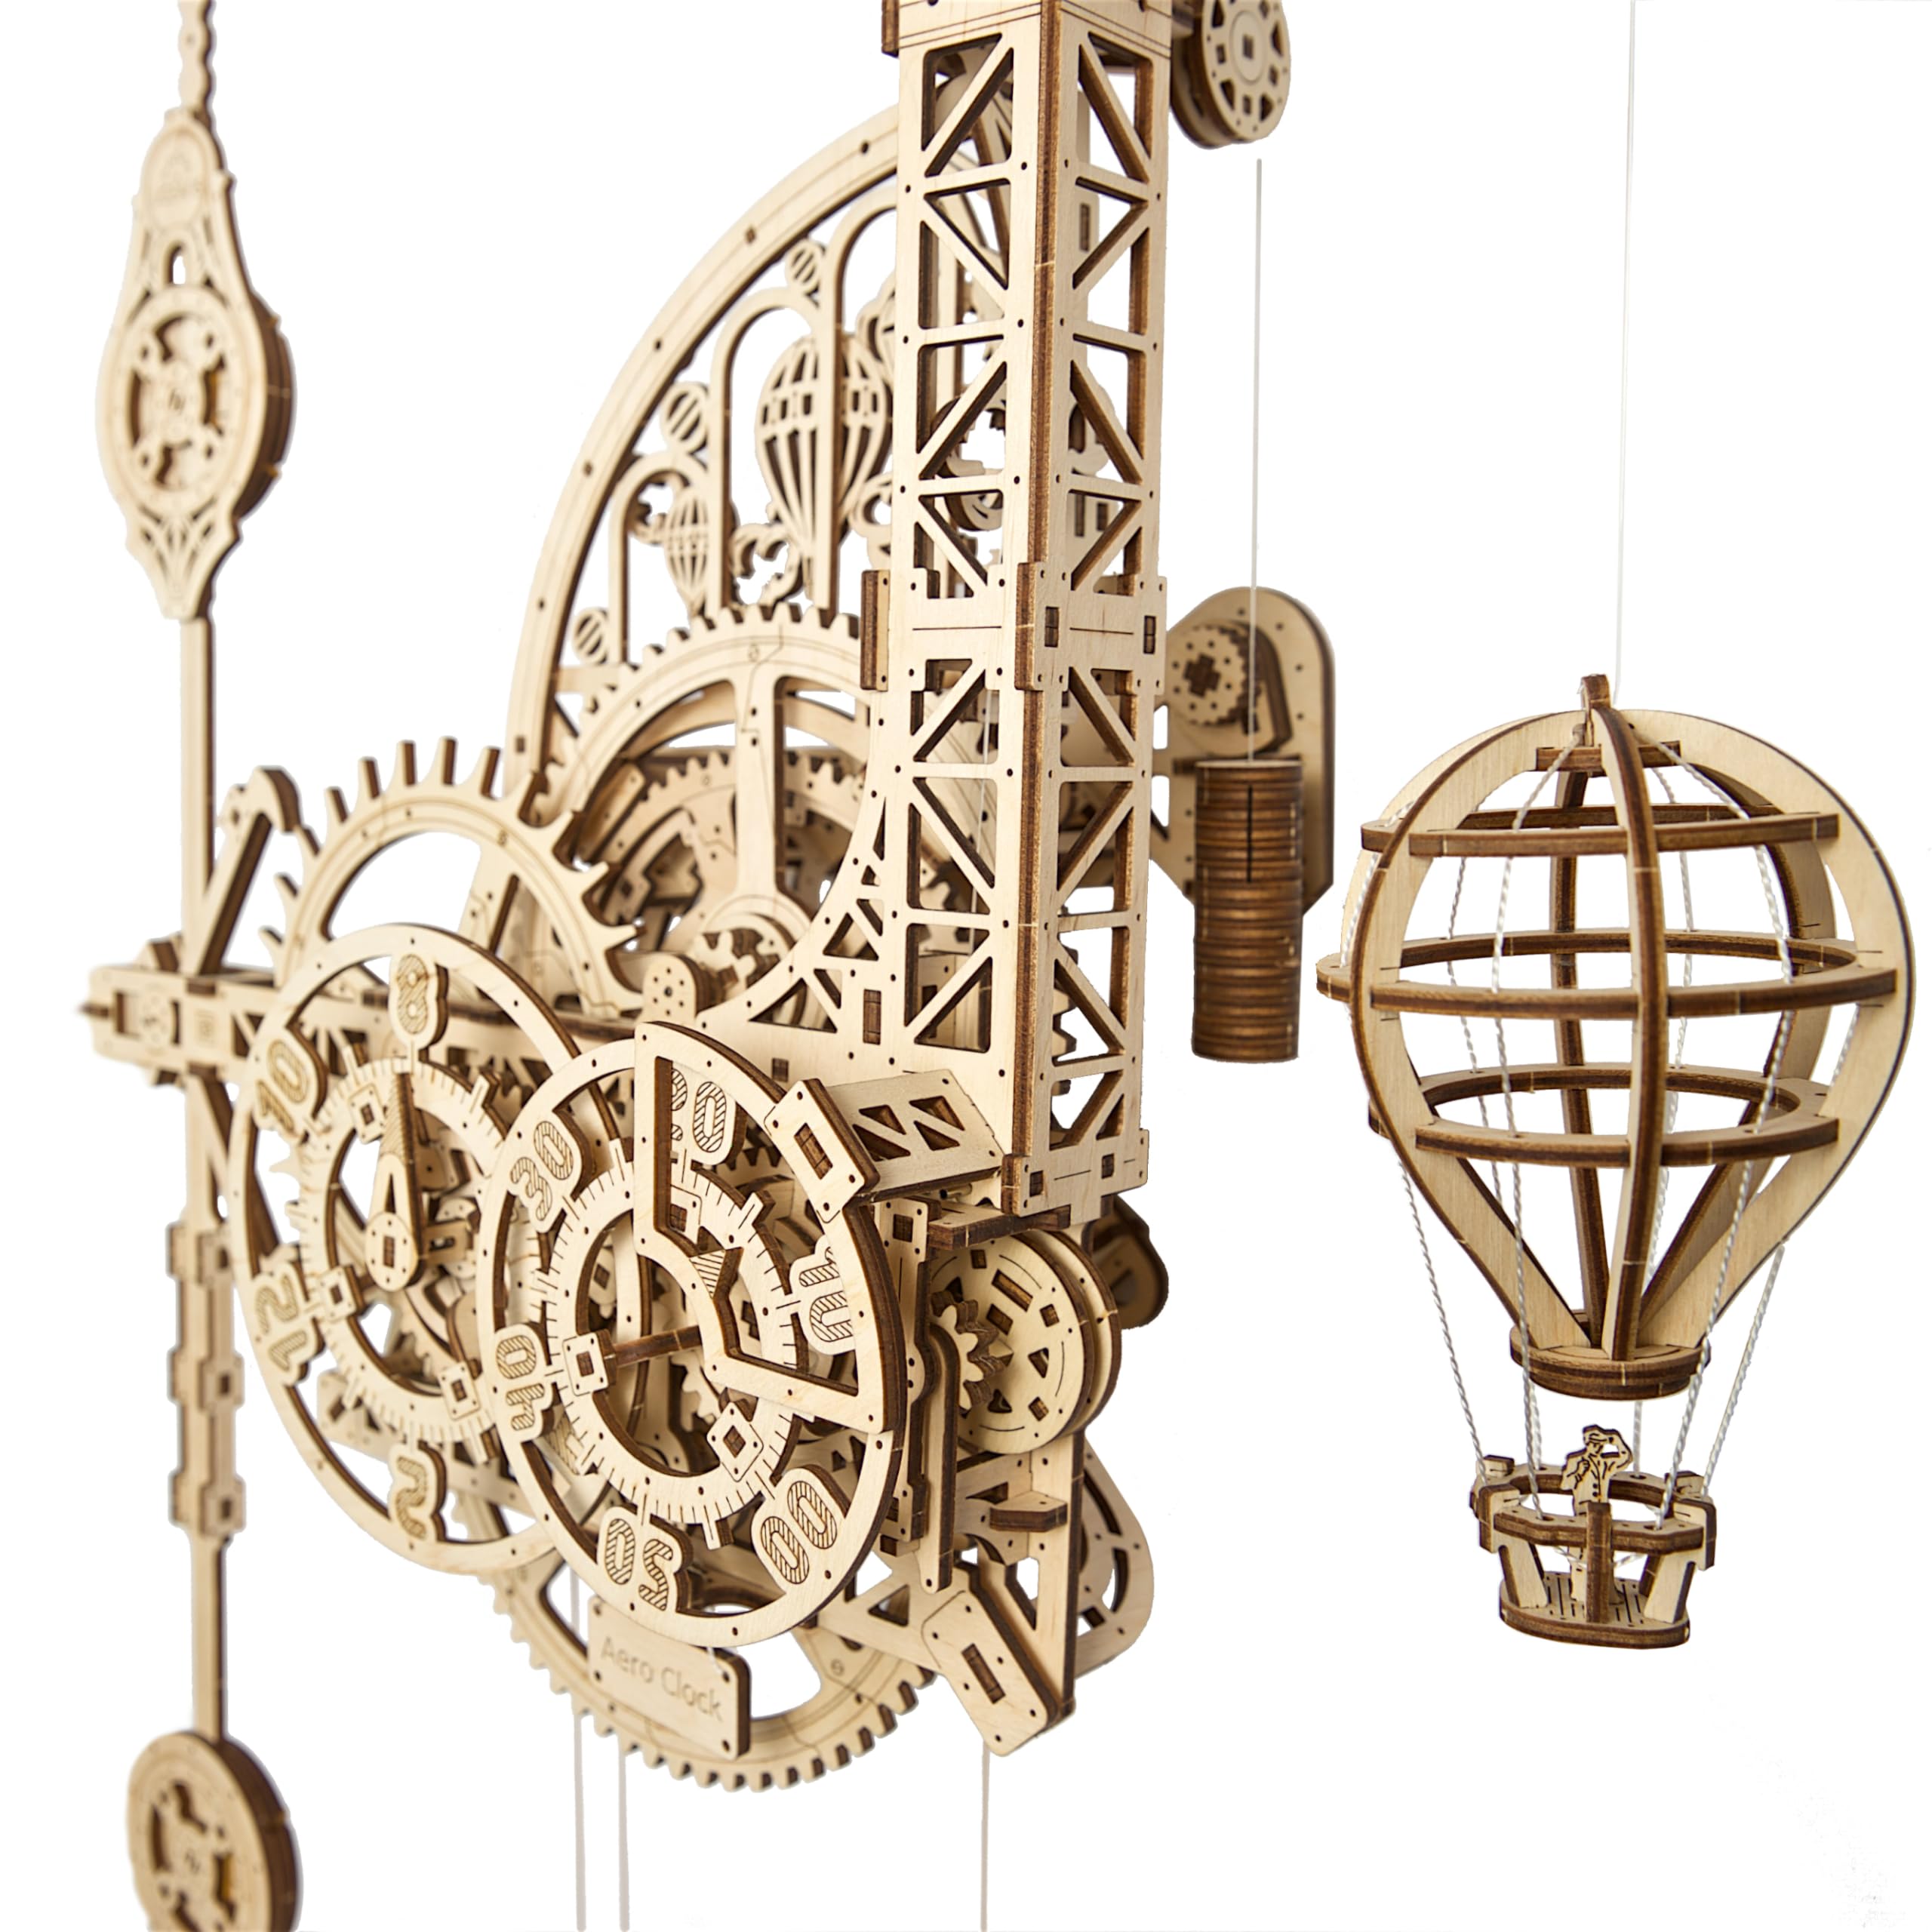
The UGEARS Aero Clock is a sophisticated 320-piece 3D wooden puzzle kit designed for adults, featuring a gravity-powered mechanical clock mechanism with rotating hour and minute discs, an adjustable pendulum, and a unique hot air balloon that descends hourly. Measuring 75x47x16.5 cm (with pendulum extension up to 220 cm), this DIY model combines authentic engineering with vintage aesthetics, offering a rewarding build experience and a stunning functional wall clock that captivates both clock enthusiasts and creative minds.


| ASIN | B094994SJT |
| Age Range Description | Adult |
| Best Sellers Rank | 30,539 in Toys & Games ( See Top 100 in Toys & Games ) 239 in 3-D Puzzles |
| Brand | UGears |
| Brand Name | UGears |
| Colour | Natural Wood |
| Country Of Origin | Ukraine |
| Customer Package Type | FFP |
| Customer Reviews | 4.4 out of 5 stars 2,464 Reviews |
| Educational Objective | Animal Recognition, Creative Thinking, Creative Thought, Logical Thinking, strategic |
| Global Trade Identification Number | 04820184121232 |
| Included Components | Waxed cord, nylon thread, line, metal axles, sandpaper, candle wax, cloth bag |
| Item Dimensions | 75 x 47 x 0.3 centimetres |
| Item Dimensions L x W | 75L x 47W centimetres |
| Item Shape | Rectangular |
| Item Type Name | 3D Mechanical Puzzle |
| Item Weight | 250 Grams |
| Manufacturer | UGEARS |
| Manufacturer Minimum Age (MONTHS) | 168.00 |
| Material Type | Engineered Wood |
| Material Type Free | Without other materials |
| Maximum Age Recommendation | 1188.00 |
| Minimum Age Recommendation | 168.00 |
| Model Number | 70154 |
| Number of Items | 1 |
| Number of Pieces | 320 |
| Number of Players | 1 |
| Number of pieces | 320 |
| Operation Mode | Manual |
| Play Activity Location | Wall |
| Power Source | Mechanical/Kinetic |
| Product Style | Vintage |
| Product dimensions | 75L x 47W centimetres |
| Puzzle Type | 3D Puzzle |
| Puzzle type | 3D Puzzle |
| Size | 750mm x 470mm x 165mm |
| Skill Level | Advanced |
| Special Features | 3D mechanical puzzle, interactive clock |
| Supported Battery Types | No battery required |
| Theme | Clocks |
| Unit Count | 1.0 count |
A**R
Great fun kit!
Great kit. Went together well. The balloon was fiddly, but all in all, great fun. And it all worked! The balloon rises, then falls on the hour. It kept stopping and eventually traced it to one of the mounting screws that wasn't fully screwed in, so it twisted the whole clock slightly. Found that 2kg of sand totally filled the weight bag. (dried it well before weighing). The minute indicator has to be turned about 7 minutes cw before the ratchet kicks it when adjusting. The pendulum "weights" could do with finer adjustments to achieve more accurate time keeping, but I'm just happy it all works 😁
D**.
Exceptional
I don't do reviews, but in the case of the Ugears aero clock I just had to make an exception. The design and construction of this kit is definitely on another level. You get what you pay for in life. The build quality is of this kit is at the highest level. All I would say to would be buyers is take your time. Yes you could probably have it all together in a far less time than the 11 hours indicated by Ugears, but the result would certainly not be a working clock. Care and attention to detail are required. Sand all rough edges and pay particular attention to those parts with mating surfaces. Anything that rubs against or contacts with another part benefits from more attention when sanding and waxing. The smoother the better. The instructions are excellent, but in my case I had some difficulty in understanding the cord winding. Youtube did however quickly solve my problem. The end result is fantastic. Visually a work of art. A work of art that actually keeps good time and a pleasure to watch as the hour sees the balloon quickly descend from its slow rise over the hour. Personally I would not consider this kit as complex. Not for a child that wants quick results, more suited to teenagers and budding teenage adults who want to spend time creating something to be proud of. If you take your time and follow the instructions carefully you will love what Ugears have helped you create. Looking foward to my next Ugears kit. Have made many hints to Santa
C**S
Fantastic.....but
On the whole this kit is fantastic, I did not find it an easy build and I have done via few things like this before. The instructions are good but some sections are a bit difficult to understand. The laser cutting of the parts is incredible. I do have a working clock after quite a lot of fettling and adjustment, however despite many attempts I could not get the balloon to rise and fall. Whenever the wheel and cog for the balloon was added the clock stopped. At the moment I am happy enough with the clock and might try to get the balloon working later
G**M
Amazing when built
Probably needs someone who's patient and good with their hands. That's not me... just as well it was a present for a family member! He's built it and it looks amazing!
B**T
Great kit, you will only get out what you put in.
A great kit, yes it’s tricky, yes it may not fully work if you do it wrong, clocks are a feat of math and engineering, anyone expecting more than a semi functional model is not understanding what goes into a real timepeice. For what it is I loved it, in fact I will make another but decorate this time. It’s not for the feint of heart or beginner yes, however! Anyone can build it if you can follow a picture instruction book and have good glasses. Not all will get it working. Time to build of 11 hours they say, yes I agree. You need to sand, wax and smooth parts for nice low friction movement. If you just pop out the parts, put them together it could take 3 hours too. It will not work and then you will give it less stars. So this where the advanced builder comes in. Advanced builder will take their time and make a nice model that functions at a basic level. For the impatient builder you will still achieve a nice model that will not function for long. Think what type of builder you are and expect the result that you put in. The kit: Read the instructions Read the instructions again Follow the instructions (mainly for us men who believe manuals are for putting your cups on) Very well laser cut, did not need a knife in my case Get more wax and check out YouTube on how to wax cogs Wax the cord Buy good sandpaper and smooth all parts for low friction movement Sand all cut edges where you can, the laser leaves joins to keep it framed in transit, these need removing Have patience The correct weight will be important in the bag, try lead shot rather than sand Weight on the balloon counterweight is also important to slow down the balloon drop when running. Test each cog as the kit comes together for friction and movement Make sure you hang on the wall to complete, if you try to build first, hang later you will tangle your cords and lines It’s a model clock, please do expect to get the correct time after 5 minutes of use It’s also quite sturdy once built Have fun building it, that is the overall aim, it’s a great achievement no matter how far you get. Sorry! It’s a long review but I found it a great model to work on and looks good on my wall
R**T
A great kit. Not easy to build but with care it works out of the box.
I bought this purely on the look of it, but after reading up a bit, was unsure if it would actually work. The instructions a very good but you do need to pay a lot of attention to them and understand exactly what they are trying to tell you. The instructions are very pictorial with very little text. The most complex part is the final assembly and threading of the cord. The best tips to ensure your clock runs are: 1: spend a lot of time with the sandpaper making 100% sure the edges of the cut wood are smooth and free of ridges left by the laser cutting. 2: The small round washer things are actually bearings that run on their outer edge, so make sure these are really nice and smooth and test them in the holes they go in to make sure they don't bind or have any tight spots. Slide them onto the stick tool so you can rotate them against the sandpaper to get them are true and smooth as possible. 3: The wax is applied as a lubricant. I used a lighter to melt the wax after I'd applied it, so it soaked into the wood. 4: When you assemble the gears, make 100% sure they run true. There's no obvious way to ensure the gear is sitting dead square on its shaft unless you make up a jig. You just have to tap the gears home and make sure they are seated flush. Then check that they run true and don't wobble once put into the clock. This is the main reason the clock will stop itself. Mine still are not perfectly true and you can see them wobble a little as the spin during the 'spin test' (see no. 5) 5: Once assembled, disengague the pendulum and let the weight run the mechanism at high speed. Do this a few times. It helps bed in the gears and bearings and it also allows you to see if you have any wobbly gears. You'll also hear if anything is rubbing. It should all spin smooth and at a consistent speed. Then put the pendulum back in and it should run perfectly. Its a fantastic kit. It's ticking away as I write this and the balloon is just about to do its hourly drop!
J**S
Fantastic Product
I'm not normally in the habit of writing reviews but I've enjoyed building this clock and had such satisfaction from seeing it running. The kit is not for the feint hearted, and I've had prior experience of building wooden kit models so I knew the care and attention required when pressing out, and push fitting the pieces. Do not underestimate the importance of sanding and waxing (I used petroleum jelly) the moving parts. It did take a little tweaking and troubleshooting, but in the end I have a fully working clock including the balloon drop!
J**K
Build Started.
Just started the build, I need two pairs of glasses to see, because I'm old😂. As a retired Engineer, I'm very impressed with the drawings, instructions and quality. Can't wait to finish it. Hope you enjoy my Witt.
Trustpilot
2 months ago
3 days ago