


Buy anything from 5,000+ international stores. One checkout price. No surprise fees. Join 2M+ shoppers on Desertcart.
Desertcart purchases this item on your behalf and handles shipping, customs, and support to Senegal.
🌿 Grow Bold, Grow Smart — Your Year-Round Garden Sanctuary Awaits!
The Palram Canopia Rion Grand Gardener 2 is a large, durable greenhouse featuring 6mm twin-wall polycarbonate panels and a heavy-duty resin frame. Designed for easy DIY assembly without tools, it offers ample headroom and multiple vents for superior airflow. Its UV-protected panels provide consistent light diffusion and privacy, making it an ideal, maintenance-free solution for professional gardeners seeking reliable, year-round plant cultivation.


| ASIN | B00M5J2Z8O |
| Best Sellers Rank | #1,073,282 in Patio, Lawn & Garden ( See Top 100 in Patio, Lawn & Garden ) #2,121 in Greenhouses (Patio, Lawn & Garden) |
| Brand | Palram |
| Brand Name | Palram |
| Closure Type | Manual |
| Color | Twin Wall |
| Cover Material | Polycarbonate (PC) |
| Customer Reviews | 3.4 out of 5 stars 61 Reviews |
| Door Style | French Door |
| Frame Material | Aluminum |
| Item Dimensions L x W x H | 104"L x 105"W x 93.5"H |
| Item Type Name | Greenhouse |
| Item Weight | 224.8 Pounds |
| Manufacturer | Poly-Tex Inc - DROPSHIP |
| Manufacturer Contact Information | 877-627-8476 |
| Manufacturer Part Number | HG7208 |
| Model Number | HG7208 |
| Nominal Wall Thickness | 0.23622 inches |
| Number Of Vents | 1 |
| Number of Doors | 2 |
| Product Dimensions | 104"L x 105"W x 93.5"H |
| Size | 8' x 8' |
| UPC | 763552402738 |
| Unit Count | 1.0 Count |
M**I
Nice Greenhouse...Time Will Tell
Ordered the Rion Grand Gardener 2 8'x16' Twin-Wall Opaque greenhouse. Took 3.5 weeks to deliver. The instruction manual is all photos, no instructions. My advice is start from the back of the manual and work towards the front of the manual. I did this to make the greenhouse very secure from high winds: 1. I modified the roof so the 3 vents would be secure by adding 2 2.5" (modified) metal hinges to each vent (photo below showing roof vent hinge bolt from the inside), which I bolted to the hinge frame. 2. I also screwed 1 2.5" metal roofing screw (with rubber seals) in the middle of the rails that hold the panels onto the roof, as the flimsy pvc connectors were sure to detach in strong winds, because that's all that holds the roof panels onto the roof. 3. I also used 4 2.5" screws to hold down the 4-point caps onto the roof, and 3 2.5" screws on the 3-point end caps on the roof. 4. I attached the frame to treated 4x4 beams with 3" dry-wall screws, then hammered 6 2' pieces of rebar (1-3/4' deep) at angels on the outside of the base (3 on each side), then attached them to the 4x4's with clamps, then placed huge rocks all along the outside of the base to hold down the greenhouse and to make it unmovable. We'll see if this greenhouse holds up, as we had 50mph winds 4 days ago, and it's snowing for the 3rd time this winter, and it's only October. UPDATE: It's now July 2020, and at 8,500' and lots of snow, the greenhouse held up very well during the winter. I used a snowrake to remove snow on the top. We had strong 60mph winds days ago & the vents are very secure with the addition of the vent metal hinges that I added. Greenhouse is very secure with no movements whatsoever, with the addition of the 6 rebar rods, the 4x4 base, and a ton of large rocks around the base. The flimsly vent channel that holds the vents onto the roof will not hold up in high winds because the channel will flex slightly and the winds will blow them off. No problems here. UPDATE: All polycarbonate panels are pre-cut to the correct size. Do NOT cut any of the panels or they will not fit correctly and the winds will blow them out. UPDATE: I built and installed 2 pollen-proof exhaust fan vent boxes and 3 pollen-proof roof vent boxes to keep pollen out of the greenhouse. Works very well, as we had no contamination this year. I also replaced the manual plastic vent openers with automatic metal vent openers. UPDATE: Vent Hinges. National Hardware N127-365 V280 2-Inch Light Strap Hinges_Zinc-plated_2-pack (These are the hinges I used/modified). the hinges must be bent to fit outside of vent box and outside of vent box container (for a custom fit), then drill holes into vent box and vent box container, then bolt together with bolts, nuts, washers and lock washers. Be sure to CENTER vent box BEFORE drilling holes in vent box container OR vents will not open/close properly. UPDATE: 04/2021. Greenhouse survived the 2020-2021 winter just fine. Fully intact (thanks to my extra efforts to make it so) with no problems whatsoever. I like this greenhouse so much that a friend is buying one (their second greenhouse). They are making the improvements above to secure the greenhouse. Someone here had a Rion just like mine, but they obviously assembled it without making that extra effort to keep it intact, and the winds totally destroyed it. Live and learn. UPDATE: 05/28/2023. Greenhouse is still solid & secure, no problems whatsoever. UPDATE: 05/01/2024. Greenhouse is still 100% secure & solid as this is our 6th year using it. The 50-60-70mph winds blow right by it, no movement whatsoever. For those having the wind blow the vent windows out, you MUST use hinges to secure the windows to the frame box & use screws on the top to keep everything intact.
S**E
Great Greenhouse but not perfectly engineered.
I ordered the 8x12 and it arrived in 4 boxes - one for the front 2 foot section, one for the back 2 foot section and 2 for the middle 4 foot section. Be warned: there are close to 1,000 pieces in these boxes. But don't be put off by that, most of them are very small connectors to hold the joints of the larger pieces together. It took me about 20 hours to put this greenhouse together by myself. Here are my thoughts about that process and the pros and cons I experienced: As I said above the boxes contain the pieces to specific areas of the greenhouse so it will help to have plenty of room to arrange these boxes accordingly. The instructions are are virtually wordless, pictures articulate the assembly process, and are specific to the smaller 8x8 greenhouse, so quantities need to be increased when gathering the required parts for larger structures. Just keep that in mind as you proceed. As with any instructional set primarily done with pictures pay very close attention to the orientation of the pieces during construction. Each of these individual pieces has a label attached with a part # for easy reference and assembly. They are also water resistant so don't worry if you are putting this together in the rain (as I did), they will stay on and still be readable. VERY IMPORTANT: The greenhouse I purchased was the 8x12 model. However, IT IS NOT 8x12. I made the assumption that I could lay the foundation prior to the arrival and assembly of the greenhouse. This was a mistake as the actually foundation measurements of the greenhouse were several inches beyond that both length and width. As with any product of this nature (i.e., somewhat flimsy), the foundation is the key. So I recommend you NOT set this greenhouse directly on the ground, rather buy enough 4x4 treated lumber to form the foundation and level these out perfectly and squarely. Then, using 8 inch long galvanized screws with washers, fasten the corners to hold this foundation together. Inside for the floor use whatever you desire. I used 16" square red pavers with enough space in between for pea gravel for drainage. Of course you'll want this space to be as level as possible if you do something similar. But I digress. The reason I opted for 4x4 treated lumber is so that I could have a strong and fairly heavy foundation to screw the bottom rails of the greenhouse down to. Each two foot section of the greenhouse foundation has holes for exactly this purpose and you can use 3 inch decking screws, they'll work perfectly. Construction is pretty simple and straightforward. Gathering the required pieces from the various boxes can be tedious. But they go together well and are engineered so that once it is fully assembled the structure will provide adequate strength. I live in a fairly windy area, but the placement of my greenhouse (near the corner of a fence) will provide additional protections. What does give me concern are the clear side panels of the greenhouse. They are flimsy and are only held in place via slots in the structures of the walls. The greenhouse did come with a rubber seal that is supposed to go around each of these clear wall panels to further provide keeping them in place and increased protection from the cold (I assume?), but I have yet been able to install these with any success and for now they lay in a bundle on the floor in the greenhouse until I can come up with a solution. This is without a doubt one of the poorly designed elements of the greenhouse. The doors of the greenhouse is another poorly designed element - at least how to secure the second (french door) if you desire to only use the single door. This door uses two fence gate style slide latches mounted vertically. One at the top of the door and one at the bottom of the door. However, they are woefully designed and to get them to function properly is going to require some creative engineering on my part. Last element of failure on the part of the engineers that designed this greenhouse: they were thoughtful enough to provide a cabling system (4 of them in my 8x12 greenhouse) to hang hanging baskets from. Great idea! Poorly executed. I'm pretty handy, but it is impossible to install these cables as designed. I was able to partially install them so as to make use of them, but I'm not confident with it so I won't be putting too much weight on them. Overall, I am pleased with the greenhouse. And it's going to provide several years of growing pleasure in my backyard. The design issues that I've mentioned aside, it's a quality product that otherwise seems very well thought out and implemented. Would I buy it again for what I paid? Good question. Probably. But knowing of these design faults I would suggest that they lower the price of the greenhouse by about $200. Either that, or go back to engineering and fix these issues. UPDATE 03/25/2022: The greenhouse still stands and it still in great shape. It has survived winters with a foot of snow on the roof. I would recommend removing that much snow as soon as possible, as I could see stress on the structure. But it did hold it until I could sweep it off. Would I buy it again? Yes.
S**.
Less sturdy than I could have possibly imagined
The plastic frame is cheap, and just of poor, poor quality. After 5 months I'm still trying to figure out how to brace it so that I'm not terrified that it will be destroyed by the slightest breeze. Honestly, the best case scenario might be that a tree falls on it so that my insurance will cover the cost, and I can just throw the damn thing out. Unimpressed on every level.
T**Y
Reinforcements required
The 80 or so pages of instructions are not very helpful. You have to poke around the internet to find youtube videos of other experiences. It says nothing about building the roof on the ground and attaching it as one piece. If you don't, it's very difficult to reach over to work on the roof from the outside. The skylights are junk. The "hinges" (more like just a metal catch) are about 1/8". This does not hold up to any significant wind. You must drill into the frame and add your own hinges to reinforce and hold the things on. Do it on the ground BEFORE you raise the roof, or you'll be very sorry. The frame lasted 3 years in Minnesota winters. Just bought this one to replace the first roof, which completely collapsed and was shattered, by snow load. This time, I will build wood framing on the inside to reinforce the roof strength. Full disclosure, I have the 20' x 8' model, so the middle gets very weak. The panels themselves are light, and it serves as a nice greenhouse. However, it gets WAY too hot. Suggest cutting a fan into the side to pull in cool air to then vent out the skylights. The skylights themselves don't do it. Not enough air flow. OK, so I liked it enough to replace the busted one, but if starting all over, I think I'd look at other options. Not terrible for the money, but it really depends on your local environment.
M**N
We got the 8x12 Grand Gardener and it's very nice, but it is a real bear to assemble
We got the 8x12 Grand Gardener and it's very nice, but it is a real bear to assemble. Hundreds of small to large parts. The instructions are nothing but drawings, no text at all, so some things you have to reason out. The top frame where it joins the middle section is on an angle and next to impossible to get the polycarbonate sheets to seat properly. ***Edit*** After having this greenhouse for a short time I can tell you that customer service is terrible, and rude. I ordered a part, my credit card was charged, and 2 weeks later I haven't had a confirmation of shipment. I called them and they said the part was on backorder and they just got it today, so it will be shipping to me. Would have been great if someone told me 2 weeks ago it was on backorder. Ben, with customer service is a rude guy. Needs to learn how to deal with the public.
S**A
Real fun-to-build project - not an afternoon quick assembly
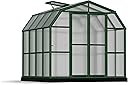
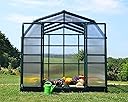
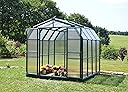
Been a year (built june 2020) and still adding to it. Older, more verbose document available - with part descriptions: Search for Hobby_Assemble_E.pdf with Google to locate the older document. The doc is actually for the ‘Hobby Gardener’, but it relates (well, almost, except you now build the roof on the greenhouse frame, rather than assembling the roof separately, and lifting/setting it on top). It will be helpful in assembly because it augments the supplied pictorial instructions with text. It also labels the panels with part numbers and supplies a description of every part. Note: extra pins are included (We worried about this with our assembly - chasing down any stupid pin that bounced up and away, while assembling!). Assembly: Lessons Learned (In no particular order...) We would advise doing a detailed inventory of all parts before you start. It will familiarize you with all the pieces and also give you a jump on getting a replacement part if needed. Our 8 x20 arrived in 6 boxes - about 400 pounds pf parts. I bet we spent 100 hours from start to finish. That includes digging up asphalt in the driveway to make a place for it, and trenching over to and under it for electrical and water hookups. - Foundation Note (real important!): As others have stated, you will not get this greenhouse assembled unless your base is true and square. Make absolutely sure your 2 diagonals are exactly equal and the base is level/true/square. A small dimensional error on the base adds up to serious misalignment as you progress with the big 8x20 greenhouse. - Panel install: We found flipping the panels helped, if it was not fitting all the way down. Use the pin insertion tool wood edge to run along the obstinate panel edge so it won’t stick out and interfere with proper seating in the slot. Soap and water spray (1 to 4 ratio) helped tremendously in assembly. We used a Ratchet strap to pull top triangles bar of frame together for pinning front and pinning back. - Panel prep/cleaning: We used the pin insertion tool wooden side (supplied for panel seating into slots and inserting Pin1 pins ) to scrape labels off & Goo Gone (let it soak in for a minute) to remove glue residue. We used a Bosch GLL 30s leveler for getting base true/level. - Foundation: We used 8 foot long 4x4s, as suggested by others, and T37 Tie Plates from home depot to attach 4x4 to each other (both sides). - Foundation anchors: We used galvanized steel GroundGrabba 1 foot screw-in tent stakes through middle of the 8 footer 4x4s to anchor to ground (needed impact driver to put them in place. We screwed the Tent stakes (groundgrabba) thru the center of each 8 footer. We used a 2 inch drill bit to make a countersink in the 4x4 for the head of the tent stake screw, and a 1 inch drill bit for the hole thru the 4x4. One 3/4 inch washer for each tent stake. Tent stake head seats down inside 1 inch countersink in the 4x4. 3 inch deck screws used to attach the greenhouse base to the 4x4s. Got the Groundgrabba accessory pack with 12 inch long 1/2 inch masonry drill to make pilot holes into the hard packed ground. We could not get the 4 stakes into the ground without first making a pilot hole in the ground and then using an impact driver. Used an oscillating tool to precision-dig up hardpan dirt for inserting square pavers as shims and leveling 4x4s. - Vent fans: We mounted 4 solar (14 inch blade ) powered fans. 2 are on the top back square panels blowing out. 2 are on the bottom panels either side of the doors, blowing inward ( Amtrak Solar Powerful 50-Watt Galvanized Steel New Upgraded 14" Fan Housing from Amazon). To eliminate panel vibration, we cut 15/32 inch thick wooden paneling and fitted it from the inside, for each of the 4 fan panels. Hunter green satin paint was a pretty close match. We cut a 1/2 inch hole on the side of each fan, and mounted an on/off switch. To keep the wiring from getting uv exposed, we ran 1/2 inch (hunter green painted) pvc on the outside, along the frame, to house the fan-to-solar-pane wiring. We popped some existing plastic T-pins out of the frame and looped tie wraps thru the holes, to secure the pvc in place, against the frame. - Tools: As others have suggested, get a rubber mallet but be gentle with it. We used Vice grips to hold the allen wrench for removing any occasional misplaced or out-of-order PIN. Pin removal example: Near the end of the assembly you are asked to remove a pin from 18 places inside the roof, to be able to secure the 9 tensioning cables (could double as plant holders, i guess, but they are there for structural integrity). We also found it easier to insert the 9 tensioning cable hooks inside top, if we temporarily removed the pin close to where we were pushing in the cable hook. - General: the build: The build will go a lot faster if the non-sequential tasks get done at the same time by others helping you: assemble the 2 front doors. assemble the 4 ceiling vents (4 for 8x20) get the base prepped level/square/true. handle fetching all the parts from 6 boxes. scrape labels off assembled parts with wooden side of pin insertion tool and use Goo Gone to remove glue residue, after part# no longer needed. - Re-seating panels: We found that the edge of the panels sometimes got flared if we attempted to seat them and then chose to flip them, and put them in the other way. We used the wooden part of the pin insertion tool to push the panel edge back in shape. Some PN60 bottom and middle panels are a touch wider than others, so be prepared to shuffle. if one is too tight, attempting to insert in frame, it might fit perfectly a few frames further over. We don’t advise trimming/shaving any panel edges - you’ll want a tight fit. - Tech support: We called tech support a few times - always treated well. Expect 10-14 days for any replacement parts to arrive (Free). - Instructions: The International instructions are incredibly good (like the airline laminates showing plane exits, safety features, etc.). If it shows no pin insertion, do not insert pins there. What you see is what you have to do. Keep all back section parts together and all front section parts together. Read thru all directions a couple time to know what to expect. We would absolutely buy/build this kit again if we could go back and choose. You can find the instruction manual online to download and review before committing to this. Nov 2020 update: - Installing hooks/eyelets: We wanted a place to attach LED growlight fixtures. We removed the plastic lock pins directly above where the tensioning wires are strung inside the roof. We screwed Everbilt screw eyes (#4 Zinc 25 pieces part# 727 401) from Home Depot into the holes. We added more of the screw eyes to create places on the outside to attach the 6’ x 20’ sections of shade cloth. Probably 30+ screw eyes now on the outside and just as many installed on the inside. -Electrical: We used home depot 5 1/2 inch wide fencing wood to make vertical strips for attaching our electrical outlets. We cut the fencing to 59 inch lengths, and installed them over the front of the existing vertical plastic frame. We used the existing pin holes to bolt the wood in place. - Flooring: For the floor, we placed 18 cement pavers down the middle, in pairs. Each paver is 24 inches square. That made a 4 foot wide path down the middle. We put weed cloth down and mulched on either side of the pavers. Update Feb 2021 - shade: Over 100 degrees in there, so… Added UV 6’ x 20’ shade fabric (3 layers) to top and sides outside to soften the harshness of the sun. Dropped the temp by 20+ degrees! We had to put grommets through the plastic shade material - it was a challenge - ended up melting the grommet holes with a soldering iron and then installing the grommet - a quick and effective method. We bound the grommets of one shade sheet edge (every foot) tightly to the grommets of the next shade sheet, using zip ties through the grommets. We used 3/8 inch nylon rope to tie it in place, looped thru eyelets, which are installed in place of locking pins on the outside. We found that a piece of round black electrical power cord was a perfect fit to pinch the edge of the shade fabric along the bottom edge in the u-channel of the roof window vents. It secures the bottom of the flap we had to cut in the shade material so the vents would still open. - Temperature monitoring + heat pads: Added 2 foot x 4 foot heat pads to each of 6 benches. Each heat pad has a wall-mount controller and a temperature probe. - Heatpad enable/disable Solution: We found that sometimes we just wanted the temperature monitoring and it got to be a nuisance to have to unplug the heatpad from the controller every time. So... We added an on/off switch (white item with red switch in the picture) to the heatpad a/c plug (see pic). 6-Pack Luxtronic White Grounded On/Off Power Switch with Red Light ETL (6). Works perfectly.
G**R
Very Pleased with my Rion Greenhouse
I'm very pleased with my Rion greenhouse. I would actually give it 4.5 stars rather than 5 because one of the construction pieces was the wrong piece - a numbered piece that must have been for another Rion product as it's number was not listed in the enclosures manifest. However, I called the 888 number provided and someone answered right away and I told them the missing piece number and they sent out a replacement right away via FedEx so it was just a couple days and I was able to install the greenhouse without it and just fit it in later when the piece arrived so all good. There are a lot of parts to this (I bought a bigger one) so I am more forgiving. I would recommend you take extra effort to make sure this is on LEVEL ground as it will make construction easier. Now it's all built and in place and is very sturdy and looks very nice in the yard, adding to the beauty of the garden rather than dtracting (much nicer than if I had made one myself with wood and plastic!)
T**S
Totally recommended
A couple months in, several wind storms, and a lot rain...she's doing well. Not much r value on the clear "blister pack" panels, but looks like they will hold up. As for people's assembly concerns, I had no problems. Take your time on the base, keep quietly singing "It's Hip to be Square", and everything else goes relatively smoothly. Impressive actually. Couple other tips...1 take your time on the "windows". I didn't check a few to make sure they were seated properly and square...paid for it later. 2 wrap 'the tool' in a kitchen towel - there are so many of those little connectors, the palm of your hand will thank you. And yes, I can totally imagine that if a large branch fell on this, it'd be toast. Don't build under a tree. We're using ours for more sitting than growing and the extra head room of this design is awesome. You should get one. Good stuff.
Trustpilot
5 days ago
1 week ago