


❄️ Keep Your Cool with Style!
The GeeekPi Raspberry Pi 4 Case with ICE Tower Cooler is a premium cooling solution designed specifically for the Raspberry Pi 4 Model B. This all-in-one package includes a 5-layer acrylic case, a powerful 4010 fan kit, and essential accessories for easy setup. Weighing only 259g, it combines functionality with a sleek design, ensuring your Raspberry Pi runs efficiently while looking great.
| ASIN | B07ZCX5KG6 |
| Are Batteries Included | No |
| Best Sellers Rank | 208,947 in Computers & Accessories ( See Top 100 in Computers & Accessories ) 920 in Barebone PCs |
| Brand | GeeekPi |
| Customer Reviews | 4.4 4.4 out of 5 stars (421) |
| Date First Available | 21 Oct. 2019 |
| Guaranteed software updates until | unknown |
| Item Weight | 259 g |
| Manufacturer | GeeekPi |
| Manufacturer reference | K-0401 |
| Number of USB 2.0 Ports | 2 |
| Package Dimensions | 11.2 x 10.9 x 8.71 cm; 259 g |
| Voltage | 12 Volts (DC) |
| Wattage | 1.5 watts |
K**N
Silence is golden or should that be RGB colours...
Having come from the official pi case (which was really noisy). On first impressions this heatsink and fan is amazing.. totally silent and that's with fan plugged in. Haven't stress tested it yet so not sure if it gets any louder. Case is a bit fiddly but that's probably because I didn't check the instructions first.. if the RGB colours aren't your thing it also comes with a normal fan. Haven't tested this so can't be sure If this its silent but I'd imagine it would be. Very happy with the purchase
G**E
I made 2 kits from this.
Enough parts to make 2 kits from this. It's pretty sick. I've got them both on 3.3v to keep noise down. Only down side is that the perspex screw hole near the POE header is a weak spot and broke off relatively easily when screwing. Otherwise good invention.
B**Y
Ice cooling Tower Raspberry pi 4 -Great!
Quick delivery and good packaging.Unboxing was straightforward. All parts and components complete and nothing missing.Extra parts included,these are:Heat sinks X3 added but not the best . So I replaced the 2 Nd Micro chip with a bigger Black heatsink 1 .Black cooling fan ×1 2.RGB cooling fan ×2 3.Base plate ×1 plus extra screws and nuts for 2 types of Ice tower configurations a.High cooling Tower utilizing (4) case plates ,2 Black and (2 ) clear b.low Cooling Tower utilizing 2 clear plates only. Assembly was easy for experienced users like myself.Instrustions not needed but always good to crosscheck. Connection and boot up straight away. Fantastic aurora led lighting effects effects! Professional job appearance! Cools like the artic circle!Brrrrrrrrrr! Never overclock your pi4!Wow!!!!! This product is not flawed.! Yes it does not touch the base plates. It's principle is cooling hot air rising and circulation from the pi. The coolant block heat sink is always cool so the fan blows directly into it's honeycomb heat sinks and circulation of cold air ensures. Only a fool would not see the temperature levels drop on the terminal to know it works. How about disconnecting the fan and removing the coolant block. Then you'll have minimal cooling from the heat sinks only. 4 stars as you may have to run a performance CPU test. Does that ice tower usage affect CPU? Until then no one knows.?
B**N
Great cooling fan
Easy to put together using the instructions. The heat sync combined with the fan keeps the raspberry pi stone cold! Great product! Would definitely get another!
A**R
works great
i love this it looks great on my desk and the cooler is really effective - it has abit of rgb too which looks great i can overclock the Pi to 2200mhz easy with no heat issues (max 35 degrees) the case is really effective in protecting the circuit boards of the Pi itself, but still allows access to the pins great pice of kit 10/10
D**.
A must if you want to overclock your RPi
Excellent, the cooler works perfectly, keeping the RPi4 temperature low even with overclocking. And it also looks great. Just watch the video as the assembling could be a bit tricky, but nothing major.
A**R
ICE Tower Cooler does NOT touch CPU using the GeeekPi case.
The ICE Tower CPU Cooler and Fan does NOT fit with this supplied case properly. The heat sink does NOT make contact with the processor. The perspex pieces (or at least one of them), are a fraction too thick, thus one should be shaved down by .5mm or so, else resort to using copper shims to plug the gap. I ended up not using the case, thus leaving the Pi 4B open with the Tower cooler fitted. Much preferred to have had the Pi in the case which is why I bought it. Wast of money. Saying that, the actual GeeekPi case is well made and does fit around the Pi 4B rather nicely, just need to make it work with the ICE Tower Cooler and it would be perfect.
F**S
A true cooler for rasberry
Excellent packages, also the thermal pads are excellent. With thermal pads with overclocked rasbi3,the temprature is limited in 47C
M**.
The Geeekpi ice tower looks beautiful when installed on the Raspberry Pi 4 and it really seems to cool my system down when running stress tests. However, I was disappointed by the quality control of the product. The cooling block itself seemed to be a bit loose. With only a small amount of force, I was able to tilt the cooling block left and right, even when I tightened all screws properly. The reason for this is, is that the cooling block itself is attached (out of the box) with a small piece of aluminium which contains screw holes. Using these screw holes you can attach the cooling block on the Pi. In my case, I found that the cooling block itself loosely connected to this small aluminium block. I do not know how these two parts are connected to eachother in the factory (perhaps glue, or simply wedged together), but I couldn't bother to look into that and fix it myself. I simply returned it right away the same day. Since I think this could possibly a simple product defect and I was out of luck, I decide to give it 4 stars anways and perhaps re-order it later.
G**O
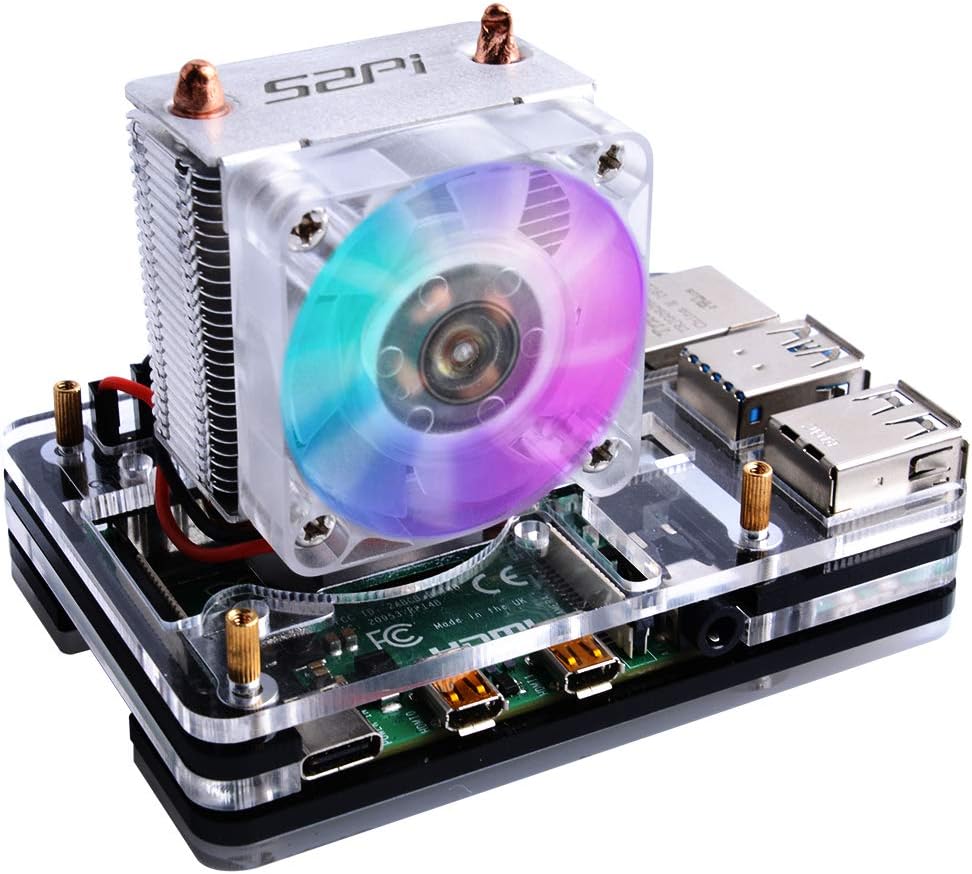
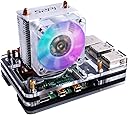
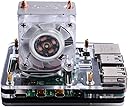
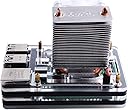
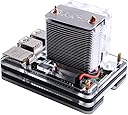
Il Raspberry Pi 4 porta con sé un indubbio aggiornamento di prestazioni rispetto alle versioni precedenti; tuttavia, le maggiori prestazioni hanno un costo, in termini di consumo energetico e di produzione di calore del SoC. Già nell’uso quotidiano il Raspberry Pi può generare una grande quantità di calore (si arriva facilmente ai 60 gradi Celsius). Per molti utenti, un Raspberry Pi 4 funziona perfettamente senza alcun raffreddamento aggiuntivo. Il problema si presenta quando si esegue un carico di lavoro che utilizza la CPU e/o la GPU per più di circa tre minuti e mezzo. Dopo questo periodo di tempo, il SoC ha raggiunto la sua temperatura operativa massima di 80 gradi Celsius: a quel punto si ridurrà automaticamente a 1GHz rispetto agli 1,5GHz di serie. Se il carico di lavoro continua, il SoC continuerà a rimbalzare tra il funzionamento a velocità massima e ridotta fino a quando non avrà la possibilità di raffreddarsi. Per ottenere prestazioni massime sostenute, la temperatura del SoC deve essere mantenuta al di sotto degli 80 gradi Celsius. Tra le diverse soluzioni ideate dalla comunità per il raffreddamento del Raspberry Pi 4, l’Ice Tower progettata da 52Pi è sicuramente la migliore, con la sua ventola colorata, brillante e lampeggiante. Ha una struttura a torre, tubo di rame da 5 mm, dissipatori di calore multistrato e potente ventola a sette pale, rendendo il sistema un super radiatore per il Raspberry Pi. L'Ice Tower 52Pi si ispira ai dissipatori di calore raffreddati a ventola (HSF) in stile torre a stack singolo che dominano il mercato dei PC desktop. Quando viene disimballato dalla scatola, si resta impressionati per la quantità di accessori presenti all’interno: • 2 x barre di fissaggio in acciaio (adatto per Raspberry Pi 3B+/4B); • 1 x ventola LED per l’Ice Tower; • 1 x ventola nera per l’Ice Tower; • 8 x M2.5x6+6 colonne di rame; • 4 x M2.5 dadi; • 6 x M2.5x6 viti; • 3 x pad termici; • 1 x pannello di protezione acrilico trasparente (ricordatevi di togliere la pellicola, altrimenti è opaco); • 1 x mini cacciavite. Questo ciò che troviamo nella confezione propriamente dell’Ice Tower. È presente poi una seconda confezione, che contiene la custodia acrilica a cinque strati, e non finiscono gli accessori: • 1 x ventola a LED blu trasparente; • 1 x cuscinetti antiscivolo; • 4 x viti e dadi per applicare la ventola in posizione orizzontale direttamente sulla custodia; • 4 x viti e dadi per il fissaggio delle parti che compongono la custodia; • 4 x heatsink con pad termico già applicato; • 1 x mini cacciavite. Quindi, nel complesso, acquistando il prodotto si hanno tre diverse soluzioni di raffreddamento: utilizzando l’Ice Tower (con l’alternativa tra ventola con o senza LED); utilizzando la ventola senza il radiatore, installandola orizzontalmente direttamente sulla custodia in acrilico a cinque strati; oppure, utilizzando un raffreddamento passivo, con i quattro heatsink compresi nella confezione. L’installazione del radiatore insieme alla custodia è risultato piuttosto semplice, ed in ogni caso si reperiscono facilmente diversi video che mostrano la fase di assemblaggio. La ventola non si può regolare via software, non essendo dotata di controllo PWM. È possibile scegliere se alimentarla, sulla GPIO, tramite 5V o 3.3V: nel primo caso funzionerà alla massima velocità, e risulterà piuttosto udibile; nel secondo la velocità sarà minore (il LED riesce a funzionare comunque) e sarà più silenziosa. Comunque, è facilmente possibile rendere la ventola controllabile via software già semplicemente con una breadboard e poco altro. Passando alla prova dei fatti, utilizzando il pad termico e con la ventola alimentata dai 5V della GPIO, nel normale utilizzo le temperature si posizionano sempre al di sotto dei 40 gradi Celsius. Ho eseguito un semplice script per portare e mantenere l’utilizzo della CPU al 100 per cento per dieci minuti, controllando le temperature nei cinque minuti precedenti e successivi. Come si può vedere, la temperatura massima raggiunta è stata di 47 gradi Celsius. Leggendo tra altri appassionati, sarebbe possibile ottenere qualche altro grado di raffreddamento utilizzando una pasta termica invece dei pad termici forniti in dotazione. Credo che nel normale utilizzo possano andar bene i pad termici, con la pasta termica da utilizzare nel caso di overclock. Arrivando a conclusione, l’Ice Tower di 52Pi rappresenta la migliore soluzione di raffreddamento per il Raspberry Pi. È strabiliante per le prestazioni di raffreddamento, ed è fuor di dubbio bellezza e stile del grande radiatore e delle variopinte luci LED che si susseguono. È sicuramente un must have.
H**R
Installed a few of these on Raspberry Pi's in my office and the next day I noticed several stunned fruit flies crawling around nearby trying to fly again. I didn't realize it immediately, but the lighted fan, and the cooling fins on this product combine to make a reasonably good fruit fly shredder (while cooling the Pi too). Add a sheet of sticky fly-paper in the path of the exiting air, and you have something very much like the Katchy product, but silent and small. Other reviewers have either complained about assembly or extra parts, or confirmed that it's just a bundle of two products with some parts overlap, and works fine. I'm in the latter camp. I'll find some other use for the extra stuff, but the case, and the cooler can be assembled such that they fit well. Also, if you don't want the case, there's another listing on Amazon (same GeeekPi brand/seller) for a little less that's *just* the cooler, so buy that instead.
M**K
Poco ruido, no es silencioso, pero bien. Disipa genial, en uso normal no pasa de 40.
A**E
This is a great cooler for the pi 4. Like other reviews mention, it takes a minute to put together, but not that long. Its nowhere near as difficult or "impossible" as they make it seem. Using thermal paste instead of the thermal pads, it keeps my overclocked pi running at 31c during idle, 40-41c under load (benched for 1 hour at 100% cpu load), with 27c ambient temperature. One thing to note, if you want to use thermal paste instead of the thermal pads included in the kit, you will need to leave out 1 of the black plates (the one that goes above the board, and below the cooler arms) and use the extra nuts that come with the kit as spacers for that layer instead. This reduces the height of that layer by about 1mm, which is exactly how much clearance you need to remove. Then when you bolt the last clear plate on the top, it will press the cooler down tight onto the CPU. Be careful not to over tighten the screws if you do this, finger tight only, otherwise you risk cracking the top plate because there is enough play to let it flex using this method. One other tip to make the installation easier: take the fan off the cooler. That will let you slide the plates over top of it, rather than fiddling with the cooler arms after getting all the plates together. You can put it back on at the end.
Trustpilot
2 weeks ago
3 days ago