☕ Elevate your espresso game—brew bold, live bold!
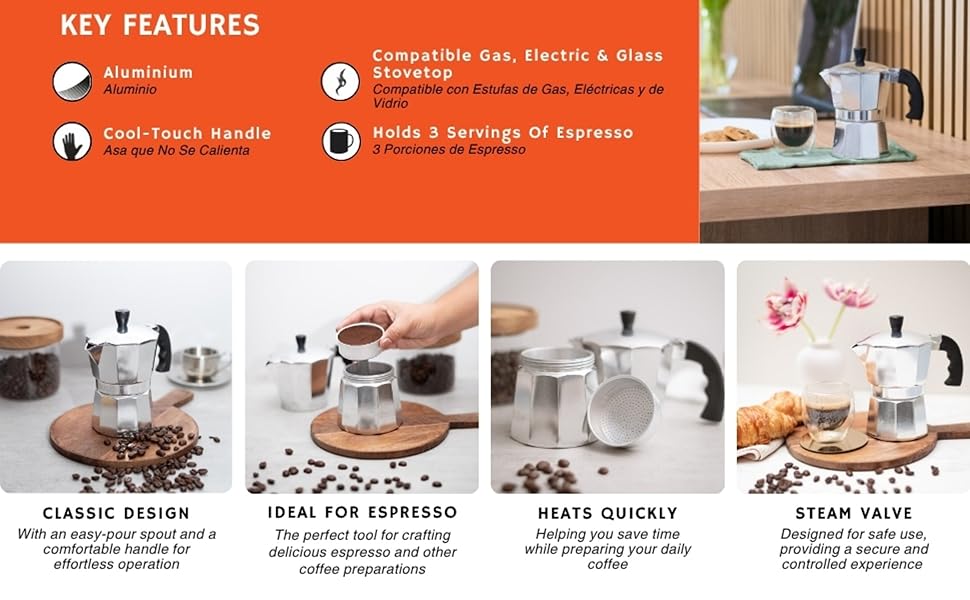
The IMUSA USA B120-42V Aluminum Espresso Stovetop Coffeemaker is a classic 3-cup moka pot crafted from durable anodized aluminum. Compatible with all stovetop types, it delivers authentic espresso with even heating and features a cool-touch handle for safe handling. Its compact, portable design and easy-to-clean detachable parts make it perfect for home, office, or travel use. Trusted by coffee enthusiasts for over 50 years, this manual espresso maker combines tradition with reliable performance.


| ASIN | B00164U4DC |
| Best Sellers Rank | #132,916 in Home & Kitchen ( See Top 100 in Home & Kitchen ) #42 in Stovetop Espresso & Moka Pots |
| Brand | Imusa |
| Brand Name | Imusa |
| Capacity | 3 cups |
| Coffee Input Type | Ground |
| Coffee Maker Type | Espresso Machine |
| Color | Silver |
| Customer Reviews | 4.4 out of 5 stars 19,640 Reviews |
| Exterior Finish | Silver Anodized Aluminum |
| Filter Type | Reusable |
| Global Trade Identification Number | 00094046220171 |
| Human Interface Input | Touchscreen |
| Included Components | Coffeemaker |
| Item Dimensions D x W x H | 3.9"D x 4.7"W x 6.3"H |
| Item Type Name | Coffeemaker |
| Item Weight | 10.4 ounces |
| Manufacturer | Imusa USA |
| Material | Aluminum |
| Model Name | Aluminum Espresso Stovetop Coffeemaker 3-Cup |
| Model Number | B120-42V |
| Number of Items | 1 |
| Operation Mode | Manual |
| Other Special Features of the Product | Portable,Permanent Filter |
| Part Number | B120-42V |
| Power Source | heat |
| Product Dimensions | 3.9"D x 4.7"W x 6.3"H |
| Recommended Uses For Product | Cycling |
| Special Feature | Portable,Permanent Filter |
| Specific Uses For Product | Espresso |
| Style | Classic |
| UPC | 094046220171 |
| Unit Count | 1 Count |
| Voltage | 42 volts |
| Warranty Description | 30 days |
| Wattage | 120 watts |
| coffee_filter_size | #4 |
J**.
Excellent introduction to Moka pots and cheap, at-home espresso. Best coffee I’ve ever had.
I don’t ever write reviews on Amazon, but I felt there was a special need here for this. Like many people, I was skeptical about this because it is so absurdly cheap (I got the 3 cup one for less than $6) and because I often find Amazon reviews to be unreliable, especially when it comes to coffee products. Usually the people reviewing them are older people who are more comfortable with a cup of Maxwell house than of Verve or Stumptown. I decided to buy it anyways because it was just a few bucks. This thing is absolutely incredible. I use a French press normally and I used to swear by it, refusing to drink drip coffee or pour over. Ever since this came, it’s all I can drink. It’s super easy to make coffee with as it basically forces you to measure out a perfectly proportional mix of water and grounds, it’s self contained and compact especially compared to a French press which requires the auxiliary component of a kettle to boil the water, and it actually creates foamy, rich, delicious, extremely intense coffee that I would say tastes BETTER than espresso from a machine, and it only costs $6! I am sure that there are higher quality Moka pots that produce richer microfoams and have more pressure and better valves and gauges, but I honestly think this thing gets the job done 1000x better than you would ever expect for $5. If you’re new to moka pots and espresso and want an affordable, easy, delicious way to make espresso (it can also be used to make americanos by diluting the coffee with hot water, obviously), then this is so unbelievably worth $6 that I can’t even explain it to you. Pair this with a cheap $4 milk frothing wand you can get on Amazon and you’ll have better cappuccinos and lattes and whatever than you’d get at any coffee shop. I use this with medium-dark roast beans from Verve Coffee, and I’ve also used a few other roasts including French roast which was delicious to me but I’m sure it would be wildly too bitter and intense for a lot of people. Look for a medium-dark roast I’d say, or even some lighter dark roasts. But probably traditional “Italian” and “French” roasts wouldn’t be the place to start unless you know that’s your thing.
P**O
Better Late than Never (or, A Late Start is Better than No Start)
Warning...Rambling review by an old geezer...read only if you have too much time on your hands, lol... Turned 77 this Christmas and just recently discovered the joys of Moka. I love strong coffee...drink my coffee black, my espresso straight, and enjoy fooling with my Aeropress...and was totally blasé about moka pots. Weirdly, a scene with a moka pot in an action K-flick (making espresso outdoors with a small camp stove) piqued my curiousity, and thus began my odyssey into the world of moka pots. Thank you Netflix movie Ballerina...lots of John Wick style revenge action by the petite protagonist, and if you like strong kick a-- female leads, this is a good one! Check out the opening scene to see if it's your cup of tea, err espresso lol. After researching and watching way too many YouTube videos, I looked to Amazon for something cheap to fool around with. And here we are with the subject of this review: the 3-CUP IMUSA MOKA POT. The key word is "cheap" as I only wanted to test the waters. Incredibly, I snagged this Imusa for less than a Starbucks flat white...a fraction of the $30 for a Bialleti. Surely a moka pot for less than $5 must be poor quality right? Wrongo! What I got was solid, nice build quality, highly polished, equal in appearance to pictures of Bialleti...and proved every bit as functional. It even has a real silicone gasket, unlike Bialleti's rubber gasket that always hardens and cracks, as revealed in many videos. Imusa made it right and gives us a louder bang for our buck. In one "Top 10 for 2023" list on YouTube, Imusa was #1 and the original granddaddy, Bialleti Moka Express was #8. $5 vs $30...go figure. With clear ideas of what I wanted, I invested the good part of a morning brewing 12 test pots to decide on the brewing process for me. The constants were the coffee (Lavazza Italiano), the grind (mid-fine), water quantity (touching the relief valve), and the heat (medium, then off after 1st drops). I must confess having a strong bias for generations-proven traditions over new techniques. So instead of coffee experts like James Hoffman, I trusted hosts who learned moka from their mothers or grandmothers. I also wanted to learn about Cuban coffee. Cubans adopted the moka pot (cafetera) as their own to make cafecito, their own sweet version of espresso (imo, the best dessert coffee hands down). Cafe Cubano is a big reason why Miami makes the list of top 10 coffee cities in the US. After my tests, I decided to use the classic methods that have worked for generations of Italian and Cuban families...including a couple of steps that many consider disputable (even wrong). Going against common advice, I pack my grounds. Unlike the classic Itallian method, Cuban families have packed their grounds for generations. Don't think "tamping" which is typically 30 lbs pressure for espresso...think "squishing." As one Cuban host said "We like it strong and dark, so we fill it to the top and squish it down, and fill it some more." Using a 54mm dosing funnel, I overfill a couple extra spoons, stir with a WDT tool, then pack (squish) it down to the top of the funnel. I consistently get a creamier, smoother, overall better coffee...that's a little bit closer to true espresso...with no increase in bitterness using proper heat management (keep it to a dribble). For me, packing the grounds is a must and no one will convince me that loose is better. Following (blindly?) coffee guru Mr. Hoffman, many have been jumping on the bandwagon and preaching as gospel to use preheated water...based on some "theory" that using room temp water will "overheat" the coffee grounds while the water heats up, resulting in a bitter brew. Huhh? Coffee is roasted between 180 to 250°C (356 to 482°F) for up to 20 minutes. Is it even rational to believe that a few short minutes in the low temperature of the moka pot while the water is heating up (less than 100°C) will overheat the grounds enough to alter the extraction? Doesn't that just mess with your common sense? After four test pots, my palate couldn't detect any difference. I believe that the palates of those preaching this would also not be able to taste a difference. In fact, one host admitted he couldn't taste a difference, but just recommends preheated water to speed-up the brewing, lol. It's an EXTRA (and unnecessary) step folks. Stay off the bandwagon and just do as generations of families across Italy and Cuba have done and still do...just fill your pot with tap water (filtered if your tap is bad). I'm blessed to live in a city with tap water from deep underground basalt aquifers that annual independent testing (Purdex) prove purer than every bottled water tested, including big names like Aquafina, Crystal Geyser, Dasani, Fiji, Pure Life, and others. Do I regret ignoring moka pots till now? Yes. But as my headline suggests, I'm thankful and delighted to be starting now. If you're sitting on the fence, take a leap of faith and jump into the world of moka...start enjoying a different style of coffee. The price of admission is just one Starbucks drink. My $5 Imusa is as solid as they come and I don't feel a need to upgrade (spend more). I look forward to brewing gallons of joy before I'm done, one demitasse at a time. I can't wait for my moka pot get that used patina like those dull, well-seasoned ones in the videos. And like the millions of moka pots drying on sinks across Italy and Cuba, my moka pot will also never be touched by dish soap. Lol... ツ
S**W
Secrets to brewing espresso? Are you curious...
This little coffee pot is capable of brewing delicious coffee with a little work and patience you will have a great little coffee maker I have used these for 20+ years I am happy to share what works for me because the directions are vague in places. However there are things that you need to do first before using it to brew your coffee I will explain why. Now If you are not willing to take the time because your lazy, and/or ask for a golden goose during a factory tour whining when factory owner says no your not going to like this coffee maker do yourself a favor give it away as a gift. If you have arthritis or your hands hurt I have arthritis and carpal tunnel just have someone help or just take your time this is not a race. When I pulled this one out of the box I noticed aluminum dust and debris inside and that the threads are a little rough this is to be expected it is not coated this is a cast aluminum aka Pot metal. For many years before the plug and play instant gratification nonsense came about everything you can think of cookware wise was made like this and it was excellent it lasted forever. So I am going to walk you through what I did to make this a good little coffee maker and how to maintain it. First use warm not hot water and normal dishwashing soap along with a non abrasive dishwashing sponge or cotton washcloth or soft bristle nylon brush . Do not use acidic, aggressive, or caustic cleaners its not neccessary and you will ruin your coffee maker. So begin to thoroughly wash/rinse everything inside and out including funnel until all dirt and debris are cleaned out and dry everything with a cotton cloth. Fill the coffee maker with water as the directions specify to the valve and assemble do not add coffee. Now when you assemble the top to the base do not over tighten dont forget your gasket sometimes they fall out just place it back in place. Hold the top and base when tightening not the handle or you will break your handle. As you feel the base make contact with the silicone gasket in the top just tighten snug to seal not over tight this will help seat your gasket. If in doubt about how tight turn until top makes contact with bottom turn until it snugs about a half of an inch extra tighten you don't want to bind your silicone gasket. Place on a burner with the handle away from the burner so it doesn't melt turning heat to medium high while waiting for it to finish the brewing process watch the little brass safety valve it will probably steam a little this is completely normal your valve is working fine. If it leaks between the top and base while percolating remove from heat, allow to cool and tighten a little more when you refill it this sometimes happens dont give up. Pour off the water and allow it to cool this is your first heat cycle a very important part of breaking in your new coffee maker. Absolutely do not cool it off under a faucet with water I know its tempting yet just patiently wait for it to cool on its own down to room temperature for everything to expand contact properly. When it has completely cooled off pull it completely apart again. Looking inside you might see more little black spots or loose debris this is normal rinse and wash them out again as described above. Wipe dry the outside and inside dry with a cotton cloth this prevents water spots and helps loosen any debris. Fill with water to valve again tighten snug not too tight and place it on a burner on medium heat allowing it to run water through watch the pressure relief when finished pour it out allow to completely cool to room temperature completing your second heat cycle. When cool disassemble your coffee maker notice how it comes apart your gasket in the top should seat nicely with the bottom and you shouldn't have any cast debris they should be gone it should look nice and clean inside. Now I will tell you what I do for a delicious cup of espresso. Fill with water using cool or cold filtered water up to the valve, drop in the funnel, add coffee level with the top of funnel loosely no need to tamp, screw on top notice how nicely it seats after all that work, place on burner on medium heat, listening for it to percolate its done when the top is about 3/4 full usually, and pour your espresso into a cup enjoy. It should taste amazing if its too strong or too weak adjust your coffee amount or heating temperature. When finished rinse thoroughly and wipe dry. If you place it in the dishwasher I don't recommend that I made that mistake. Hard water spots happen don't worry about them. With proper cleaning and care this should last for many years. I use these at home, shop, traveling, and they are wonderful on a camping stove. If you notice any yuck on the bottom from a burner or if coffee maker gets nasty dirty inside/outside I clean these with non abrasive white shop hand cleaner buffing it in until dirt is loose, wipe off excess cleaner, wash as described above, and cycle water through it. I have many of these in different sizes all plain aluminum like this. I have polished the outsides of these and and top inside to a beautiful shine with aluminum polish using the same procedure as you do with silverware when I encounter hard water or high mineral water. I have sanded the rough cast inside surface of the base smooth and polished the inside to a mirror shine for fun and easy cleaning. I have busted off or melted off the handles and replaced them with different designs of my own creation. I have Heliarc welded these if they get a seep in the bottom or if the lid hinge breaks/cracks. With care you should be able to pass this on to your children or someone close to you who loves delicious espresso. Hopefully this was helpful for you and you enjoy your espresso maker. If you have any questions just ask me and I will share what has worked for me. Good luck and importantly have fun.
L**A
Makes good coffee and is easy to use
This coffee maker does exactly what it’s supposed to do and brews coffee quickly. I appreciate how simple it is to operate and clean. The coffee tastes great, and the overall performance has been reliable. I’m giving it four stars because some of the materials and finishes feel a little basic, but that is understandable considering the price point. Overall, it’s a good option for anyone looking for an affordable and dependable coffee maker.
J**J
cheap and works! just be gentle!
This is my first time owning this kind of coffee maker. Know that for the price, it is not built durable, so treat it gently. 1. don't loosen or tighten the top by only holding the plastic handle or lid - hold the whole upper and lower unit, otherwise the handle and lid may break at the hinges some day. 2. don't over tighten it - just snug enough so it doesn't leak under pressure (think of a soda bottle - enough so it doesn't lose carbonation.) it is probably not high quality and durable aluminum, so over-tightening may wear out the threads and leave aluminum dust. Usage: -I set my timer for 4 minutes on the electric stove on high. a few seconds later it bubbles and steams and is done within a few more seconds, with maybe a spoon of water left inside. I don't want to let it dry out and overheat. -If you use gas, DO NOT let the handle be exposed over any flame, or it will melt off. (electric stoves do not have this issue.) -After every use, I remove the silicone gasket with a spoon and rinse all the parts. I don't want mold to form under the silicone. Conclusion: cheap and it works if you treat it gently. I bought another as a gift but they already have one so it'll be my backup or if I need to make more than one serving. UPDATE 2025.02.21: I watched some videos and my heat was too high, such that it spits out violently. I lowered the heat to 4 out of 10 and it comes out slower and smooth, like pouring tea in a cup, and it's richer. It takes twice as long but I'll try to play with it to trim that down a little. UPDATE 2025.05.13: To get rich, dark coffee, quickly, I now heat it on high for about 4 minutes (electric stove), then lower it to about 3.5 out of 10. Within seconds I can hear the boiling noises (or maybe it started for a few seconds already). I will now slide it off the hot red circle half way to control the amount of heat it will receive. Soon the coffee will start to trickle out very slowly and smoothly (about 4mm wide of dark coffee). If it spits, move it off right away until it calms down, then go back on the red circle a third of the way instead of halfway. I let it continue to trickle, and when it starts to stop trickling out, I'll move the pot halfway onto the hot red circle again to give it some heat and it'll trickle out slowly again. If it starts to spit at all, remember to move it off. I may do this 2-3 times. Finally, at the very end, it may need to be placed fully on the red hot circle to squeeze out the last bit. It's like an art, so Godspeed!
Y**A
Love
I purchased an IMUSA coffee maker and overall it has been a good, budget-friendly option for daily coffee at home. The design is compact and lightweight, which makes it perfect for small kitchens or limited counter space. It’s also very simple to use, with no complicated settings—just add water and coffee and it gets the job done quickly. In terms of performance, it brews a decent cup of coffee with a strong and rich flavor. It’s not a high-end machine, but it delivers consistent results for everyday use. Cleaning it is also fairly easy, which I really appreciate. One thing to note is that some models may feel a bit lightweight or basic in materials, and they don’t always have extra features like auto shut-off. However, for the price, it’s a solid and reliable option. Overall, I’m satisfied with this IMUSA coffee maker. It’s practical, affordable, and does exactly what it promises.
A**R
3 "cup" size, actual capacity is 2 expresso shots
I've always been attracted to the simplicity and compactness of these classic coffee makers. Unfortunately mine didn't really make such a great cup of coffee. It doesn't even taste as good as a cheapo steam espresso/cappucino maker. That may be because the coffee gets boiled somewhat in the top chamber as it brews or just because it never gets enough pressure. In any case it's worse. Alot of the reviews focus on the inaccurate cup size ( why can't they just tell us how many ml anyway?) I measured the "3 cup" machine and it is just barely 120ml. An espresso shot is usually considered to be 60ml, "a demitasse". So it can just barely make a double espresso with the water up to the release valve. An actual "imperial" 8 fluid oz cup is 240ml, so it makes 4 fl oz of coffee, 1/4 of a cup. Looking at the model number, the 120 is in there, so maybe that can help more accurately predict the sizes of the other models. The price is quite low, but you need to clean it with soap and water and brew with soap and water, then just water a few times because it is not clean as it comes. In fact, even after mulitple cleanings with soap and rubbing alcohol, there is still an oily "machining" odor in the bottom shell of mine. This also does not help the taste of the coffee.
B**R
The most flavorful $5 shot of coffee maker ever. Without a handle? Say it ain’t so.
Updated: It works perfectly. I have been enjoying a shot this makes mixed with a teaspoon ish of 1/2&1/2 every morning. Wonderful ! Absolutely fascinated by the concept of very very tasty home brewed latte for $5. You will enjoy yours too. Watch a couple of YouTube vids for the pot’s unique operation. Key to a good brew is to preboil the water. I make a cup of tea for the day so boiling a kettle is normal for me. For the most successful brew. You must pre heat the water to a boil. Preheat the pot base with hot tap water then assemble and brew. YES! The whole this is now hot so I use a towel wrapped around it to hold the base while screwing it together. Now the bad. This little pot gets hot. As they all do to work. Boiling water hot! to pressurize the system. The only flaw in the whole $5 pot is the handle. Order some JB Weld with it. After about the 15th brew (another really good one), the handle melted enough to break free. I had to glue mine with JBWeld. Drying now. Will update if glue holds. 4-4-25. For longer than a month. updated 5-14-1025 The JBWeld is the balm. It is holding and working fine. I do want to warn you about the boiling water. NOT NECESSARY. The guy on you tube will get you burned. DO NOT USE BOILING WATER!. Hot tap water works better. This is basically a physics experiment ever morning I make a cup. Some morning I get it right and it fills the holding well to the top. some morning it only fills half. The heat regulation is the key. If you go full power to completions it will work but boiled to quickly. KEY is to build up the pressure inside the lower chamber so as not to over do it. Reduce heat to keep the flow going then turn it off about half way through. it will finish with on last good push of water. Good luck!. This is by for the best money you can spent on a product that is top quality once the handle is glued back on. If your getting a MOKA pot Get this one.
J**.
Looks Good, Works well
I have not brewed coffee in it yet. But I have gone through the process of "cleaning" it, by boiling the water over the stove on low heat. Water is coming out without a problem. Will start to brew my coffee after I repeat the process a couple more times. Now I need it to cool down before. Happy it works for a fraction of the price against branded ones. Update: Have been brewing myself a cup of coffee for the past one month. Some discolouration due to coffee stain which is normal. No issue with the product itself. Contemplating to get a 6 cup as the 3 cup gives only half a cup of regular coffee.
ح**د
ممتاز
فعال لا يغير طعم البن
A**Y
Good product
Good product
A**F
Great kitchen appliance gift
A necessary item for the kitchen which most people don’t have. Would make a great inexpensive gift.
T**O
Perfecta, recomendable.
Muy buena, el sabor del café es puro. Se usa a diario y el funcionamiento es perfecto. La volvería a cmprar. Muy recomendable. Los materiales de calidad y duraderos.
Trustpilot
1 week ago
5 days ago