
Desertcart purchases this item on your behalf and handles shipping, customs, and support to Senegal.
🚽 Upgrade your throne with smart savings and leak-free peace of mind!
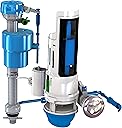
The Danco HydroRight Water-Saving Toilet Repair Kit (HYR460) converts standard toilets into efficient dual flush systems, reducing water usage by up to 50%. Featuring a durable silicone seal, leak detection, and customizable flush volumes, this easy-to-install kit ensures long-lasting performance and significant water savings. Compatible with most 2-inch flush valves (excluding Mansfield), it comes with a 5-year warranty and is designed for professional-grade home upgrades.
| ASIN | B005FPNGWO |
| Best Sellers Rank | #19,520 in Tools & Home Improvement ( See Top 100 in Tools & Home Improvement ) #20 in Toilet Repair Kits #3,041 in Kitchen & Bath Fixtures |
| Brand | Danco |
| Brand Name | Danco |
| Color | White |
| Customer Reviews | 4.1 out of 5 stars 4,582 Reviews |
| Global Trade Identification Number | 00188670000442 |
| Included Components | Dual Flush Converter, Flush Valve, J-Tube |
| Installation Method | Floor Mounted |
| Installation Type | Floor Mounted |
| Item Dimensions D x W x H | 3.75"D x 3.75"W x 14.25"H |
| Item Length | 5 inches |
| Item Type Name | HyrdroRight Universal Water-Saving Toilet Repair Kit with Dual Flush Valve |
| Item Weight | 0.74 kg |
| Item Width | 5 inches |
| Manufacturer | Danco, LLC |
| Manufacturer Part Number | HYR460 |
| Manufacturer Warranty Description | 5 year |
| Material | Plastic |
| Material Type | Plastic |
| Model Number | HYR460 |
| Number of Items | 1 |
| Number of Packs | 1 |
| Product Dimensions | 3.75"D x 3.75"W x 14.25"H |
| Seat Material | Plastic |
| Shape | Round |
| UPC | 188670000442 |
| Unit Count | 1 Count |
B**T
Great System
This is my second one. The first one was installed nearly 5 years ago. When the flow valve on an upstairs toilet failed, there was no question about which one I would replace it with. We've been very satisfied. The flow valve used on the first installation has worked flawlessly. The flush valve has worked well, too. In these five years, it started to leak once. It took me less than a minute to clean and reseat. That's less maintenance than with a flapper. The flow valve itself is easy to install. You might have to make customizations for the tube that goes in the bottom of the tank. The tube works well to keep the tank clean, BTW. Just ensure you trim from the valve end, if it is necessary to shorten it. The dual flush button was a pain to get working correctly due to its proximity to the flow valve. The toilet is small, and it is a lot to pack it all in there. Adjustments here and there are necessary to make it work. Once you figure out which orientation works, the installation of the flush valve is easy. It's necessary to take time to calibrate the system to make it function properly. You might have to adjust the fill level to make it all work, but once everything works properly, it maintains the setup and works very well. The first one had the issue that the tank would fill, then at some random time, it would start again for a few seconds. It didn't seem to be leaking. Perhaps it doesn't have enough hysteresis built into the valve and the slightest vibration can set it off again. It would only do it once. For unknown reasons, it stopped doing it. It's well worth the price not to have to deal with flappers, and it saves money to boot. It's more robust than a flapper system, and I am more confident that it leaks less, if at all.
P**3
Very pleased with this replacement system
Have now had installed for 6 months in one case and 2 months in two others. Working just fine. One advantage to these systems is the white slide mechanism on the filler tube. You can slide that so that it will not refill after flushing. This is a big help if have to adjust the replacement for the flapper value but even bigger help when wanting to clean the toilet bowl. Can slide to stop flow, flush using the liquids flush button and then with the bowl nearly empty can clean the bowl thoroughly. Then release the slide and bowl refills normally. Big help vs turning the water off at the valve. Same is true if going on vacation or away for weekend and want to prevent possible toilet overflow as mentioned below. Features not mentioned in other reviews I have seen on the product but a big plus for it. This us update to earlier note. I have now installed three of these systems. The only issue I had was getting the flapper replacement installed so it did not leak. But once that problem was solved the system works great. One item I have not seen noted but important to me is that you can slide a white slide on the arm of the filler mechanism to lock it in place. Very useful if going on vacation or even away for weekend as it could prevent a toilet from overflowing as friends had happen a few years ago with major damage. Beats turning water off to the whole house as the major risk is from the toilets. System worth it just for this! Also when checking for leak you can mark level with pencil and lock the filler and then go back in a few hours and see if level has dropped. Likewise if you have to adjust the flapper replacement it is easy to do by locking the filler when water level is low and then twisting the large part off of the flapper replacement and adjusting to be sure no leak. After doing this can release to let water part way in and then lock again and mark so do not have to fill entire tank (or drain it). Thought these useful enough to pass along. I initially bought each of these separately so my review of the filler valve and the dual flush valve are under the individual parts except that I am only adding the comments above to the entire system link. I have replaced the innards of toilets numerous times over the years and found this system very easy to install. Only caution I would pass along is to read the directions and the warnings with some care before you attempt installation. I have for years used bleach tablets in the tanks and I note that they warn not to do this with their system. Each part of the installation has some simple instructions but important to read them to save yourself a lot of frustration. When I first installed the dual flush I did not follow instructions to put water over the seating valve and mark with pencil and let sit 15 minutes to be sure it was seated. As a result I had to go back and redo the installation. Once you have done an installation for one toilet doing others will be extremely easy. So far system is working very well but I plan to wait a couple of months before buying more and installing in my other toilets. If this works as well as I hope I will be using these from now on. Especially attractive to me is replacement of flapper valve and those of us with hard water tend to find build up of sediment and lime allows leaking of the flapper over time which can waste a great deal of water from a very slow leak that you may not realize is occurring. If I find problems with the units after installed a while I will come back and revise this review. As of now I can recommend this unit both for ease of installation and how well they are operating so far. Some of the problems I have seen in other reviews have yet to show up for me. If they do I will edit this review.
D**R
Works but lacks durability
If you want to convert to a low-flush toilet option without upgrading the comode, this is the product. I purchased and installed 3 of these units on standard Eljer brand toilets and have had no issues whatsoever. Yes, the installation can be challenging but the step-by-step instructions do a reasonable job of guiding you through installation...honestly, the hardest part is calibrating the various floats and water intake valve for the low flush but again the instructions are good and its just a matter of trial and error. If you are in doubt because of some of the negative reviews, let me assure you the product works and works well, besides many of these bad reviews are because the unit did not fit the overflow tube (square vs round) and not because of any defect in the product intself. When installing, I also recommend replacing the old ballcock nut and washer (the nut and washer that connects to the water valve and main toilet supply line underneath the toilet) My existing ones leaked after install as they were metal flange tubes with very worn rubber washers so I upgraded to stainless steel braided lines with integrated ballcock nut and washers which you can find at any DIY bigbox store or local hardware...absolutely no leaks. Our household consumes roughly 3,500 gallons of water monthly and I'd estimate we'll save at least 1,000 gallons/month (or about 25$ month on our water bill) using the low-flush option. UPDATE: OK, so after 3 and a half years of normal household use two of these units have failed. The issue in both faulty kits is with the silicone seal of the internal plunger mechanism...on both units they developed slow leaks and one become quite audible. It was very easy to diagnose the issue as when I was able to manually push down on the plunger via a small hole in the top of the flush valve the leaking stopped. I placed a call to Danco/HJSI tech support and explained the issue and they are replacing both units with new ones under the existing warranty (5 years) so they do stand by their product. I reduced my rating to 4 stars but still feel this is overall a decent product as long as you don't expect it to last more than a few years.
G**Y
Great solution at an amazing price!
Blue Source HYR460 Toilet Repair Kit w/Dual Flush Converter by MJSI Great solution at an amazing price! My 1876 San Francisco Victorian has a small bathroom, converted from a pantry in the 1920's, complete with a cast iron claw foot tub and a toilet manufactured in 1962 . The date is pressed into the bottom of the tank lid. Previous owners installed homespun tricks to save water (bend the float handle, bricks, rocks, marbles and bottles of water). The inside of the tank was dirty and flush "performance" suffered. The choices were to find more tricks to save water or install a low flow toilet. When it comes to an old house, any change requires balancing authenticity and functionality with conformity to current codes. Plus, the bathroom floor was ceramic tile laid over two layers of hardwood, with a basement below. Replacing this old toilet meant opening the floor and replacing old sewer pipe connections. I kept procrastinating, and one day Amazon offered a solution. A few months ago, I ordered a toilet flapper and flush handle from Amazon. After that, my screen started displaying ads for the MJSI Hydro Right Dual Flush Converter Kit. (Imagine if Amazon got into the online dating biz. Buy with your Amazon Prime, overnight delivery and if not satisfied slap a label on and return.) The Amazon reviews for the kits had several cautions. 1. Verify tank height and width against MJSI requirements. 2. Check handle placement in relation to fill valve. 3. Install dual kit if the old toilet still has the antiquated ballcock configuration (mine did). After watching the MJSI website installation videos, I ordered the dual conversion kit. For my toilet, the anti-siphon fill valve was the more difficult of the two to install. It was a tight fit and the valve was almost too tall, but I had already measured. In addition, the old valve had been on there for over twenty years and removing the nasty plastic nut was tough. But the effort paid off because the new valve works great! One of the best features of the MJSI fill valve (why didn't someone think of this years ago?) is a white tab on the top of the valve. Slide this tab and the tank refill stops, eliminating the need to turn the water off at the toilet or to the whole house. This feature made installing, the Hydro Right conversion kit a breeze. Close the refill valve, flush the toilet, drain the tank, remove the old flapper and install the conversion unit. The entire process took less than 10 minutes, but I benefited from the experience of the Amazon reviewers before me. 1. Ensure the new valve seats securely before adding the conversion top (or have silicone sealant on hand just in case). The easiest way is pressing the silicone seal down into toilet outlet before installing the top and filling the tank fill with a few inches of water (the white slide tab came in handy). 2. The handle's plastic lead can be tricky. Try placing the unit at different angles to get the best fit. (The company video assumes a handle on the side.) 3. Perform a dry run (so to speak) with everything in the tank before finalizing the install. It took two tries to get the seal fitted correctly, and the unit worked perfectly from then on. Immediately, I noticed the Hydro Right shot a stronger stream of water into the bowl, clearing liquid and solid wastes. Both units are made of lightweight plastic and almost feel cheap. But they sit inside of a water tank where plastic works better. This is an amazing piece of technology! BlueSource HYR460 Total Toilet Repair Kit with Dual Flush Converter by MJSI
G**L
Flush uses too much water on lowest setting
I installed this unit in a 20 year old Koehler toilet. It was an easy and straight forward install. I was able to meet all of their fitment requirements. My first thought is that the push button takes significant force to push. My 4 year old grandson can't flush it. I would expect the lever version to be a little easier. My biggest problem is the amount of water each flush uses. The low volume flush uses just about as much water as my pervious standard set-up. The higher volume flush uses much, much more water. Both flush levels are set to use the minimum amount of water. It is equivalent to holding the handle down on the old set-up until the tank is almost empty. I contacted the manufacturer and they were not helpful at all. I explained that the button was hard to push and that both the blue and green adjusters were set at the top (lowest water usage). I asked for any advice. It took them over a week to reply and when they did they said there was nothing that could be done about the button and that I should move both adjusters to their top position. I responded and said that is where I told you they were set and that their answer was not helpful. I received another email that said they were sorry.
N**N
It works but it's not without its flaws (leaks after two years) HUGE POS
The good: Well, it works. It had all the pieces i needed to do the job outside of a different flapper specifically needed for my toilet. The not so good: The directions don't include a few key steps in getting it to work right. They tell you to adjust the screw but the main adjustment for the water level is the float that is adjustable. They mention it previously in the assembly steps but don't mention it in the troubleshooting. It really should be in the troubleshooting because the blue adjustment screw barely does anything. The "tank cleaner" hose quite frankly doesn't fit at all. I've tried 5 different times and had to cut it off each time it made it fray. It appears they didn't get the size right. The little puny zip tie they include is pretty funny. Like a joke part cuz it's not big enough for literally anyone. The button assembly isn't really designed well because it could easily interfere with the float. It should have been designed to be flush against the tank not stick out 2 1/2". If you're doing this on a Mansfield toilet (even though they say it's not compatible) you're going to need to replace your flush valve with a toilet flapper style flush valve. There's a review video where a someone shows they did it but doesn't tell you how. This also means you will need to remove the tank. Fluidmaster has a universal one k-507A 2" that fits well and includes new tank bolts. They're not brass like they should be (surprise, surprise they cheap out on the bolts). You'll need to use the white spacer included in the danco kit to get the distance from the overflow tube right. All-in-all it's decent. They probably should have installed it on a few toilets in the testing phase and revised it but it still works alright.
A**N
I like the water saving feature, and the push button flush valve
I have nothing but good to say about this product. I didn’t think that installation was overly complicated and I am certainly not a plumber. I really like the water saving feature. It has two flush methods, the first one uses far less water. The whole thing just looks to be constructed better than the other toilet repair kits I have seen. Update: This is the 2nd one of these that I bought. The first one I bought was 3-4 years ago and I have had absolutely zero issues with it. It works as good now as it did on day 1. The 2nd one I bought was probably 10 months ago. It, too, worked flawlessly for those ten months, then I noticed that occasionally (maybe once every few hours) the toilet tank was refill for a little bit. Obviously it was leaking a little. I looked at the online owners manual and tried the troubleshooting steps, but was unable to solve the issue. It was still within the one year warranty so I called the company. I didn’t have to wait on hold very long and the representative I spoke with was very friendly and helpful. I explained to him what I had already tried and fortunately he didn’t insist that I repeat that. He quickly offered to send me a new unit and no cost, which he did. I installed the new unit and it is working perfectly now again. I don’t know why the 2nd one of these that I bought only lasted 8 months or so before developing problems. It’s not out of the realm of possibilities that it was somehow my fault. All I do know is that I will MOST DEFINITELY buy another one if I need to buy another one. They work great and they stand behind their product. The idea of not wasting water unnecessarily is a good feature. Let’s face it — most of the time only the smaller amount of water is needed, and eventually that savings will pay for any additional cost of this unit.
G**0
PUSH BUTTON VS LEVER, INTERFERENCE and OVERALL FUNCTIONALITY
Initially I was drawn to the lever design because it's more familiar and incidentally cheaper. But the reviews are more negative (having to hold the lever down for 2 seconds, inconsistent results for the small flush etc...). The push button design is traditional elsewhere in the world. I am glad I bought this version. It's very simple to use and consistent. The round button also updates the look of my toilet. The tube at the bottom of the tank (see red arrow) sends jets out to clean the bottom. This tube does not come with the lever version. My tank lever is on a curved side resulting in insufficient clearance for the push button cartridge. The cartridge interferes with the float. I had to rotate it into a slanted position to avoid interference (see red arrow). Be warned and be prepared to make adjustments if your tank has a non-square shape. Do yourself a favor and watch a YouTube video review by Phil. He lays out the procedure much clearer than the instructions. Also avoid wasting time and get yourself a new hose going from the wall to the tank. The O-ring on mine had hardened causing a leak and, stopping the installation mid-way. It's important to understand how the green valve on top works to reduce water waste when filling the bowl (see arrow). In normal toilets you can waste more than a gallon down the fill tube. Think of the green nub as a flow indicator arrow. If it points along the fill tube, max water flows out. If it points up water is cut off. Water for the bowl flows only while the main tank is being filled so if this adjustment is made using the big flush the level will be too low for the small flush. Using the small flush adjust so the bowl is correctly filled by the time the main tank is filled. Adjustment is quick and easy once you understand the principle. When seating the blue silicone dome gasket that seals the tank, think of how the old flapper works. The flapper seals only with its weight so pushing hard on the silicone seal will distort it and cause a leak. The black rubber ring is for holding everything in the correct position so don't force it down either. As pointed out in other reviews, the zip tie is weak and will break leading to leaks. I have a Costco box of zip ties and chose the strongest that will fit through the slots. I also added another one on top for good measure. Play with the small flush blue float adjustments to familiarize yourself before installing it. The clicks are numbered by steps, 2 clicks per step. I started at 3 steps from the bottom (bottom is max water). Adjust upward if you want to reduce the small flush amount. I did not do much with the green slide big flush adjustment, just pulled it a little bit up from the max bottom. Installation and adjustment should not take more than 1/2 hour but add 1 hour for screwing up, more if you have to go buy stuff. Love the result.
A**Y
So Effective!
Toilet technology has come a long way! This was so easy to install and it saves so much water that it was a no brainer. I watched some youtube videos on how to install this and it literally took me 15-20 minutes to swap out my 20-year old valve in my most used toilet. There are plenty of water adjustments to get the perfect flush for a #1 and a #2. In my estimation, from looking at the water level in my reservoir, I'm only using a quarter of the water for a #1 flush and about 2/3 for a full flush. I tested it plenty of times in the last couple of weeks and the power of the flush is great with the water I mentioned above. I suspect this will save me plenty of money every month and pay for itself in a short time. Why didn't I do this before?!?! I would definitely recommend this product to anyone. It has a very good design that will fit most, if not all, toilets that were manufactured within the last 30 years or so.
H**O
Ahorrador y de fácil Instalación
Es un excelente producto. Funciona tal cual está indicado. En mi caso, el sapo de la descarga se atoraba y no regresaba a tapar la descarga, lo cual generaba una fuga de agua muy considerable y por lo mismo, un consumo de agua mayor (+ $$$$ pagada al servicio municipal de agua potable y alcantarillado). Se puede instalar en cualquier depósito, no se requiere que sea nuevo o que este preparado para este tipo de válvulas. Este es el 2do juego de baño que instalo. En ambos casos la instalación fue super sencilla y no requerí herramienta (solo para quitar la manguera de la tubería al deposito). En la 1er instalación me lleve aproximadamente 45 minutos. Ya en esta última fueron máximo 15 minutos. Los materiales de primera calidad y no se requiere desensamblar el tanque al inodoro pues ocupa la misma descarga. Recomiendo que lean bien las instrucciones de instalación y se familiaricen con las piezas. Si he observado una disminución del consumo de agua a raíz de la instalación y uso de este sistema. Inclusive hasta la sensación de desperdiciar agua de mas en cada descarga se ve reducida.
C**N
Actualización moderna de un inodoro
Substituye todo el herraje interno y funciona bien modernizando y actualizando el funcionamiento del inodoro, ahorra agua , evita fugaz al ser más exacto en el uso del agua .
N**R
It works !!
I spent some time on youtube familiarizing myself with the installation process. Installed in about 45 mins and I am happy with it. No leaking and a lots of water saving ahead
U**S
Bien
Por el precio muy bien funciona bien hasta ahora
Trustpilot
3 weeks ago
1 month ago