
Desert Online General Trading LLC
Dubai, United Arab Emirates
Desert Online General Trading LLC
Dubai, United Arab Emirates


🤩 Build, Code, Conquer! Your robotics journey starts here!
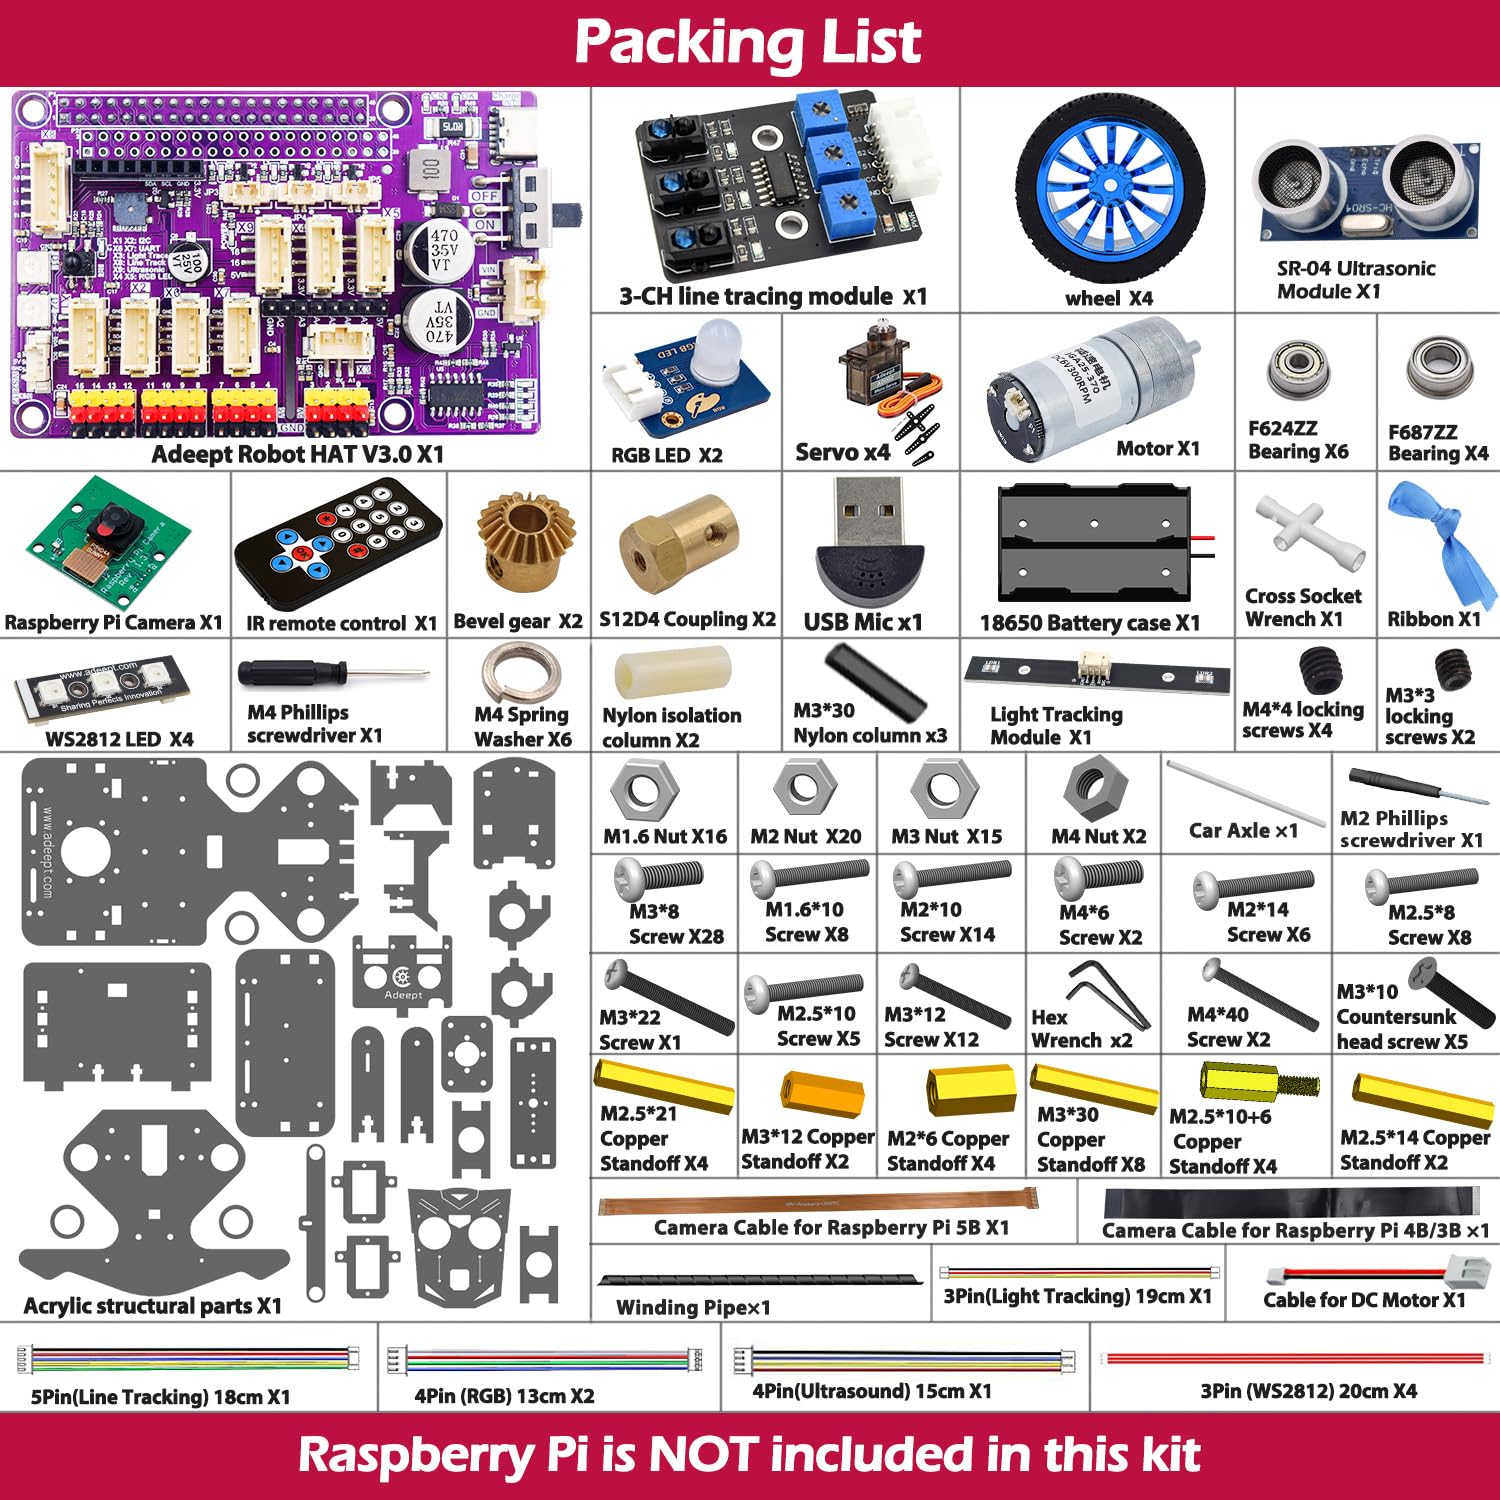
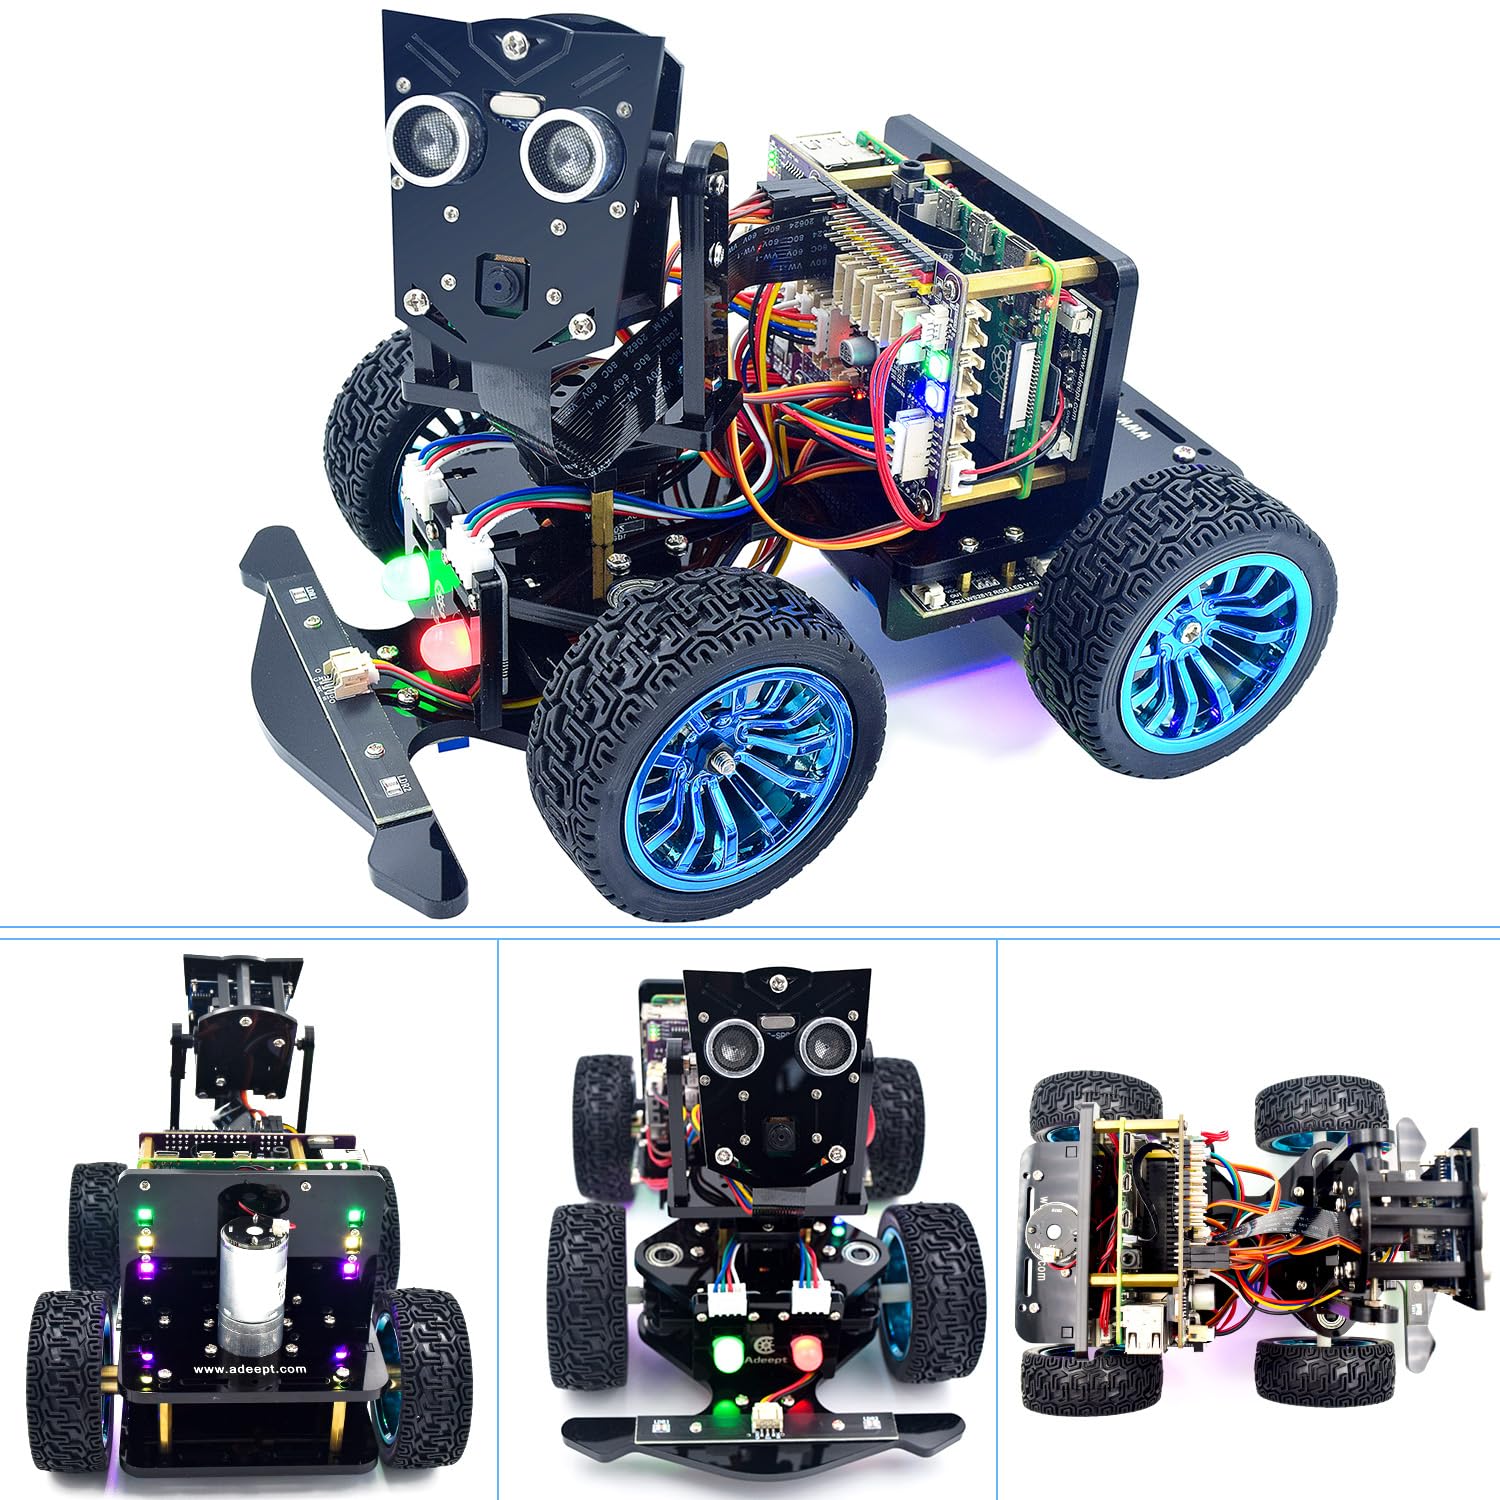
The Adeept PiCar-B Mars Rover Smart Car Kit is an innovative educational tool designed for teens and enthusiasts to explore programming and robotics. Compatible with Raspberry Pi models 5/4B/3B/3B+, this kit includes a comprehensive 309-page tutorial and offers multiple functionalities such as obstacle avoidance, line tracking, and speech recognition. With easy assembly and various control methods, it’s perfect for STEM learning and hands-on experience.


| Supported Battery Types | Lithium-Ion |
| Theme | educate, science, math, stem, |
| Item Dimensions | 9 x 6 x 2 inches |
| Item Weight | 2 Pounds |
E**G
PiCarD+fun build
I bought the PiCarB as a programming tool for one of my classes. It is a real fun build. I followed the written directions and used the video directions only as a secondary back-up to verify positioning. I did not use lock tight. Programming was a bit tedious, but this was my first time programing Raspberry Pi. Other than that, it was rather simple.The only suggestions or things I felt were lacking was the packaging did not mention that you need to supply your own batteries or Raspberry Pi. However, It is suggested that these are not included due to the relatively low price.In short, the kit is made of high quality material, the build is on the high level of ability but it is presented as simply as possible. I highly recommend this product for wither the classroom or the home study student.
H**J
All the parts fail.
The worst kit you can buy, the hardware they provide is just frustrating and stupid. The motor hat they provided was spoiled, it made 3 raspberry-pi’s just go blank, and they don’t work anymore, the wires for the motor they provided broke after 2 runs. The servos provided were soo bad, they did not even move after the first run and locked up. The camera cable stopped working after the two runs and so the webserver would not come up. Overall the stupidest and the worst kit you can buy ever!!!!
M**A
Awesome geek entertainment!
First off I want to say that I found this project from reading Python All-In-One for Dummies book which was a good indicator to begin my decision into picking this one. It was really fun to assemble and get the PiCar running. I must say that their documentation was clear and precise. I usually read the guide first to understand the overall idea and then I start assembling step by step. The motor, servos, camera, ultrasonic sensor, battery holder, LED lights and cables were packaged correctly so they don't bend, break or get scratched even though the kit comes in a small box.The software can be installed in different ways. You can image the pi and install each library, install the pi and use their phyton script or simply burn their image into the PI for faster result. I tried the second and third option successfully. One thing I look for in a project like this is their code and their Git repos are up to date which is a great sign meaning that development and updates are still happening. Their documentation and online video guides explain why they chose and use certain libraries like OpenCV. They also have an active forum where their employees answer questions and you can interact with others that have done the project.I am now using and getting to know the code. I have taken it for a ride around my place and can already detect color, motion and proximity but the best part is that my dogs love to play with it. My main purpose is to enhance the code into a machine learning model where it can recognize and follow my dog. It's just an excuse to keep programming as well!I have 16 years of experience with technology and I am currently a Systems Architect with strong devops background so I highly recommend this project to anyone looking to do a fun python project or just to get practice with Raspberry Pi, robotics, machine learning and electronics. The price for what you get is a great deal!
J**S
Quite a nice item overall. It's sexy, quite solid, with a solid and serious driver motor.
Assembly instructions were quite good. However, the software installation instructions really need a refresh.
J**E
Great Robotic Project
The media could not be loaded. Adeept Mars Rover PiCar-B v3Build/Test/Review/Reportby Jim KlapsteMay 2022INTRODUCTION First , a little bit about myself. I am a retired architect, My hobbies, since I was a young boy, are model railroading, RC cars and airplanes, general electronics, computers and for the last couple years decided to lear about the Raspberry Pi and Python coding and robotics. I thought it would help keep my mind busy and hopefully slow it’s deterioation.EXPERIENCE So far I have built a DIY 4WD car, an Adeept RaspTank, a Devastator Tank and now I am building the Adeept MarsRover Car-b V3.0, which I will be reviewing here.PROCESS In building the RaspTank, I had problems with the software installation and with some of the build steps, but since then, Adeept has revised and updated there build instructions, made some videos and has developed tutorial resource, which look pretty good, so I will be following the tutorial V3 as if this is my first time into robotics while building the MarsRover.EQUIPMENT I will be using a Raspberry Pi 4-B, which I was lucky to get a couple of months ago, still out of stock everywhere, Raspberry Pi OS (Legacy) with Desktop. Also I had installed Raspberry Pi Desktop on an old Dell note book computer, which I will be using to interface with the Raspberry Pi.BUILDING So now that all the hard stuff is done, it is time to start the fun stuff, ASSEMBLING the MarsRover.NOTE The first thing I discovered when removing the masking tape from the board of pieces they start flying all over the place, so be careful when you do this. I usually save all the punch outs until I am done, just in case, and when you are done, there will be a few pieces left over, don’t worry about it. Also comparing Tutorials V3 to V2 build diagrams, I found more informative diagrams in V2, so I ended up, referring to both Tutorials during the course of assembly, to help me better understand the steps and assemble the car. Initially it would have been helpful if in the V3 Tutorial “Precautions for Assembly” that suggestion would have been mentioned. Also, it would have been extremely helpful if I had watched Adeept’s assembly video of Pi Car-B before I assembled the MarsRover. In fact I suggest you watch if at least twice before you start the Assembly Tutorial, due to the fact that no where in the assembly tutorial are any of the wires shown nor where they should be threaded through out the model. I should have, but I didn’t andit would have saved me a great amount of frustration.TESTING THE MARS ROVERNOTE All the following run/tests were done with the Pi plugged into an electrical outlet/adaptor. After the initial testing is completed I will test the MarsRover, remotely on batteries.FIRST RUN Logging into the Adeept Bot Controller on my laptop and checking out each button operation I found that the camera worked but there was a 3 to 4 second lag time between what the camera saw and what was displayed on the screen. Not all the buttons work or worked the way they should have, were slow in responding or didn’t respond at all or responded sporadicly. The move forward-backward buttons were reversed, the move left-right buttons operated the camera head left-right, the arm head up and down buttons operated the steering and the arm left-right buttons move the head up-down. Same with the key-board keys.TROUBLE SHOOTING After doing several servo-Motor Hat connection tests and adjustments and more tests, checking each servo for position and operation, the steering servo died. After replacing the steering servo, the steering worked fine. To fix the move forward-backward buttons. I edited the code as per the directions in the Tutorial Q&A section. I messed around, switching the servo wires so many times I lost track if I had them mixed up to start with, but finally, making sure the servos were connect to the correct pins on the Motor Hat, the servos respond to the keys and buttons like they should.TESTING Tested: Camera, Radar Scan, PWM Init Set, Hard Ware Info including the CPU Temp turning RED when the temperature got above 53C, Motion Get, Auto Matic, Keep Distance and FC Control all work like they should. Haven’t tested: Track Line Nor Speech.REMOTE TEST Using the Adeept “blue” 18560 2000 mAh batteries, fully charged’The drive test using move buttons and key-board, the buttons and keys, when pressed and released work sporadically at first but eventually got to be a little bit more responsive as time went on.The arm control operated smoothly with both buttons and key-boards keysThe camera worked good, right from the start, but some of the time, white horizontal lines were showing up on the screen. Aldo there is about 2 to 3 seconds delay from what the camera sees to what shows up on the screen.The hardware window shows all the information including the temperature window turning red when the Pi temperature goes above 54°F. So to keep the Pi from over heating, I will be adding a cooling fan.All the other features: motion get, automatic, keep distance, radar scan all worked fine. Again, I did not test track line and speech control.NOTE The batteries that came with the kit had enough power to boot up the Pi and run the car for several minutes. These batteries have a 2000 mAh rating. My other batteries with a 9900 mAh rating gave me a much longer runtime. Having several pair of batteries, I will get to enjoy playing with my MarsRover until I get tired.NOTE I’m not sure why Adeept included batteries in this kit, because in the list of parts it shows that batteries and the Pi need to be purchased separately. I think the reason Adeept included batteries was because of some complaints in the Reviews and post on the Adeept Forum site about batteries; what kind are the 18650, where to get them, can they be charged while installed, why not, how to charge them since they don’t fit in an AA battery charger, etc, etc.. So if Adeept is going to supply batteries then they should supply a charger, otherwise the batteries are useless unless to the modeler.NOTE In the WEB control part of the tutorial, Lesson 2, Step 2.2.3-4, there is NO button labeled “POLICE LIGHT” in the controller window.ISSUES TO RESOLVEThere are still some issues which I will need to resolve, I.e. the interface between the bot controller ‘keep distance’ ‘automatic’ and ‘speech’ buttons and the MarsRover. They work very inconsistently or sometimes not at all and once pressed it is difficult to stop selected action and move on to another action. I will contact support to resolve these issues.SUMMARYTo summarize, it was a very enjoyable, building the MarsRover Car-b. All the well cut parts and hardware were in the box, well packaged and clearly labeled. The updated tutorials and videos made building the car and installing the software a breeze. I feel that this kit is not for someone inexperienced in robotics unless they have some guidance from someone more experienced in model building, working with the Raspberry Pi and programming in python.The few problems I encountered, were mostly builders error, not clearly reading or following the directions. I was able to resolve all the problems by reviewing the excellent revised tutorials both versions two and three more thorough, Reading what others have posted on Adeept’s Forum Site and just generally some intuitive insight form years of building models.The Mars Rover Car-b is fun to operate, has many features to keep it interesting to play with for a long time. It also gives you a platform to expand and experiment upon. To start with, I’m going to add a volt meter to monitor the batteries and a cooling fan to the top of the Raspberry Pi-Motor-Hat.End of report.Jim KlapstePS I gave this product 4-Stars because I never give anything 5 stars.
R**Y
Important and different pieces were missing
We wasted around 12-14 hours only to know many important parts are missing. No remote, missing important circuit board and many other. So it never came to a working one.It’s almost 2 years since I bought it. Couldn’t get enough time till, my 8 year old son asked me to complete it, only to find many important parts missing.Suggestion from my son: please ensure your packages are not faulty or incomplete at least on such complicated things. As it waste money and time of customer! :)
Trustpilot
1 month ago
2 months ago
1 day ago
3 weeks ago