Desertcart purchases this item on your behalf and handles shipping, customs, and support to Senegal.
🚀 Elevate your Jeep’s cargo capacity and style—because your adventures deserve the best!
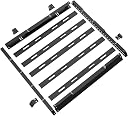
The Hooke Road Wrangler JK Roof Rack Cargo Basket is a heavy-duty, vehicle-specific cargo solution designed exclusively for 2007-2018 Jeep Wrangler JK Unlimited 4-door hardtops. Crafted from high-strength carbon steel with a durable powder-coated finish, it supports up to 150 lbs of evenly distributed gear. Its aerodynamic design minimizes wind noise, while the bolt-on installation requires no drilling, making it a perfect blend of rugged functionality and sleek style for the modern Jeep owner.


| ASIN | B085NDGVG7 |
| Automotive Fit Type | Vehicle Specific Fit |
| Best Sellers Rank | #730,552 in Automotive ( See Top 100 in Automotive ) #1,091 in Cargo Racks |
| Brand | Hooke Road |
| Brand Name | Hooke Road |
| Color | Black |
| Compatible with Vehicle Type | 2007-2018 Jeep Wrangler JK 4-Door Hardtop, Jeep JK |
| Customer Reviews | 4.3 out of 5 stars 202 Reviews |
| Included Components | 6× Mounting Bracket, Installation Instruction, Mounting Hardware Kit, Roof Rack Assembly |
| Item Dimensions | 58.3 x 53.5 x 6.3 inches |
| Item Weight | 77 pounds |
| Item dimensions L x W x H | 58.3 x 53.5 x 6.3 inches |
| Load Capacity | 150 pounds |
| Manufacturer | Hooke Road |
| Manufacturer Part Number | QP.BXG-203-1 |
| Material | Carbon Steel |
| Material Type | Carbon Steel |
| Mounting Type | Roof Mount |
| Vehicle Service Type | 2007-2018 Jeep Wrangler JK 4-Door Hardtop, Jeep JK |
P**O
Great but figure out without instructions.
Plan on 5 hours, taking your time. Throw instuction out, they are terrible. Plus you need a 13mm and allen key set, not a 10mm and 12mm like it said. I laid it all on my carpet and assembled. Make sure you install the front and back ends to the sides first or you will have to disassemble, like i did. All nuts and bolts assembled by hand, power tools too big. Yes, it takes time and I figured that it would. After assembly, i had i buddy assist to lift it on top of the jeep. Yes, the rear window brackets will break, just like everyone says. I will super glue them on later. Overall, it looks better than i would of guessed. I threw out the LED lights, you have to buy brackets for them and i thought that they looked cheezy. Yes, it is strong and heavy duty and doubt that it will rattle, it is bolted down pretty well. Bigger/better instructions would of been great. Took me a while and i am a construction guy, lol.
D**N
Good quality, takes a little time and patience to install.
Unit arrived well packaged. Nothing was missing, bent, or scratched. The instructions could be a little more clear, but I didn't have any trouble following them. The only thing they left out is: On the plastic covering for the Jeep hatch window, pry at the bottom with a spodge tool to release it. The plastic piece has a hinge at the top and you want to push it up to release the top. When you mount the rear brackets, you want to pull down on the gas window shock to get things into alignment. Hand thread the original factory bolt. If it binds, try again. Use a (moving) blanket on the Jeep top to prevent top scuffs. You can adjust the basket backwards to keep the freedom panels unobstructed. Use blue lock tite (not included) to keep things from coming lose and rattle free. Recommend two people to put it on the roof. Install time was about 2 hours with the the biggest part being the rear hinge to alignment. No major addition to wind noise when at speed on the highway.
F**R
Well designed.
I just finished assembling and installing this on a 2010 JK by myself. It took about 3 hours from start to finish but I have all the right tools and am very mechanical. As others have said, some holes need to be drilled out to line up, but not many. I glanced at the instructions but they're worthless. If you know what it should like like assembled just go for it. My biggest complaint is ALL the welded on nuts were a bit crooked and had to be chased with a tap to clear the threads of obstructions, either from coating or welding, I don't know which. The combination of being welded on crooked and obstructed threads makes it seem like things are being cross threaded unless you run a chaser tap through them first. For assembly I found it easy to put a sheet of plywood on saw horses for a table so the whole thing could be worked around. While still on the table I applied some anti-slip tape (for stair treads) to the front and rear cross sections so whatever is lashed up there (for me that would be ladders and lumber) won't slide around. Lifting it atop my Jeep was done with a tractor loader with pallet forks. I had a little hardware left over but nothing significant. My hinge covers snapped right back on, then the hooks broke when the window was lifted. I just put them back on with hot melt glue that can be pried off easily enough. All in all, this thing is solid and I feel like it was a good value if you have the tools and skills to work through a few minor issues.
D**K
Great Quality American made products
I have been customizing and restoring cars and trucks for years and love to find an American company making great affordable products. Every Hooke product I have gotten for my rigs or installed on our customers vehicle's has held up great. We do coat everything in raptor we believe it is the best product for longevity and performance before installing them. With that said they are great products and usually considerably less than most other aftermarket companies, and you don't have to compromise on quality. So support an American product.
C**H
Tuff Enough
Easy straight forward install. Fast shipping and solid packaging. Directions say 1.5 - 2 hrs. With 2-3 people. I installed by myself in about 2.5 hours. The rack is super sturdy when installed. The only advice I can give is to pay attention to the instructions when attaching the leg supports to the roof and make sure you are centered. I’m super ocd so I had to adjust slightly after install. Nice rack and would definitely recommend. One issue that I did encounter was the plastic window hinge caps do break when you open the window. An easy fix was just to lower the cap about 1/4” and attach with a small amount of silicone. Or you could cut the plastic to clear the support.
A**.
Okay for the price but...
First let me start off by saying that who ever wrote the instructions did a horrendous job. IKEA has better instructions and theirs is just pictures. Seriously, the instructions need to be redone. Now to the actual product, for its price it’s pretty okay. I wasn’t expecting anything glamours with this purchase but I was expecting some kind of problem and that’s exactly what I got. The holes did not align correctly when trying to screw things in. I did one side like instructed then tried to do the other and nothing was aligning. I had to play around with it for about an hour and try several things to finally get the center bars attached. I got the back bar attached but the front still wouldn’t align all the way. I ended up not using 1 screw for the front because it wouldn’t go through. Maybe all the parts I got were warped I don’t know. The rear hinge caps for the rear window also can’t be put back on because of the rack attachments sticking out to much. All of that being said it is a cheap rack and if you want something better go else where. Eventually I will get myself a better rack but for now this will do for what I need it for.
D**Y
Easy install
Installs easily. Followed directions. No drilling required. Sturdy and looks great.
A**S
Simply a Poorly Engineered Product with Even Worse Instructions
First off, I'd like to state I am an engineer and I generally do not write reviews and when I do I definitely don't write bad reviews. I like to spread positivity. But this is an exception. This is one of the worst engineered products I've ever purchased. Not only are the parts cheap, warp easily, and don't thread or strip out, but the instructions are IMPOSSIBLE to follow. The kit came with 3 different kinds of bolts and they refer to them as things like "Part A" and "Part L" with pictures that are literally 1 mm x 1 mm and do not have any measurements to point out which bolt is which (they have the same numbers). The instructions are a bunch of blurry pictures with arrows pointing where to put parts which aren't labeled and there are multiple circumstances where the pictures actually do not match what the actual parts look like, leading to just extreme confusion. I finally got the thing together (there were 6 our of 30 bolts that would not thread into place so the thing is flimsy as hell.) Eventually I literally gave up and tried to get a return and they didn't respond to my return request. If you are looking for a roof rack, look elsewhere. I was really excited about this thing but now I am stuck with a $300 roof rack that is likely unstable because literally the parts don't go together properly. I hope I saved someone a lot of grief.
D**D
Good quality
Easy to install, sturdy, I'd recommend this item.
Z**Y
Decent, so far...
Genuine review here from Canada. Researched this rack and knew since it’s a knock-off of Smitty Defender it would have some issues. For the price I thought it would be worth it to problem solve some things. Surprisingly the powder coating was well done, however, one of the pieces was severely bent which forced me to cut into the rack a bit to align the holes (picture attached). Welds weren’t the best and interfered with some bolts, some bolts wouldn’t thread and that took some playing with. If it works for what I want then I can handle some of its shortcomings. MOST important: when bolting the brackets onto the rear window hinge (nobody shows this part of the install) the bolts holding the rear window are under significant force and there are the two support bars connected to the window. Once the bolts are loosened the glass and hinges shoot upward and it pulled the bolts out a few threads, ripped the rear window defraust off, and yanked the window bar off while contorting the glass. Luckily it didn’t shatter but just a warning for those who choose to go the cheap route. Pros: looks good/sleek, comes with lights (doubt they work well being so deep in the rack, nice coating, unique, and sturdy. Cons: going to take some creativity (ratchet strapping the sides and bending them together to bolt on the sides (picture attached), instructions are...yeah, might come bent (others found scratches or parts missing - I didn’t). Day 1-5: very long install troubleshooting (roughly 6 hours). Used electrical tape and some thin rubber to protect the rain gutters from the rack sitting on them. Forced to use power tools. Day 5: first day driving with it and it WHISTLES going between 65-80km. Haven’t taken on highway yet and it is loud so far going those speeds (depending on wind and I live somewhere fairly windy), but turning up the music gets rid of it. Day 15: Will have to be creative to reduce the whistling sound but I am glad how sturdy it is even hauling a kayak on the highway. Rain gutters appear to hold the rack without issue which makes this roof rack worth it. The kayak being placed on top did remove the power coating in some spots so I may have to spray rocker guard on it. All that is left is to buy replacement hinge covers and silicone them on after shaping them since they don't fit with the rack. Day 20: Rack does fairly well holding my 10 foot kayak on the highway (picture). Kayak weighs around 55lbs and rack weights around 80lbs and getting it to the lake requires driving on some trails that were anything but flat. Did that twice and recently checked the bolts and about half of them were quite loose which was concerning, but hard to tell since the roads I drove on were quite ripped up and sloped. Future: may update if I run into any issues or find that it is rusting.
E**S
You CAN keep your hinge covers on…
I’m gonna save you guys a lot of trouble, the ones who have broken hinge covers l and say you can’t have the covers on with this rack installed… first off, take the bolts out, then place the rack UNDER the window hinge… opens no problem! So no modifications needed. If you already broke your covers, go buy new ones then do as I did.
Trustpilot
1 month ago
1 week ago