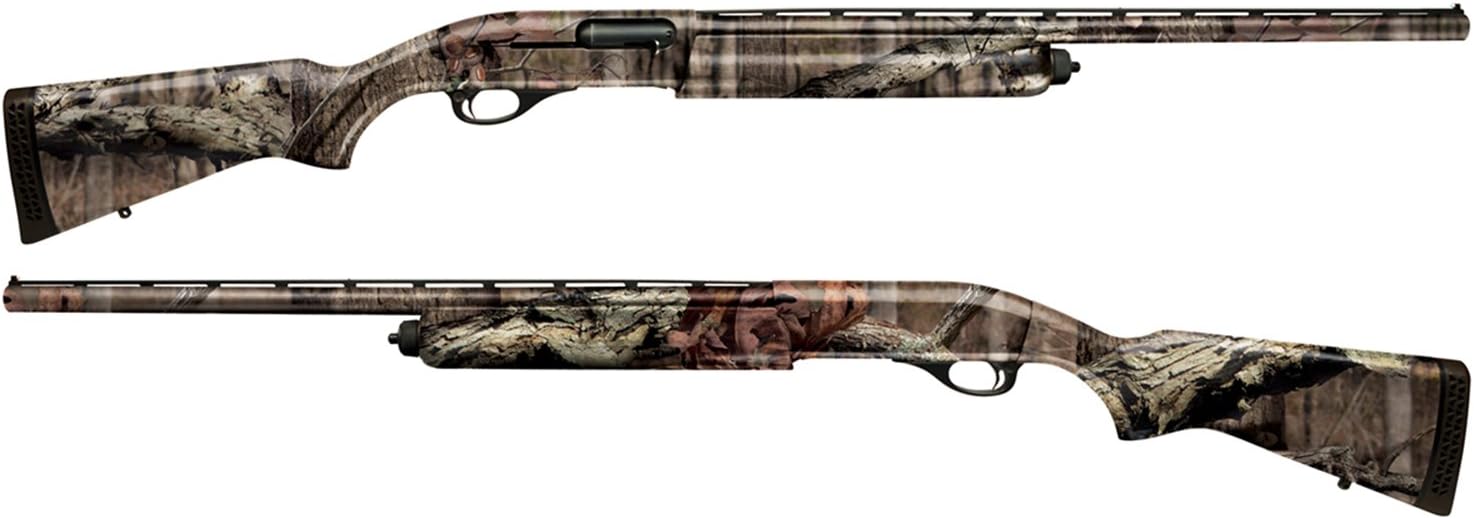


Mossy Oak Graphics - 14004-BI 14004 Break-Up Infinity Camouflage Gun Skin Kit - Easy to Install Precut Vinyl Wraps and Matte Finish - Shotgun Kit
Product ID: 1814158
🎯Easy Install
🔄Removable
🛡️5-Year No Fade
Buy anything from 5,000+ international stores. One checkout price. No surprise fees. Join 2M+ shoppers on Desertcart.
Desertcart purchases this item on your behalf and handles shipping, customs, and support to Senegal.
🎨 Unleash Your Shotgun's Style!
The Mossy OakGraphics 14004 Break-Up Infinity Camouflage Gun Skin Kit is a high-quality, easy-to-install vinyl wrap designed for shotguns. Made from durable 3M cast vinyl, it offers a matte finish that resists fading for up to five years. The kit includes pre-cut pieces for a perfect fit and can be removed without leaving adhesive residue, making it a versatile choice for firearm enthusiasts.


| Manufacturer | Mossy Oak Graphics |
| Brand | Mossy Oak Graphics |
| Model | 14004-BI |
| Item Weight | 4.8 ounces |
| Product Dimensions | 7.8 x 7 x 1.5 inches |
| Country of Origin | USA |
| Item model number | 14004-BI |
| Manufacturer Part Number | 14004-BI |
| OEM Part Number | 14004-BI |
| Special Features | Waterproof |
W**Q
Make your weapon great again!
For the most part, it's easy to install, taking me an hour, and the video tutorial on the website is invaluable. Took a 40-year-old gun and made it look new. Great graphics, and it has held up well through hunting season. Provides an extra layer of protection as well. Guys, though I bought a new gun, an inexpensive solution to make your weapon great again!
C**B
Mossy oak graphics Remington 870
Awesome product and looks good, great quality and easy to install
M**K
Easy to work with.
Looks Good. Pretty easy to install if you’re patient it’ll come out nice.
A**H
I thought it was too good to be true
You simply cannot beat this product when it comes to camouflaging your firearm. I've wanted to dip my shotgun since I became a waterfowl hunter, and I could never get myself to spend over $200 to have it dipped...then my dad told me about gun wraps. I thought it was too good to be true....$22-$30 for a full gun camo cover that protects your firearm and doesn't have to be removed each season. Makes my beat up 870 look like a brand new dipped shotgun. I do have some criticisms that I think people should know, however... 1) If you are lazy and don't want to spend AT LEAST 2 HOURS getting this stuff applied to your firearm properly...then this is not your product. 2) If you think that this will be exactly like dipping your firearm, IT IS NOT. YOU WILL HAVE MINOR WRINKLES AND EDGES; only things you can notice if you look closely. Turkeys, ducks, or whatever you're hunting will not notice these things. When you put the wrap on your firearm, make sure to take your time....I mean really TAKE YOUR TIME. Watch the youtube videos on how to apply the wrap to your firearm, they will help you immensely. 2 YEAR UPDATE: Gun still has original wrap on it...still looks great. No peeling, no fading so far. There are minor abrasions and cuts in the vinyl from carrying it through the dense cover, but the gun underneath is still completely covered and protected. I've wrapped 3 of my firearms with this stuff, and I just bought a new BPS that I will also wrap. Awesome product.
T**K
Worked great
Fast shipping. Great product. I used it on a Winchester super X2 fit great and adhered very well. Better than expected..
H**R
Really impressed with this wrap. Looks like a new gun!
I bought this to wrap my Beretta AL390. I watched the instructional videos on YouTube before purchasing to get an idea of how difficult it would be to wrap my gun. I went into this knowing it was going to take some time, possibly an hour or two. I started with the stock and right away knew this was going to be a two hour project. It's not that it's difficult to wrap the gun or work with the material, it just takes time lining things up and working the material around the edges, and at the same time making sure there are no bubbles or creases. I used a heat gun and that really helped. I don't think it would have been possible without the heat gun (or a hair dryer). A hair dryer should also work as it should get hot enough to warm up the material. The videos mention you can easily adjust the wrap if you need to. I found this to be true, especially on the buttstock where it took a few attempts to line things up properly for fitment. I was worried that once the wrap stuck to the stock it would be difficult to remove to adjust but that was not the case. Apply a little heat to it and it pulled right off. I did use scissors to trim a few pieces and a box knife for trimming along the lines. I went into this with low expectations thinking one little mistake on my end would ruin the project or material, but honestly it was a pretty easy job and your chances of messing up a low. You still need to take your time, especially when cutting. Do not rush, be patient, and you will transform your gun. There might be some people out there that can wrap their gun in under an hour, but plan for about 2 hours. The finished product looks amazing and i'm so happy I decided to give this a try. I was thinking about purchasing a new shotgun that comes from the factory with camo, but this saved me a lot of money and looks just as good.
J**.
Pretty awesome!
The key to being happy with this camouflage kit is going into it with realistic expectations. If you are anticipating a perfect job on par with a factory applied finish , you may be disappointed. However with that said, I am very happy and impressed with my results and would dare say that it does look professionally done if not inspected closely. As other's have mentioned the vinyl is slightly "slick" but not enough to concern me. It completely transformed my gun and was actually kind of fun to install. One big positive for me is that the kit is made in the USA. Tips: Do it in a warm room. Clean your firearm really well. (Don't skimp, or you will regret it) Use a sharp blade, a hobby knife would be best. Use plenty of heat. A blow dryer worked great for me. Leave excess on the seams and overlap them a little to ensure complete coverage. Keep one of the backing sheets next to you and put the excess on it to use for patching small areas later. Make relief cuts on tight curves and then hide the cuts with the seam. Don't be afraid to pull the vinyl up if it isn't right. It is thick and the adhesive can handle it. If you get wrinkles, first try to re position, if you can't, apply direct heat and smooth them down. Be creative, some parts are harder than others. If you have to patch pieces together it all blends together well. Most of all, take your time and don't get frustrated. Good luck!
C**O
Awesome product and camo pattern, but has a few cons.
This product is a PAIN to handle and install. I believe after several uses a person may become very efficient with the wrap, but that means to me it is not as simple as advertised. I'll leave my very honest opinion and insight to hopefully help others. Once the pain of installation is done this product literally transforms your gun! I am very pleased with how it looks on my bird gun! My buddies thought I bought a new shotgun. Almost all of the air bubbles resided after the install and the only creases were where the material over lapped. You do lose some grip one the gun because of the wrap, not enough to complain about. The reason I could not give it a 5 star rating was due to the materials inability to withstand the heat of the hot gun after the install. I went to a pigeon shoot and was really proud of my gun. I shot often and well that day. After 5 boxes of shells the gun gets hot [Duh]. Much to my dismay, the wrap began to come "un-glued" to the barrel of the gun around the muzzle, foregrip, and the vented rib. I tried to ignore it but when a buddy used it and brought it back pointing out the flaw I was over it. If you put this on a gun and you don't plan on running to the point of getting hot you'll be fine. But to me, its on a gun and I had hoped (not using common since) that it would hold up to my idea of typical use. 1st, the instructions tell you to clean all surfaces of oil before you apply... and they mean it. It seems taboo to do this to your firearm, but it is a must. Use your favorite oil cleaner as long as its not abrasive to any of the surfaces. If there is any oil, or even residue, it will effect the adhesive. 2nd, leave yourself at least 3 hours to do this. It is very tedious so take your time if you want it done right. 3rd, measure TWICE, cut ONCE. There is a little material to spare and you can use to fill in gaps but it makes this even harder and more time consuming. Also, when making cuts where material overlaps, make your cut a wavy line cute rather than a straight line. This helps the pattern transition and really decreases the visibility of the crease and overlap. 4th, HEAT IS YOUR FRIEND!!! Use a hairdryer or heatgun to "warm" the material and surface when applying. This will help you stretch the material into place because you will never be able to make perfect cuts with this stuff. Just don't get crazy with the heating and stretching, it will MELT the material and it will loose its adhesive. When you are all done, hit with more heat and give it some final touches. I did a Ruger 10/22 as well as my 11-87 and had good results by leaving the gun in the hot car all day the next day to help the material set in and memorize its surface.
Trustpilot
1 week ago
3 days ago