![[Gulfcoast Robotics] All Metal Hotend Conversion Kit - Polished Titanium Heatbreak for Creality Ender 3 Pro and V2, Ender 5 Pro and Plus and CR10 3D Printers](https://m.media-amazon.com/images/I/510fQT8OgyL._AC_SL3840_.jpg)



🔥 Elevate your 3D printing game with titanium precision!
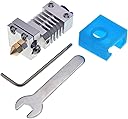
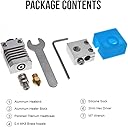
The Gulfcoast Robotics All Metal Hotend Conversion Kit is a precision-engineered, drop-in upgrade for Creality 3D printers, featuring a polished titanium heatbreak that drastically reduces heat creep and clogs. Its silicone sock insulation ensures faster heat-up and stable printing temperatures, enabling reliable printing of high-temp filaments like ABS and PETG at lower temperatures. Compatible with a wide range of Creality models, this kit transforms your printer’s performance with minimal installation effort.
| Customer Reviews | 4.2 out of 5 stars 977 Reviews |
B**T
Amazing Results, night and day difference to my stock Ender 3 hot end
Prior to getting this hot end, I was struggling with printing PETG and having it stick to my bed. After the first 2 good prints, I couldn't get another reliable print from that spool to save my life, and it was very frustrating. Whether it was not sticking to the bed, excessive stringing, not extruding enough, or a slew of other issues I was having, it was just being difficult. Finally, I was able to get that print to stick (on the stock hot end), but I had to be at 235C in order to do it! I took a look at my PTFE tube and it was charred and breaking down at that temp. SO I ordered this kit and was very impressed. Build quality is good. No instructions came with it, but their support team responded to an email without a few hours with a detailed guide and answered all my questions. (Installation is very straightforward, but I'm glad I asked the questions I did because I didn't know about the Heat to 250C then tighten the nozzle). My first print with the same material I was having issues with printed just about perfect. There was still minor stringing issues, but that can be dialed in with settings. What really shocked me is that this material, which the old hot end needed to be at 235C in order for a possibly-ok print printed fantastic at 215C! thats a whopping 20C lower, the stock hot-end would barely extrude properly at that temp. I'm curious how this compares to the TH3D titanium all-metal conversion, which just replaces the heat break on the stock hot end. I had that as well in case I didn't like this, but am so satisfied with this product I think I'll save the other one as a spare / if I decide to go to a dual-hot end setup.
B**D
Works Nice and Cheaper than The Big-Name
This works nice and I am happy with it. I originally installed per instructions (at least I thought I did). After a few nice prints it started to leak. This only caused issues with PETG where a blob would build on the side of the nozzle, brown up, and then drop on the print. This lead to either a random brown blob on my print or a collision and layer shift. So... I took apart and cleaned/polished the heater block and heat break with a heat gun, wire bush, and file. Then I put the block and break back together, using a heat gun to get em hot and tightened up good. Then added a new nozzle, heated it all up and tightened good. Been running perfect since. Im saying to make extra sure that the break is tightened into the block with heat and then the nozzle into the block so it is all tight and there is no way anything can ooze past those threads.
J**R
I have this on 4 of my 6 Ender 3 Pro printers and it is very good.
When I started printing PETG, I used to get blocked hotend's all the time. The issues with using an all metal is to follow instructions on installing. If you want a good result, then understand how they work. 1/ You must get the heat break to fit tight against the nozzle to stop any leaks. 2/ When you change nozzles, NEVER allow the heat block to move as you remove the nozzle. This hot end does not have the two screws (that screw up the function of high temp printing). Hold it tight with a pair of good pliers or with a crescent wrench and only change nozzles at the full temperature. The printing results are extremely good with this. Along with normal maintenance of the printers. Before you print anything make sure all the screws are tight, and the rollers have a clean track, have no wiggle, and the rollers are snug against the tracks. When I start a print, I will always check the bed for having no movements, and runs very smooth on the rollers. If you find any movement up or down after snugging the rollers, then you have a bad roller bearing or two. After 300 prints the quality is still nearly perfect. The layers look really nice. And I print my PETG parts at 0.12 layer height and some at .36 width for extra strength. I print mostly PETG and have great results. For TPU you want the teflon tube in contact with the nozzle, because you need all the "slick" you can get to make it into the nozzle and make nice flexible prints. For that I use the "Hot End Fix" on Thingiverse.
H**M
Good - mostly
I used one of these on my Ender 3 v2 and it was like a gift from heaven. 99.9999999% of my persistent heat creep issues were solved with this hot end. That being the case, I ordered one for my Ender 3 Max thinking I would avoid any heat creep issues with the stock hot end. AND, that mostly happened except despite installing it correctly and cold and hot tightening the grub screws and the print nozzle, I got consistent leaks around the threads of both the nozzles and the heat break with predictable results - clogged nozzle and persistent under extrusion. I had read user reviews about the leakage, but paid them little heed due to my experience with this hot end on my E3 v2. To make a long story short, after some investigation I discovered the threads for the nozzle and the heat break had what I consider excess play and even when properly tightened - cold and hot, allowed for leakage around the threads. After some careful consideration on a solution, I opted to wrap the threads of the heat break and the nozzle with common plumbers teflon tape. Its working temp on the high side is 500 C, which is hot enough for the filament I use. I currently print only PLA, so this solution seems ideal. After reassembling with the teflon tape and re-tightening (cold and hot), the leakage problem is gone along with the attendant side problems and the printer produces beautiful results. Unless you print with very high temp plastics this solution is easy and inexpensive and makes this clone a worthwhile purchase. Barring the leakage problem, this is a very good product, well made, easy to install and with the titanium alloy heat break has eliminated my heat creep problem.
C**.
So Far, So Good!
I decided to give this hot end a shot before paying twice as much for the “name brand” option. I’ve been printing for a straight 24 hours on my Ender 3 so far. So far there have zero leaks, and my prints appear to be of better quality. I can definitely say that it heats way faster than stock. Simple to install, and a great upgrade, all for half the price. Update 08/19/21 It’s been a little over two months of close to nonstop printing with this hot end. Still no leaks and no issues out of it. Will update again if anything changes
A**R
Horrible Product, Absolute Trash...
I have never written a review before, until this one, and felt it was needed based on the horrible results got with this hotend and my findings. I typically use MicroSwiss hotends in my print farm, but I decided to try three of these hotends based on the reviews. Installed them on three machines and removed my MicroSwiss hotends. I installed them over Christmas 2021 and ran them the entire month of January 2022. I have had these three machines down for clogs, leaking, and coming loose while my MicroSwiss hotends installed a year previous are still cranking away without issues. You can't argue with three machines running these hotends continuously going down while 12 others keep running without issue. On this last failure, I decided to look closer at the hotend and it appears to me that the heater block and heatsink are made from extremely soft aluminum. I should not be able to bend/pry, cold, the aluminum heater block apart where the heater element is pinched. Worse yet, this was with the cheap flat tip screw driver that comes with the Ender 3. When at operating temperatures the second heater block tested was able to be pried open with absolutely no effort! I also noticed that the grub screw holding the heat break into the heat sink strips extremely easy, with little to no pressure. I will state, I have not had any issues with the grub screw, but I tested it because it was the easiest way to check the quality of the aluminum used in the heat sink. The last test I did was to take a tap larger that the thread pitch of the heater block and see what sort of effort it would take to cut threads into the aluminum. Again, no effort required. This last test was a destructive test, I know, but I wanted confirmation that it was soft aluminum before posting this review. The last picture, of the nozzle end with the oozing yellow filament, literally has a single print and it started oozing half way through... I will not recommend this hotend to anyone! It is an absolute piece of junk and buying it will be wasting your money. If money is tight, save it until you have enough for a real MicroSwiss. You will have far less issues, stress, and frustration...
C**K
I am incredibly impressed! easy install, fantastic quality!
While I wish they included paper instructions, the bag that the hotend was in had a qr code on and when I scanned it, it took me to the website where they had excellent detailed step-by-step instructions with lots of pictures that very thoughtfully and verbosely explain the very easy installation procedure. moreover, despite having them already, the hotend upgrade kit includes all the tools you need to install it. everything goes together exactly like the stock hotend except the hotend and heat brake are separate pieces that come apart with a grub screw and because it's actually all-metal, the ptfe tube doesn't go into the heat brake, just into the coupler where it meets the top of the assembly so you have a little more sticking out of the top. you can either trim your ptfe tube (recommended as the end is probably fried anyway if you've been printing with it on the stock hotend for some time), or let the excess hang there. for the price (which is honestly fantastic!) this is a great upgrade to be able to print higher temp materials without frying your ptfe tube (like abs for example which is why I bought it). I'm going to be using my ender 3 with a cardboard box enclosure to print the parts required to construct a voron 2.4 soon. following the instruction guide online, they recommend reducing retractions in half to 3.5mm and after making that slicer correction, I get honestly FANTASTIC PLA prints. (I haven't bought my abs yet, but if this prints as good with abs as it does PLA, I'm REALLY happy with this. I will very likely be buying another one of these for my tevo torando (which is a cr-10 clone and has identical mounts and cooling configuration as the ender 3). I would recommend that this company start including the web instructions on paper with their stuff for people who don't want to have to refer to the internet via computer or phone for installation or don't know how qr codes work (I see some other reviews stating that this doesn't come with instructions and i think they totally missed the qr thing (which isn't nearly as huge in the US as it is in other countries), but I can easily give this product a 10/10 review and as I said, will likely be buying another one just like it for my tornado. oh, and in case anyone is wondering, it uses the standard mk8 hotend design so it accepts the same nozzles as the stock hotend (so if you have a bunch already they'll work)
W**E
You need a thin 7mm wrench for proper install.
First things first: yes, this does work. If you print mainly in FDM what you're doing by installing this is trading the possibility of a PTFE clog (where the PTFE pulls away, allowing filament to expand and clog) for a possibility of a clog between your nozzle and the heatbreak thread. If you don't routinely get PTFE clogs and you don't need the other benefits of an all metal hot end then you don't necessarily need this. After installing I can say that I get fewer clogs. It is more rare (for me) to get a clog between the nozzle and heat break than it was from the PTFE receding. So that's good. So not having PTFE clogs has been amazing. What's not amazing is ensuring there's no gap between the heat break and nozzle. You have to thread both in very tightly so that they meet in the center with zero gap. There zero margin for error. I put my hot end at 250 degrees and tighten the nozzle with a socket wrench (much easier than using a wrench - recommended!). So why three stars? First of all, nowhere in the product description does it say you need a 7mm wrench. A stock ender 3 comes with three types of wrenches: a 6mm (for the nozzle), and a dual 8/10 mm wrench. Why the heatbreak wouldn't be designed around one of these sizes or, better yet, made to fit a socket wrench of some size is beyond me. I know this is a clone. It just copied someone else's design. But a quality of life change could have been made. The point of the matter is that getting the heatbreak nice and tight is challenging. You have to heat to a very high temperature which makes handling it difficult, and you need a *thin* 7mm wrench, as there is very little surface area for a 7mm wrench to grip on to. At least a socket is more conducive to getting a tight fit, instead of slipping and sliding around with a thin 7mm wrench with a scalding hot piece of metal held by pliers or another wrench. It's true I get fewer clogs. But when I do get a clog, there's a lot of hope and prayer involved in making sure I threaded both the heatbreak and nozzle appropriately. So it's pretty much a net wash for me over whether its better. Fewer clogs, but when I do get a clog it's significantly longer to troubleshoot and make sure its reset correctly.
Trustpilot
1 month ago
1 week ago