Desertcart purchases this item on your behalf and handles shipping, customs, and support to Senegal.
💧 Seal the deal on leaks before your neighbors do!
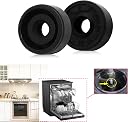
The W10195677 Dishwasher Diverter Valve Seal Grommet is a durable, nitrile rubber replacement part compatible with multiple major dishwasher brands. It offers a cost-effective, easy-to-install solution to stop leaks by replacing worn seals instead of the entire diverter motor assembly, making it ideal for DIY maintenance and extending your dishwasher’s lifespan.


| ASIN | B07X7LBRW7 |
| Additional Features | Portable |
| Best Sellers Rank | #49,596 in Tools & Home Improvement ( See Top 100 in Tools & Home Improvement ) #543 in Dryer Replacement Parts |
| Brand | ShineUs |
| Brand Name | ShineUs |
| Color | Black |
| Customer Reviews | 4.4 out of 5 stars 940 Reviews |
| Finish Types | Matte |
| Form Factor | Freestanding |
| Included Components | Dishwasher |
| Inner Material | Nitrile Butadiene Rubber |
| Installation Type | Freestanding |
| Item Dimensions D x W x H | 0.4"D x 0.4"W x 0.2"H |
| Item Weight | 3.2 ounces |
| Manufacturer | flyingamz |
| Manufacturer Part Number | WPW10195677 W10195677 |
| Material | Rubber |
| Material Type | Rubber |
| Model Name | W10195677 |
| Model Number | W10195677(WPW10195677) |
| Number of Items | 1 |
| Number of Packs | 1 |
| Product Dimensions | 0.4"D x 0.4"W x 0.2"H |
| Recommended Uses For Product | Replacement for leaking dishwasher diverter valve grommet |
| Special Feature | Portable |
| UPC | 778992056342 |
| Unit Count | 1 Count |
R**S
Worked with Whirlpool dishwasher, though Whirlpool said I had to buy a much more expensive assembly.
This seal fixed a leak in my Whirlpool WDF750SAYM0 dishwasher.
R**.
Difficult to remove the old one, but works great!
Like others. I could see that water was dripping from the diverter motor. It definitely made sense to try replacing the grommet rather than buying a new diverter motor. I was surprised to find how hard it was to remove the old gasket. Having watched the a couple of videos on replacing the diverter motor, I found taking things apart inside the dishwasher to access the grommet to be very easy. It literally took one minute to get everything apart. That was the easy part. The hard part was getting the old grommet out. That was surprisingly difficult. I had good tools: various picks used for removing O-rings and such, but the grommet wouldn't budge. I then tried an ice pick, fine needle nose pliers, and a small screwdriver -- couldn't get the old one out. I wondered if it might be glued in place. I then decided to pull out the dishwasher and remove the diverter motor so the shaft wouldn't be in the way and also so I wouldn't scratch the walls of the cylinder the grommet fits into or the shaft. That helped a lot. Using a very small screwdriver, I was able to pop it out. I put it in partially to test the fit and found it wasn't nearly as snug as the original so I wrapped two layers of teflon plumbing tape around it and put it aside for the moment. I then decided to re-attach the diverter motor. I wasn't sure if it made more sense to put the grommet in first and then the motor or vice versa. I decided to reattach the motor first so I wouldn't push the grommet out of place and mess up the teflon wrap when trying to push the shaft up through it. With the motor in place, I put some plumbing grease on the shaft, then inserted the grommet with the groove-side up (flat side down). It was a snug fit, which I was happy about. I pushed it down in place using a small open-end wrench which ensured even pressure. A little bit of the teflon tape pushed up as I pushed the grommet down, but enough of it seemed to be staying in place. I then put things back together as shown in the videos, turned the water and power back on and tested it out, while lying on the floor looking to see if there were any leaks. My heart sank when I saw a drip, but it turned out that was it - literally one tiny drip and no more for the whole rest of the wash. I knew for sure that was the case because I had slipped a cookie sheet underneath the motor so I'd catch and drips and also be able to tell how much it had leaked, if at all. My dishwasher is an old (probably 10 years) Whirlpool model WDF730PAYB3
B**R
It stopped the leak!
As many reviewers have noted, the most difficult part of replacing this grommett gasket is removing the old one. I had to use a pointed hook tool and basically destroy the old one to remove it. So once i started with this project, i was at a point of no return! Fortunately the part fit and stopped the leak from the diverter motor. Be sure to save the metal spring from the old grommet to place into the new one. be sure to take photos of the situation before you remove anything so you remember how to put things back together. I recommend watching at least two You Tube videos on replacing this part by searching: "fix leaking dishwasher diverter motor seal replacement". It is pretty straightforward, but you don't want to mess up any steps.
M**E
Apply silicone glue to seal it in!!!!!
The big question? It definitely worked for me. It leaked first time I attempted it. Did a bit more research and decided to try again using a new grommet with clear silicone glue . I applied it evenly on bottom and sides of grommet and spread some more in slot where it sits . I made sure to avoid getting glue in hole where diverter stem goes in or inside of grommet hole.after carefully seating it in place, I then waited 24 hours for glue to cure. After reassembly and repeated use, subsequent inspections over a few days show no leaks at all. As shown in photos (new part on right) the part I received was not OEM but aftermarket with a narrower hole so as not to require a spring that was utilized on original and new one is also noticeably taller than original but did not affect performance of diverter in any way. This installation method worked for me. I hope it helps those of you with similar problem repairing your dishwasher. Good luck.
A**Y
Immediately fixed the leak (with correct installation)
With a correct installation, this fixed the leak. Installation instructions: To help remove the old grommet, I purchased this hook set: https://www.amazon.com/dp/B07676QLSQ?psc=1&ref=ppx_yo2ov_dt_b_product_details and used the 90 degree hook to slide down the diverter motor shaft (the white plastic piece) and pull the old one out. I was surprised when it slipped right off. Perhaps because the grommet was pretty worn? Just be careful that you don't drop the grommet down into the sump water feed as it's very difficult to remove :) I ended up having to turn the power back on to the dishwasher and run a few seconds on the express wash to blow the grommet out. If you have to do this, be ready with something to catch all of the water that will for sure leak. I ran the drain function to remove all of the excess water in the sump. Take note of the grommet orientation whether it is spring side up or down. I'm not sure how important this part is, but it could be important to prevent leaks. VERY IMPORTANT: After removing the old grommet, I used the full hook to very carefully pull the spring out of the old grommet and then used the straight hook to slip it on to the new grommet. As I've seen a lot of reviews say they needed teflon tape to keep it from leaking, I can only assume they skipped this step. Don't forget the spring! Next step: I applied some silicone grease (https://www.amazon.com/dp/B000DZFUPC?psc=1&ref=ppx_yo2ov_dt_b_product_details) on the inside of the new grommet and carefully slipped it over the diverter motor shaft. As I goofed up pulling out the old grommet, I'm not entire sure whether the spring side goes up or down. It looked like it was spring side up on the old one before I pulled it out, so that's the way I put it in. I wiped the excess grease off the diverter motor shaft and replaced all of the parts. Aside from when I goofed up and dropped the old grommet, this took a total of about 15 minutes to fix. I'd watched a handful of videos of how to replace the sump and diverter motor, so I was pretty familiar with general disassembly, so it might be worth watching a handful of related videos. I did not need to pull the dishwasher out at all which was nice.
P**N
KitchenAid built in Dishwasher - KDFE104HPS0 - solved leak
Only 2 runs in, but the leak at this stage has gone. The old leaky one was extremely difficult to remove, and this one went in quite easily so was a little skeptical but followed another reviewer's advice and tapped it down using a socket wrench attachment. Also as added precaution I put a SimpliSafe (Home monitoring system) water detector under the washer in a shallow tray so to warn of a future leak, plus this appeased the wife, that I should have spotted this leak sooner! I am not advocating A SimpliSafe solution, as there are many products out there, but it has saved me a few times from frozen pipes and other stupidity of the homeowner (Namely me!)
M**D
Doesn’t work
Did not properly seal the diverter valve. While it fit comfortably, it did not create a good enough seal to stop the leak. Amazon wants me to return it for a refund, but that would require removing the grommet during which it would likely get damaged and thus void the return.
E**.
Easy fix for dishwasher
Just what I needed to fix my leaky dishwasher! My Kitchenaid was leaking and this had happened on a previous dishwasher, so I knew what part I needed to order. This $9 part saved me hundreds by not having to call a repairman. I just searched online for a video to show me where and how to replace it. It was pretty easy! 6 months later, still no leaks!
A**R
Did the trick.
The Grommet fit perfectly and stopped the leak, as well easy to install. My only complaint was the cost. $30 in Canada but $7 in the States. I know the dollar isn't the same but holy mark up. Amazon should look into why the huge range in cost.
K**I
Saved me at least $300
When my machine started leaking, I diagnosed the problem and called the repair shops, and they all tried to sell me a $350 sump replacement. That’s parts ALONE. If you include labour, it’s not even worth fixing. Instead I decided to take a risk and see if this little grommet would fix the problem, sure enough it did. It’s absurd that whirlpool doesn’t sell this cheap part and they expect you to replace the whole sump assembly when a tiny rubber seal fails (seems to be a very common problem, my neighbours have exact same machine and theirs failed too). The repair was pretty easy and if you can find instructions, you could do it yourself in about 20 minutes. $30 does seem steep for a little chunk of rubber, but it’s far better than spending $350 on a sump, or $600 to have someone do it for you, or $1000 for a whole new machine. It’s an easy fix, you can do it yourself.
D**E
Reason why the Manufacturer does sell this part
It leaked worse than before. Ended up changing the whole bottom end and finally fixed the leak
G**B
Easy fix for my dishwasher
It fits my w10849439 Kitchenaid dishwasher. A big higher than the original one but works perfectly, no more leask. Just overpriced for this piece of rubber :)
C**G
It works. Environmentaly prudent & supplier praised 1 extra star. Manufacturer... coal for Christmas
Happy for sure. Worked as intended however I'm not loving the fact of how much it cost for what amounts to a little rubber washer and spring. Sure its an engeneered part but the cost is way out of wack and takes advantage of poor manufactures policy of replacing the entire assembly (sump) **Kudos for ensuring dishwasher was repairable but should easily be 1/4 the price. Also ensure you replace the diverter motor as if you need this part, the motor got wet!
Trustpilot
3 weeks ago
1 month ago