Desertcart purchases this item on your behalf and handles shipping, customs, and support to Senegal.
🚐 Upgrade your ride, silence the road, and never look back!
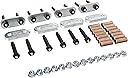
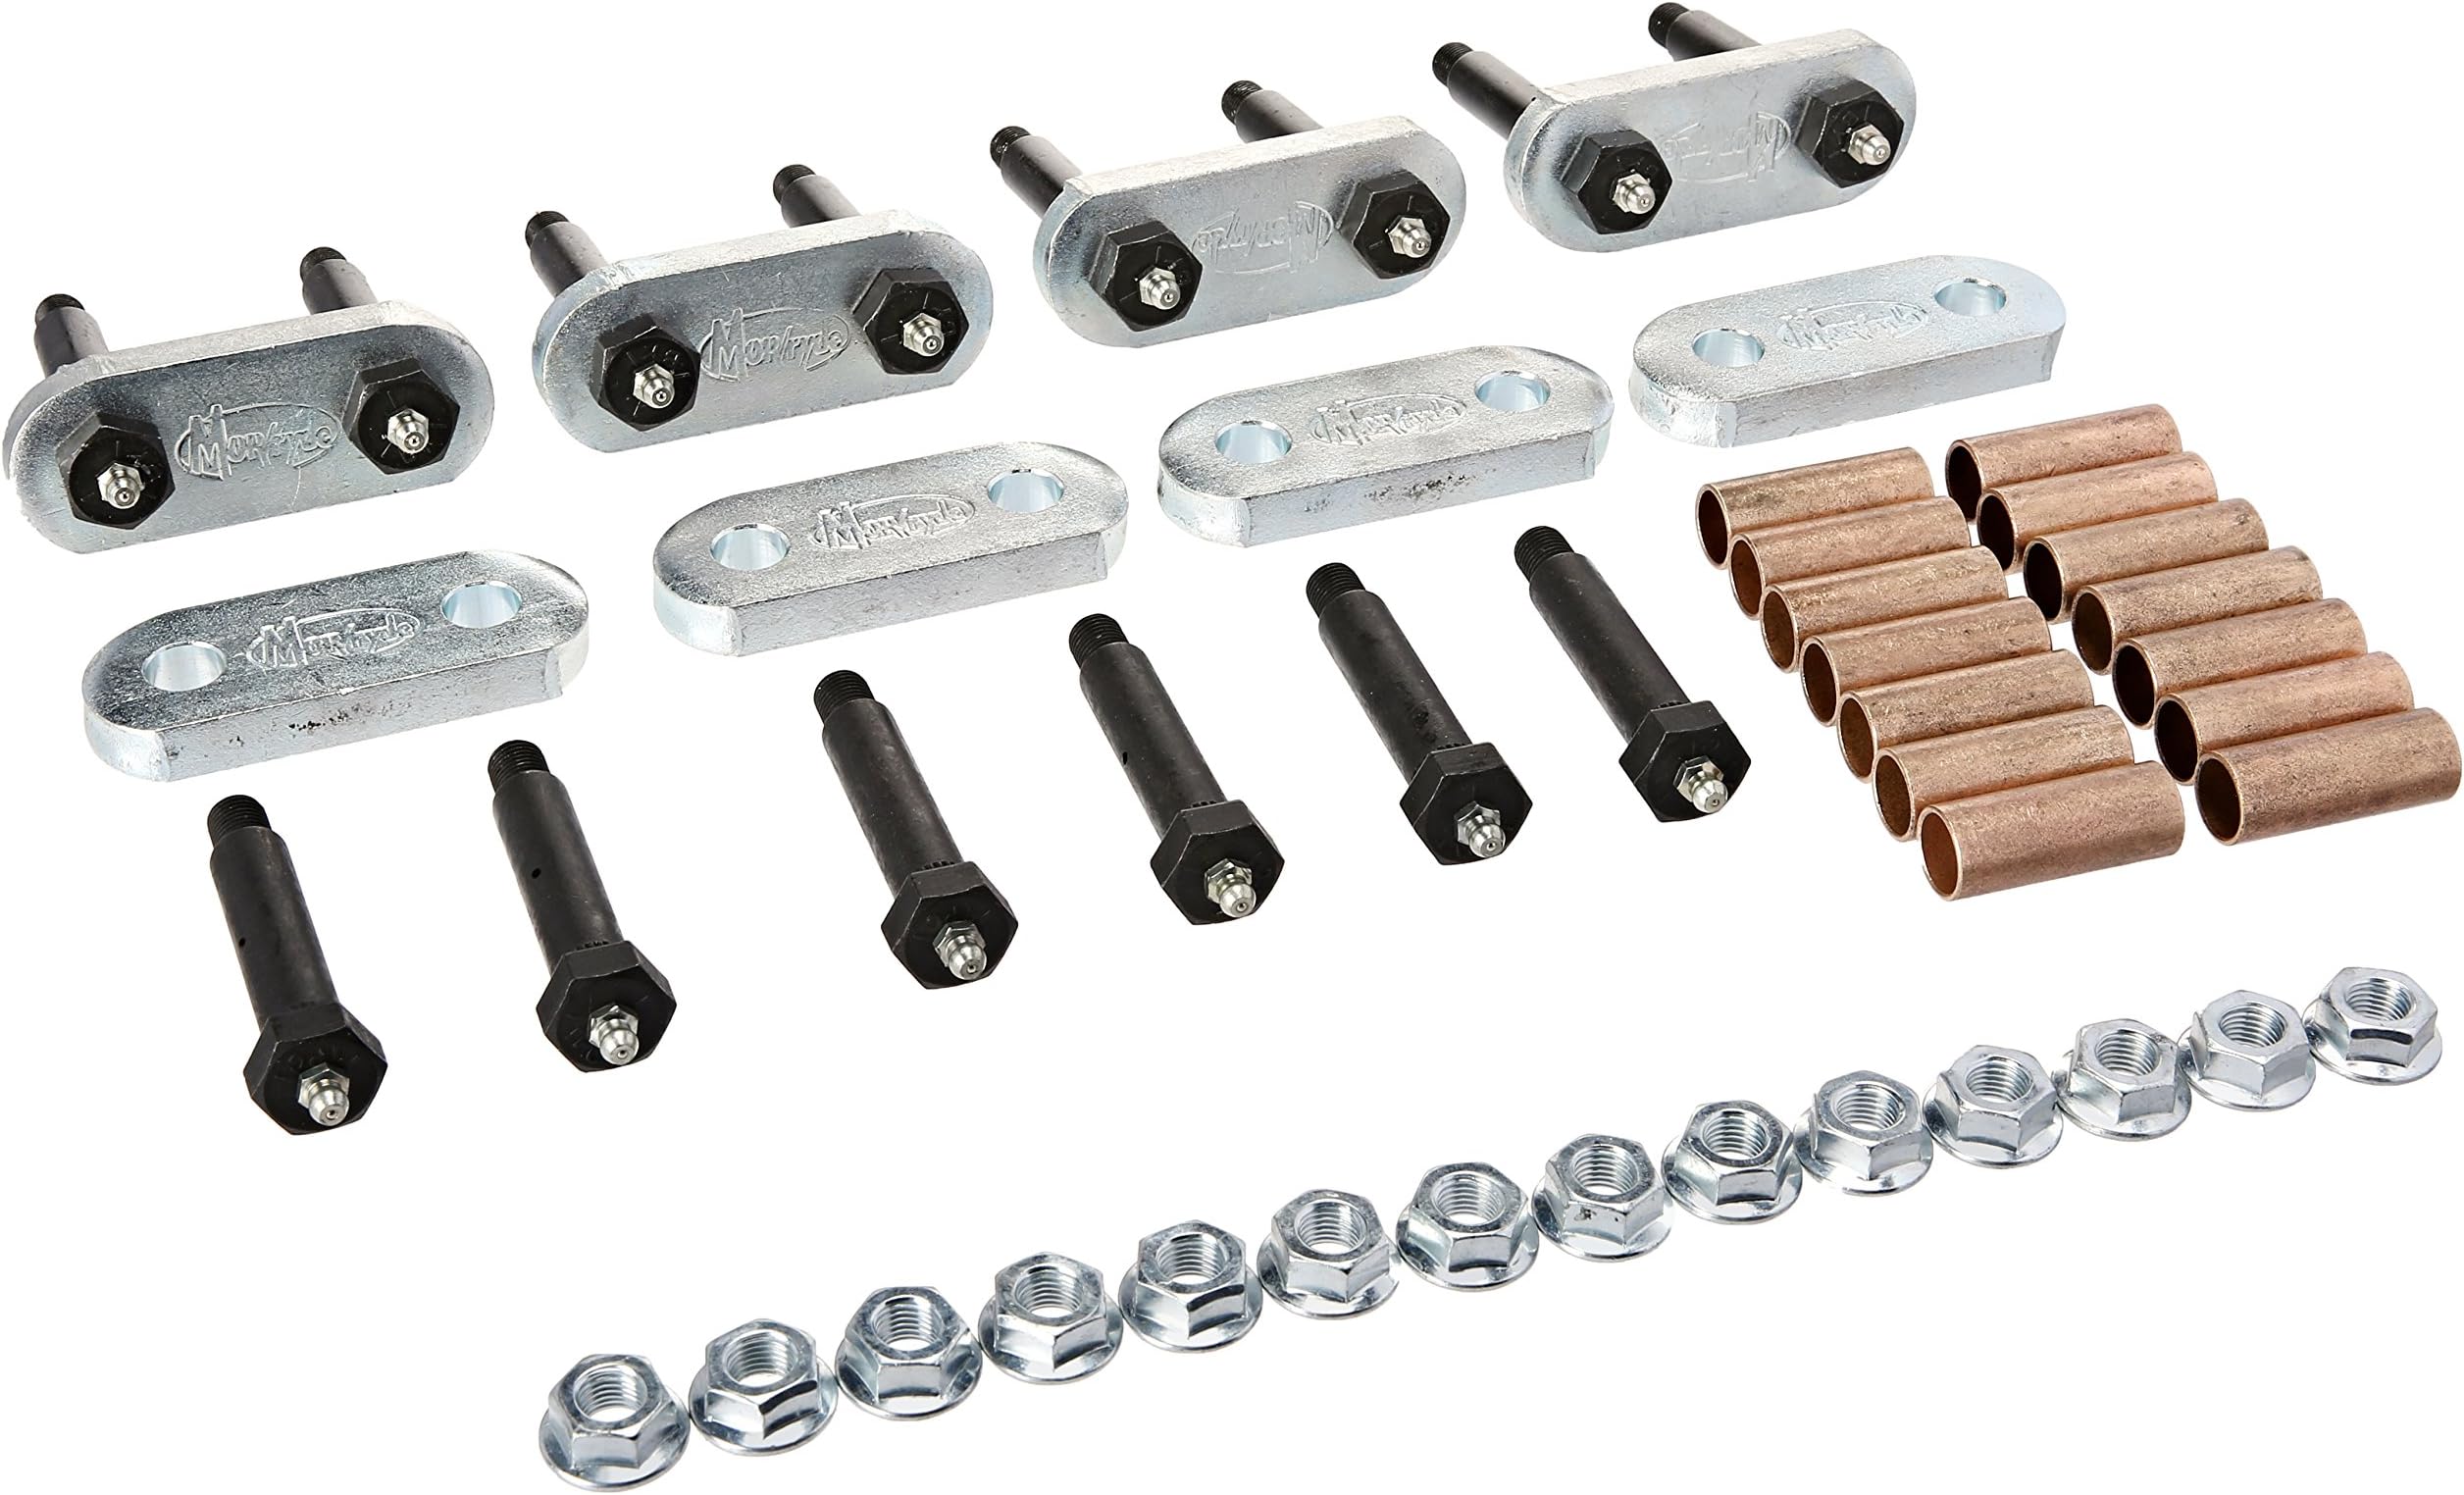
The MORryde UO12-016 Heavy Duty Shackle Upgrade Kit is a precision-engineered tandem axle suspension enhancement featuring thicker 2.25" shackles, durable bronze bushings, and greasable bolts. Compatible with CRE3000, Stock, and Equaflex shackles, it delivers superior strength, reduced maintenance, and a quieter, smoother ride—perfect for full-time RVers and serious road warriors.


| ASIN | B007HRICH2 |
| Auto Part Position | Front |
| Automotive Fit Type | Vehicle Specific Fit |
| Best Sellers Rank | #63,151 in Automotive ( See Top 100 in Automotive ) #21 in Automotive Replacement Chassis Shackles & Parts |
| Brand | MORryde |
| Brand Name | MORryde |
| Color | SILVER |
| Customer Reviews | 4.8 out of 5 stars 1,384 Reviews |
| Fit Type | Vehicle Specific Fit |
| Global Trade Identification Number | 00094922294494 |
| Included Components | MORyde UO12-016 Heavy Duty Shackle Upgrade Kit - Tandem Axle |
| Item Type Name | MORyde UO12-016 Heavy Duty Shackle Upgrade Kit - Tandem Axle |
| Item Weight | 12 pounds |
| Manufacturer | MOR/ryde |
| Manufacturer Part Number | 0213.3006 |
| Material | Alloy Steel, High Carbon Steel |
| Material Type | Alloy Steel, High Carbon Steel |
| Model Number | UO12-016 |
| OEM Equivalent Part Number | UO12-016 |
| UPC | 094922294494 |
| Unit Count | 1 Count |
M**S
Glad I did it
In short, I bought this. Installed it myself. Survived the experience. Glad I did it. Want a ridiculous amount of detail? Keep reading. PLEASE NOTE: Below I refer to parts that are included with MORryde’s CRE3000 and NOT with this shackle upgrade alone. Don’t think you’ll be able to do everything I describe below with only the shackle upgrade. I posted essentially this same review for the CRE3000 since they go together. On impulse I decided to upgrade the suspension on my 2006 26' travel trailer. Myself. In my driveway. I've never done anything like this before, but how hard could it be? So without revealing to my wife my grand plan to turn our driveway into an RV maintenance yard, I ordered the CRE3000 and (since I'd be removing the wheels and rusty bolts anyway), I decided to upgrade the shackles as well with the MORryde heavy duty shackle kit. I think it's called "wet" because you can lubricate it. ( MORryde UO12-016 Heavy Duty Shackle Upgrade Kit, CRE3000 / Stock / Equaflex 2.25" Shackles - Tandem Axle . Additional stuff purchased, using this project as an excuse, included: A 2 ton floor jack with a 23+ inch lift (enough range to lift my trailer at the frame). A grease gun (for the zerk fittings on all the new bolts GreaseTek Premium Pistol Grip Grease Gun with 18" Hose and Extension Pipe ). A 24" breaker bar (rusty bolts are fun!). A can of B'laster ( B'laster 16-PB Penetrating Catalyst - 11-Ounces . A set of impact sockets for my air powered impact gun. Two tall jack stands (tall enough to support the frame jacked up). Some work gloves. Additional stuff I used that I already had on hand: An air compressor. Air powered impact gun (pretty excited about my 2nd opportunity to use it in 10 years). A second, much smaller floor jack (I didn't expect to use this, but it was VERY handy to have - details below). A creeper/crawler borrowed from a neighbor. Two small jackstands for supporting the disconnected axles. A couple wrenches of appropriate size for my bolts. A rubber mallet. A hammer. A punch. I planned to tackle the project with my 13 year old able assistant on a Saturday afternoon. So starting Thursday, I began soaking the eleven year old bolts/nuts (7 on each side of the trailer) with B'laster hoping to make them easier to remove after a couple days of soaking. Saturday afternoon I hauled the trailer out to the driveway, jacked it up, placed the two tall jackstands to support the trailer, and removed the two wheels (on one side), revealing the entire suspension. Then, thinking it might take a some pressure off the leaf spring and bolts, I lifted each axle just a little bit and supported them with small jackstands. Now it's time to remove those rusty old bolts. So the bolts faced away from me. That is, they were inserted with the head toward the outside and the nuts on the inside (under the trailer). No problem. I put a wrench on the backside to hold the nut in place, and then used my air-wrench to turn the head. Or tried to. Didn't budge the tiniest bit. Then I hung my 13 yr old off the end of the breaker bar. Then I hung myself off the end of the breaker bar. Didn't budge the tiniest bit. More P'blaster, a little banging with a hammer to try and free the frozen bolts. No joy with any of the 7 bolts. I was extremely frustrated and had to really bite my tongue to avoid language my assistant shouldn't hear. Until one bolt finally gave just a little bit. At this point, some of you more knowledgeable folks already know my mistake. It turns out the bolts themselves (on my trailer) aren't intended to turn. Near the head of the bolt is a small area of grooves that locks the bolt in place. The nut has to be removed from the stationary bolt. At least until the nut backs off far enough that the bolt can be tapped out past the grooves and then turns as you might expect. So learn from my mistake - apply pressure to the nuts, not the bolts. I wish I had learned this lesson an easier way, say by looking at the brand new replacement bolts, seeing the grooves and realizing their obvious purpose. But that's not my style. Plus it was a lesson in perseverance for my assistant. If at first you don't succeed, cuss, hit it with a hammer, nearly give up, and then get lucky. Anyway, after the bolt design revelation things started moving much faster. Between the air-gun and breaker bar all the nuts came free without too much difficulty. The creeper and small size of my assistant (compared to me) was invaluable in removing the nuts under the trailer. Thank goodness for sturdy jackstands and his mom staying in the house. Then we used a punch to knock the bolts out, freeing the leaf springs and removing the triangular center hanger. More use of the punch to push the worn OEM plastic bushings out of all the bolt holes. Now disassembly is complete. Reassembly was mostly straightforward. Insert the shiny brass bushings (from the shackle kit) into all the bolt holes and gently tap in with rubber mallet. Hang the new CRE3000 in the center and drive in the center bolt, put the nut on the back, but not tight yet. Reattach the leaf springs to the left & right of the CRE3000 using the new shackles and bolts from the kit. One tip - on the center bolt (that hangs the CRE) the zerk fitting in the head of the new bolt faces outward toward you. On ALL other bolts, the zerk fittings face inward, under the trailer. That's supposed to make it easier to reach and lube when the tires are on. So unlike the original bolts, all the nuts except the center bolt will now be on the outside rather than inside. That'll be handy in the future when I forget the lesson learned above. The left & right ends of the leaf springs that attach to the front & rear frame hangers can be a little tricky to get aligned so the bolts will go through. The holes will be too high, too low, or crooked. This is where I used my small floor jack to push up on the end of a spring raise it, or push down on the spring to lower it. To push down on the spring, I set the jack on TOP of the spring and pumped it up until the jack foot hit the frame above. Than as I continued to pump, the jack pushed the spring down aligning the holes. It took a bit of fiddling, including with the axle jack stand, to get the leaf spring ends reconnected, but in the end it wasn't really hard. The last step was to tighten all the nuts and lubricate the 7 bolts with the new grease gun. Then we we replaced the tires and we were done. With one side. It had taken us about 4 1/2 -5 hours and daylight was running out. We finished the job the next day and, with the lessons learned, it took only about 2 1/2 hours to finish the second side. So roughly seven hours total including the time penalty for stupidity. We went for a test drive and I immediately noticed two things. First, the tires/axles didn't immediately fall off. That was a relief. My mind had been full of "what ifs" and "what did I forget?" and "where did that extra bolt come from?" (just kidding). The second thing was how QUIET the trailer was. I had gotten used to lots of squeaks and squeals over speed bumps and maneuvering at low speed, but now the trailer is whisper quiet in all circumstances and seems to float along behind the truck rather than bounce. I'm very pleased with the end result and glad I chose to do it as a DIY. It was actually a very satisfying project to complete with my son.
A**.
From Rattling Wreck to Rolling Royalty – The Suspension Upgrade Every Full-Timer Deserves
Let’s cut to the chase: if you’re living the RV life full-time and still rolling on factory suspension, your trailer isn’t riding—it’s surviving. I finally got tired of feeling every pebble like it was a personal insult and gave my rig the MORryde double-whammy upgrade: the CRE3000 Suspension System + Heavy Duty Shackle Kit. And wow. Just... wow. The CRE3000 is like strapping a pair of orthopedic shoes to your axles. It absorbs road shock like a champ, flexes with every dip and bump, and instantly turned my ride from “YIKES!” to “Yessss.” Even my cat stopped giving me dirty looks on travel days. Pair that with the Heavy Duty Shackle Kit, which I swear was forged from the same stuff they use on spaceships, and you’ve got a system that not only rides smooth—it lasts. The stock shackles looked like soda-can metal in comparison. These ones? Absolute units. Greasable, overbuilt, and built to work. Installation? Not for the faint of heart or the rust-averse. It involved tools, a few emotional breakdowns, and more than one bolt that fought for its life. But when we finally hit the road post-upgrade? Silence. Smoothness. No crashing dishes. No white-knuckle cornering. Just me, the road, and a trailer that no longer sounded like it was coming apart at the welds. Final Verdict: If you live in your rig more than your sticks-and-bricks, do your future self a favor and upgrade now. The MORryde CRE3000 + HD Shackle Kit combo is a game-changer. You’ll feel the difference on day one—and wonder why you didn’t do it 3,000 potholes ago.
C**T
Great wet bolt kit
Install was pretty easy but I was installing them on flatbed utility trailer with no floor so I had access to both sides. Best way I found to seat new bushings is to use an old single leaf spring bolt and a flat plate. Then you can hold it and tap it in with a hammer without damaging brass bushing. I tried pressing it in with a c clamp and it did work good but took longer trying to get it set up than just hammering it in. I’ll add a picture of it. Good quality and one kit was enough for dual axles. If you’re going to have the zerks facing tires I would order a bag of rubber caps to keep them from getting nasty. Will probably buy another set for my camper now!
J**G
Excellent Suspension Components
When I received my new 2017 travel trailer, the suspension was making quite a bit of noise. I removed one of the OEM nylon bushings and it was already worn through with only 1,800 miles on the chassis since it was built and delivered to Arizona. I elected to change out the cheap nylon bushings with the MORryde bronze bushings that are included with this kit. I paired it with the MORryde CRE3000 equalizers. The quality of these components are superb compared to the OEM parts that were installed by Lippert who manufactured the frame and suspension components. Check out the picture I'm attaching to see the difference in the parts. The beefier MORryde shackles should last much longer than the thin OEM version. Changing out the components was straightforward, and the instructions were clearly written. Make sure that you orient the grease holes on the wet bolts at the 3:00 or 9:00 position or you may have trouble getting grease into the parts. Even with them oriented correctly, I'd suggest a high pressure grease gun to get the grease to flow. Make sure the parts will accept grease before finishing the assembly or you may have to disassemble the suspension again to address the issue. I hope these parts last for many years. I put about 10-15K miles on my trailer every year. When they do wear out, I'll replace them with this same kit.
D**G
Great suspension upgrade.
What an upgrade from the original nylon bushings in my Grand Design Imagine. After only 4 years, the old bushings were well worn. The quality of the new wet bolts, shackles and bushings is evident. Very happy with the speed of delivery and the overall product.
P**.
Impressive quality
Nice heavy duty, tax extremely well, install as it should.
D**R
Fairly hard work, but worth it!
I installed the MORryde shackle kit on my 2011 Fun Finder 210uds travel trailer and the parts were great. I put grease in the wet bolts prior to installation to make sure all the zerk fittings were good, which they were. The installation directions were in the box beneath the cardboard sheet containing the parts so I didn't find it until I was done! It was pretty hard work and took me about 4 hours per side working alone, but worth it. I used 2 6 ton jack stands under the frame and a 2 ton trolley floor jack under one axle and a scissor jack from my truck under the other axle. 2 floor jacks would have been better, as it's good to have wheels on the jack to move the axles side to side to line up the spring eyes with the frame hangers. I also found that I had to remove the zerk fittings from the wet bolts to pound (not tap) the wet bolts into the frame hangers at the ends of the springs and the one holding the center equalizer. Using a socket over the zerk fitting to pound the bolt in did not work. I also torque the nuts to 50lbs, not 80lbs as recommended in the instructions, as several reviews suggested not over torqueing or the nuts would strip. The zerk fittings, if you need to replace, are M6-1.00 if you get a bad one.
C**N
Suspension upgrade
Kit came in and was the exact parts for my camper. Be cautious when reading the instructions, they can be misleading. If you are DIY, I recommend not doing as they say, put the camper up on jack stands on all 4 corners, for safety only do one side at a time because it will keep the camper a lot more stable while having to work on it. Other than that, it was a perfect fit and much needed upgrade.
A**R
Quality product. Very solid. Huge upgrade over stock hardware
Eliminated all the squeaking and creaking on my 5th Wheel Used on my 2007 Cougar 276RLS 5th Wheel. (7300 lbs dry Tandem Axle) I installed it myself with some help from a friend. You can buy the kit and take it to a shop and they will install it for you. I would do it ASAP on your trailer. It took all the squeaks and creeks out and smoothed out the towing experience. It 10X better than your stock set up unless you have “wet bolts” already. It is completely serviceable (unlike the factory stuff) and is easy to grease. When it’s easy to grease then you’ll do it. I actually have mine greased every time I get it inspected ( yearly here) and usually once in the season. The more miles you tow the more often you need to grease up. It’s the same for your wheel bearings on your trailer… something most people rarely do themselves unless you have the easy lube style of hubs. The last time I got my trailer inspected the Mechanic said that’s the best thing he ever saw on a trailer and thinks all trailers should have them…. He works on trailers all the time and says the suspension is always the weak point but with this product not so much so…..So do yourself a favour and install these on your trailer - especially if you travel long distances.
C**N
Brilliant service
I ordered this for my American style caravan on Saturday afternoon and absolutely amazingly it was delivered direct to my door on the Monday . The parts were exactly what I wanted .Awesome
W**R
Excellent That u can Grease the Bolts!!
Way better than stock! A lot thicker & like they say Heavy Duty!
B**G
Beefy construction, well made
Self installation went well. I had two bottle jacks, two floor jacks and two jack stands. Setting up takes time but well spent. I had the dual axle kit and replaced equalizer with Morryde CRE 3000. I did one side at a time, wth the first time replacing equalizer first as per Morryde instructions. The second side I did the outside pins first, followed by the equalizer. This worked better for me. A tow of around 30 kms seemed be smoother and definitely quieter than my old suspension
D**N
Installation facile
Le kit est complet. Installation facile. Semble de tres bonne qualité. La seul chose il faudrait avoir des bushing de brasse comme dans kit mais over side pour les lame de ressort.les lame origine sont beaucoup moin Précis que les equalizer. Si possible de pouvoir en acheter séparément . Pour réglé ce problème. Mais le kit est très bon merci
Trustpilot
1 month ago
2 weeks ago