


Buy anything from 5,000+ international stores. One checkout price. No surprise fees. Join 2M+ shoppers on Desertcart.
Desertcart purchases this item on your behalf and handles shipping, customs, and support to Senegal.
🧠 Elevate your brainstorming game with brilliance that sticks!
The Quartet Brilliance Glass Whiteboard (48"x36") offers a premium, frameless design with a high-contrast, non-absorbent glass surface that resists stains, ghosting, scratches, and dents. Featuring a magnetic surface with included magnets and a 25-year warranty, it’s engineered for heavy use in professional and creative environments. Easy to mount vertically or horizontally, it transforms any office or workspace into a sleek hub of productivity.


| ASIN | B07SXCRDJF |
| Additional Features | Dent Resistant, Dry Erase, Magnetic Surface, Scratch Resistant, Stain Resistant |
| Best Sellers Rank | #21,069 in Office Products ( See Top 100 in Office Products ) #250 in Dry Erase Boards |
| Brand | Quartet |
| Brand Name | Quartet |
| Color | Brilliance White |
| Customer Reviews | 4.3 out of 5 stars 502 Reviews |
| EU Spare Part Availability Duration | 25 Years |
| Frame Material | Alloy Steel |
| Global Trade Identification Number | 00034138156827 |
| Included Components | Magnet, Marker |
| Item Dimensions W x H | 48"W x 36"H |
| Manufacturer | ACCO Brands |
| Manufacturer Part Number | G24836W |
| Material | Alloy Steel, Glass |
| Material Type | Alloy Steel, Glass |
| Model Number | G24836W |
| Mounting Type | Wall Mount |
| Number of Packs | 1 |
| Occasion | Birthday |
| Orientation | Horizontal or Vertical |
| Product Dimensions | 48"W x 36"H |
| Recommended Uses For Product | Community Center, Home, Office, School |
| Target Audience | Business Professional, Parent, Student, Teacher |
| UPC | 034138156827 |
| Unit Count | 1.0 Count |
| Warranty Description | 25 year limited warranty |
| Writing Board Type | Whiteboard |
S**Z
New Shipments Include Template - But Still has Shoddy Plastic Wall Anchors
Based on older reviews, it appears that this product used to ship without a template. I received mine on October 25, 2019 and it now comes with a large sheet of paper that you use as a template for mounting on the wall. My only complaint about the template is that it does not have the holes marked off. It's a bit odd for them to give you a "template" that is, in reality, just a really large sheet of paper that you have to place the whiteboard on and mark off the holes yourself. It seems it would be pretty basic and inexpensive for them to print the "template" with the holes already marked off, so you don't have to manually do it. This is a minor complaint. My only other complaint is that the wall anchors that come with this product are really shoddy. Others have complained about them breaking, and I didn't need to attempt installing them to know they would fail. These are the cheapest anchors you can buy; they are made of plastic and easily strip/break if you turn them to hard once you get them in the wall. You also have to pre-drill, which is annoying. I went to Lowes and bought identical anchors made of metal, which require no pre-drilling, and it took all of 10 minutes to create the template, mark the holes on the wall, install the metal anchors, and mount the white board on the stand-offs. You will probably want a second person to help hold the white board up against the stand-offs, because it is pretty heavy. The board looks great. It's high quality and easy to see the markers. It definitely fills the blank space on my office wall with something visually appealing and sleek. I would definitely recommend, even for the price.
M**R
Very nice board
It looks Gorgeous on the wall! It took three people to hold it up for mounting. It is VERY heavy. Pre-drilling holes is not easy, the template was not correct, the provided anchors are a joke for this weight and fell out of the wall. Unable to mount it in the studs due to the spacing of the holes not lining up with 16-inch standard. Had to buy new heavy-duty anchors. The board works well with specialty magnets. The background white color makes for a very nice look (not green glass look). Recommend to have it professionally installed
R**N
Very professional, gorgeous board
I bought this for the home office, decided to go with this board because I did not want to worry about magnetic issues, or poor mounting hardware. Yes, there are complaints in this thread about mounting hardware and overall mounting procedure, which I will address. So that is really a major part of the board. The hardware was steel, even the drywall mounts were high-quality steel, not plastic. Advice for a professional installation is still mount one side entirely into studs (the holes do not line up to match studs for both sides). It's about a 15-20 pound board if you get the 3x4. Using all four drywall only would not be a good long-term plan. Would you hang your TV just in drywall? No. So don't mount your heavy board only in drywall. If one side is in studs, you will never have a problem. A paper template is included. Yes, you need to mark holes before putting it up. Just measure thrice and drill once. Very handy to have that big template. Also, tape the rubber washers on the back of the board to keep them still when mounting. Will save you loads of frustration. Looks incredible when up, really performs well. Glass boards need stronger magnets, which you get a few of with the board. Cheaper fridge magnets will struggle to stick through the thick glass. I give this five stars easily. I got the optic white board, not the frosted.
C**.
Beautiful Whiteboard: Issues with Anchors
I purchased a glass whiteboard to replace a traditional whiteboard that I use in my counseling office. I got tired of trying to clean up the whiteboard due to the marker not completely erasing. The new whiteboard looks great and erases perfectly each time. I would also recommend the brilliance white whiteboard as it makes the marker easier to read. It’s a little more expensive, but absolutely worth it. However, when it comes to installation, I wish I would have taken the time to read other reviews as I too had issues with the supplied anchors. Believe the other reviewers when they say DO NOT USE THE INCLUDED WALL ANCHORS. The anchors are made out of metal rather than plastic and as a result, they tear up the dry wall and become loose very easily. For the installation, you first have to install the anchors and then you fasten a spacer to each anchor with a screw. After that, you can attach the whiteboard which is held in place by four bolts that are screwed in by hand. So, as I was installing the whiteboard to the wall, three of the anchors started to come loose. Fortunately, I was able to catch it in time and was able to safely remove the whiteboard without any damage. I then replaced the anchors with toggle bolts which have worked well. One last piece of advice, DO NOT USE THE INCLUDED PAPER TEMPLATE. Paper templates are great for projects like this, but the one that comes with the board does not have the crosshairs printed into it. Instead, you must lay the whiteboard on top of the paper and mark the hole openings yourself. The issue with this is the paper is folded to fit in the packaging. The fold in the middle does not allow the paper to lie completely flat. As a result, your markings will be slightly off. Although the template is a good idea, I wouldn’t recommend using it. Again, the whiteboard works well and looks great. I highly recommend the board. But, the installation would be much easier if you use your own anchors and don’t use the paper template.
H**R
READ THIS TO AVOID EXPLODING GLASS!!
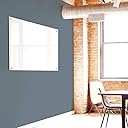
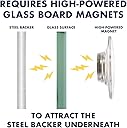
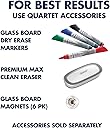
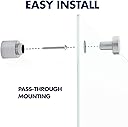
Use the box to make your template! From one large side of the box, pull back the top tab to open it, which leaves a straight edge along the top side of the box. Cut out the other 3 edges of the side panel. It doesn’t have to be straight because you will use the straight top edge that you didn’t cut to square it up on the wall. Lay the cardboard down and completely remove the foam pieces that are glued to it. A metal spatula or putty knife works great. Lay the glass board face up directly on the cardboard and match up the straight edge of the cardboard with the straight edge of the glass. Use a Sharpie to trace the glass around the other 3 edges and the 6 circle cutouts for the hardware. Find the studs in your wall. A strong magnet will work better than any stud finder. It will stick to the drywall screws under the surface that hold your drywall onto the studs approx 16” apart). Make sure the 2 center holes of your template go into a stud. The other 4 holes did not line up w a stud, so I used my own plastic anchors in those. Tape your template to the wall and use a level to get your top or bottom straight edge straight. Trace the 6 holes on the wall and remove the cardboard. DRILL THE TOP 3 HOLES ONLY!! If you drill all 6 and the bottom 3 are slightly too high, this will cause your board to slightly bow, creating constant pressure on the glass, and a possible explosion. I drilled all 6 holes at once, and after hanging my board by the top, I had to slightly lower the 3 bottom holes even thought they all looked centered, so better to wait until the board is hanging. After drilling your 3 top holes, remove the template from the wall and attach the foam pieces from your box to the wall (the nicer springy foam that was holding your glass). It is too thick as is, so I used a kitchen knife to slice it down to the exact thickness of the hardware that will keep your board away from the wall. If you leave it as is, your board will bow out from the wall. It has to be the exact depth of the H/W. Insert the H/W in the top 3 holes, have a 2nd person help you hang the board on the hardware, and screw in the top 3 screws NOT tightening too tight. Now that the board is hanging, carefully drill the bottom 3 holes straight in the center of each, and attach the hardware, again, not tightening the screws so tight that there is any pressure on the glass. The board is very solid with the foam in the back, and I have no fear of it exploding in our homeschool area as the holes were all drilled correctly, and we did not tug the board right or left to line up with a mis-aligned hole. I am a woman and did this on my own. My son helped for 2 minutes to help me lift the board onto the 3 top hardware pieces and screw in the 3 top screws. It all sounds like a lot, but it is very doable and worth it. We love our board and MAGNETS DO WORK. Purchase a box of neodymiums from Amazon. They are cheap and work very well. I put them inside of these googely eyed microfiber erasers, and they stick incredibly well even through the thick fabric. We bought these magnets and they are awesome. You can stick whatever you want on them to personalize them. https://smile.amazon.com/gp/product/B072KDBJWC/ref=ppx_yo_dt_b_search_asin_title?ie=UTF8&psc=1 LOVIMAG Super Strong Neodymium Disc Magnets, Powerful Rare Earth Magnets with Double-Sided Adhesive for Fridge, DIY, Building, Scientific, Craft, and Office Magnets - 1.26 inch x 1/8 inch, Pack of 12
P**R
Looks great!
This adds a classy look to my home office. I was concerned that a plastic whiteboard would look cheap. This glass one looks great. Using the recommended glass markers, erasing is no problem. With the magnetic board and eraser, there is no concern about where to put the eraser any more.
J**R
worthless is you plan to use magnetic stuff
it looks nice and wasn't terribly difficult to get on the wall. they could have made it easier by including an actual template with the mounting locations shown. i skipped the template they provided for that very reason. i have a lot of magnetic stuff that i had on my old board. none of it will stick to this. refrigerator magnets won't stick. none of my previous accessories stick. the only things that stick are their magnets. i have some rare earth magnets from my hobby that i tried and those will also work. i suppose if all you want is a whiteboard it'll be fine. they supply one marker. weak color (it's supposed to be black) but it's readable. i got some other markers to go with it (magnetic and they don't stick either) and they are kinda weak but probably has more to do with the tip of the marker than anything else. this goes into my top 10 worthless buys of 2021. i'd return it but already have the holes in my wall.
J**R
Nice Whiteboard. Installation is a Pain, do not order the magnetic unless you have a tool collection
The way they make the whiteboard magnetic is by gluing a thin piece of tin to the back of the glass. The board I was sent was misaligned, so two of the mounting holes were not the full diameter that the should be. When installing the board there is supposed to be a little bit of tolerance in the mounting holes for slop in the installer's measurements, these misaligned mounting holes made it so there was no give in my wall mount measurements. After fiddling with the very heavy board for 20 minutes trying to get everything to line up, I ended up taking it down to cut the misaligned tin out of the mounting holes. This required pliers, heavy duty snips, and a careful hand to ensure I didn't break the glass. Everything worked fine after that. The "Brilliant white" color is true opaque white, which is very nice for contrast on the board so I can see everything I'm writing. Manufacturer needs better QA for mounting hole alignment on tin backer board.
Trustpilot
1 month ago
2 days ago