Desertcart purchases this item on your behalf and handles shipping, customs, and support to Senegal.
♻️ Turn waste into garden gold with effortless dual-chamber composting!
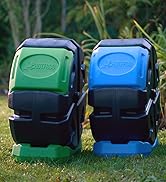
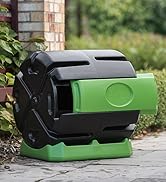
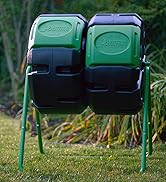
The FCMP Outdoor Heavy Duty 37 Gallon 8-Sided Steel Composter features two separate chambers allowing continuous composting cycles. Made from durable, 100% post-consumer recycled polypropylene, it offers a spacious 37-gallon capacity and easy tumbling action via built-in handholds. Designed for efficient, eco-friendly composting, this Canadian-made unit supports sustainable gardening with robust construction and excellent customer service.


| Brand | FCMP Outdoor |
| Capacity | 37 gallons |
| Color | Black |
| Item Dimensions L x W x H | 30"L x 28"W x 36"H |
| Item Weight | 28 pounds |
| Material | Polypropylene (PP) |
| Material Type | Polypropylene (PP) |
| Product Dimensions | 30"L x 28"W x 36"H |
| Shape | Octagonal |
A**S
Good product, fantastic Customer Service
I bought this unit as "used, in very good condition" from Amazon Warehouse. As far as I can tell when received, it was never actually used. Someone appears to have taken it out of the box and then returned. All the parts were in there, although as I was assembling it, I discovered that two panels were broken. More on this later. The unit is reasonably easy to assemble once you figure out the somewhat cryptic instructions. To be fair, the skimpy instruction manual refers you to a video on the web site which I assume shows the assembly process in greater detail. I didn't look at it, and after a short while, I figured out the right way to put it together. Be warned that there are lots of screws to place. Lots! Also, it is very easy to assemble the supporting bars in the wrong order, and again the instructions are not terribly clear in the manual. Other than that the assembly process itself is not too hard. Once I got the unit together, I found that the composter stands sturdily enough,and seems to be working. Mine will probably need at least two to four weeks more before it produces anything recognizable as soil, but there's certainly activity taking place in there. It's also a lot less messy than my original standing square-box composter. Now, regarding the pannels, I wrote to the manufacture's support address explaining the situation, and asking whether they could send replacement panels. Remember that I got the unit as "used" from Amazon Warehouse, and so I thought there might be a chance that they could refuse to honor the warranty, in which case I more than half expected that I would have to return the whole thing back to Amazon. I was very happily surprised when they replied within a day, letting me know they were shipping the replacement panels. However, I was then further happily shocked when the panels arrived (plus the whole set of screws as well!) within two days, to Puerto Rico! (normal shipping for most of the stuff I buy only usually takes at lest 5-7 business days! I am happy with the composter, and I am extremely happy with the customer service. The instructions could definitely used some improvement.
J**C
FORGET NEGATIVE REVIEWS TOTALLY !!!
I read them all and basically it all has to do with the eternal "not my fault, it's a piece if junk !" : easier to blame the item. It's an incredibly solid machine and very clever. The assembly is time consuming but IF you were to pay for it to come in one piece it would cost a fortune. WARNING: You shouldn't have kids around while you put it together. ..nasty words will fly out of your mouth. 1●●Be certain you make sure the vents face up when you start. 2●●The FIRST PANEL goes into place to the right of that first space and then continue one at a tine. 3●●● Most important AND frustrating, make sure the center separator fits in the panel grooves or you will have to start over. 4●●The two long screws are for the shafts to secure to the legs. It is a great machine !! SECOND UNIT: Learned a lot from the first. Still the best Composter for any money. I wanted to address the water in the compost mix issue. Each panel has tabs at the top to fit into guide holes in the previous panel. IF each panel tab IS NOT inserted into these guide holes, they in turn become weeping holes which guide rain water in. Personally l also opted for using 100% silicone putty at each panel joint...little extra for huge return. THE MAIN TOP is about the partition wall. With the second unit l decided l didn't need the composter to be divided into two halves. It sounds good on paper but l can load our new unit with no divider, faster with no problem. PLUS, the partition wall is NOT a structural entity. It can be left out which also greatly facilitates assembly. In fact l even cut away the dividing bar at the door opening to make access easier both at loading time and emptying the compost when done. This machine is designed to end up rigid as a tank. Once you made it as waterproof as possible you will not have any weight problem. It's like any other gardener project where you learn new tricks as you go. THIS has been a great addition to having a healthy garden growth without chemicals.
J**A
PIA, missing screw, but we got it done.
As everyone said the instructions provided are beyond terrible, which makes it difficult to put together. Add to it, it’s missing a screw. First of all, nuts and screws cost pennies so put an extra nut and screw inside so you aren’t wasting money shipping a damn screw. It’s common sense. Also, the composter did not come in its own box inside the amazon box. The amazon box had some damage and the plastic zipped bag the nuts and bolts came in was opened and pieces spread throughout the box. A damaged box and loose parts does not mix well. I will be contacting them for the missing screw. Next, at least at times, you may need two people to help put this together. Try to find someone who isn’t easily aggravated. I regretted asking my husband to help who wanted to take a hammer to this to separate the poles when they got stuck tight. I refused as I was afraid he would ruin the plastic. He admits he’s a bit of a Neanderthal. You will need a Phillips screw driver and a wrench. I had the bottom put together wrong so pay attention to the size of the pieces. It’s not supposed to be slanted. 🙄 Usually I’m better than that, but my dogs climbing in my lap while trying to put this together apparently distracted me. The middle separator is a pain, this is where two people help to keep lined up as you screw the pieces together. Don’t try to force it, just unscrew the outer pieces until you can readjust. Don’t tighten the screws all the way until you get finished so you don’t strip them trying to undo them. You may need to undo them until you figure this out. The nuts on the actual composter are self tightening so you can hand tighten a bit and you won’t need two hands to finish tightening them. It seems sturdy enough now it’s together, even with the one missing screw. I may spray the legs with Rustoleum to protect the metal, which I think may rust since it will be sitting on the ground year round. It definitely took awhile to put it together, but hopefully worth it. We shall see!
T**2
Glad to have this tumbler
Needed to find a more accessible compost bin. Our large compost bin will still be used for yard waste, etc but it's too hard to turn the materials deep down. Have been interested in compost tumblers that meet these criteria: made in America or Canada, tough enough for northern winters, discourages wildlife access, large enough to heat up the materials to form compost, easy to fill and empty, not too heavy for a senior to move. This composter is Canadian which I trust much more than a Chinese built unit. Canadians know winter and this composter appears solid. First, ignore the reviews stating this compost tumbler is difficult to put together. 68+ lady here, and it's not hard at all. Just takes time. As others suggest, watch a few videos on the assembly and you are good to go. I used a Phillips screwdriver, pliers. The assembly took about an hour but I took my time. Hint: if you assemble this indoors as I did, use the box to cover your floor/carpet. The support stand width is about 28" across at the bottom, not 24". Be careful to assemble the stand pieces correctly. There are two longer bolts...set these aside as they are for securing the main bar to the stand, one on each end. The black plastic tube covering the main steel bar comes in one piece, not two as shown in some assembly videos. After placing the two end pieces with the separator in-between onto the bar (they flop all over and slide during this step), secure the bar onto the stand with the two longest bolts. Then you are ready to place and attach the panels, one at a time, securing each panel as you go. The company provided a few extra bolts and nuts which is appreciated. Be sure to watch a couple videos as you need to have the end panels with the vents exactly the same, ie be sure the vents are in line. If the vents are not lined up the same, panels assembly will not work. Each panel fits only one way and snaps into place, but you must bolt them into place securely. They snap into place as an assistance with assembly. Be careful to tighten the bolts snug but don't over tighten as you may crack the panel. Panels are secured with the included nuts and bolts. Fit the separation panel into the slots built into the panels as you go. This takes a little work but I did fine even with arthritic hands. One big plus is the large sliding cover. It slides either way and can easily be taken off for access to the interior. This is much better than two separate small covers. Plenty of room to dump a pail of vegetable waste without spillage. Seems like a well built composter. The plastic is heavy duty, thick. More manageable than the giant bin we've used for decades. We don't have bears in our area, just the regular curious wildlife. Likely, the critters won't be interested in the composter. Even if they are, it will take work to chew it or open it. We are looking forward to years of composting with this tumbler.
L**.
Awesome Design!
***Updated Review - July 2025*** I've had this compost bin for almost a year now and would highly recommend it. Not only has it solved all of my night time critter problems which my previous composting system had but it is neat, easy to use and for me, fun to rotate:) Over the past year, I have emptied rich compost from the bin several times with ease by spreading a large garbage bag (right off the roll and still flat) under the bin. I then rotate the bin so that the door is at the bottom and slide it open on the side of the bin I want to empty. Once the compost has fallen out onto the garbage bag, I slide the door closed, grab the 4 corners of the garbage bag and carry it to my garden. It really couldn't be easier! In terms of producing compost, this rotating bin does a great job. It is important to have a mixture of ingredients that include a balance of 'greens' (such as vegetable peels, egg shells, fresh grass clippings, etc) and 'browns' (such as dried leaves, shredded cardboard, egg cartons). If the mixture is too dry, it will take a long time to compost. If the mixture is too wet, it will have an unpleasant odor. With the right balance and with warm temperatures, the mixture composts in about 3 weeks. ***Original Review - August 2024*** I was looking for a compost bin that would not attract any of the wildlife in our area and I'm happy to have found the perfect bin! My next door neighbor has been using the same type of bin for a couple of years and highly recommended it to me. For years now, I've been composting successfully directly in a shallow pit in my yard. Recently, I noticed that the top of the compost pile was occasionally being disturbed and pulled apart by night time critters. So it was time for me to either stop composting (which I did temporarily) or find a sealed system. This FCMP tumbling composter was the answer! This bin is completely sealed except for some tiny venting holes which bring in oxygen but also allow excess moisture to drip out. The bin is designed very well for tumbling which I know is getting spun around a bit too frequently at the moment - out of sheer excitement. The size of this compost bin is just right for a family of 3-5. I love the dual compartments which allow for one side to break down into compost while the other side is being filled up on a regular basis with food and yard waste. After reading other user's comments, my son and I were careful to follow the assembly steps and everything went very smoothly. Since I've had the bin for less than a month, I can't speak about its ability to turn food and yard scraps into finished compost because it is still too early. I'm currently still in the process of filling up 1 of the 2 compartments. I am pretty confident that once the contents of this compartment are 4 inches from the top, it will take about 2-4 weeks to completely break down. I have noticed a few insects like fruit flies in the bin whenever I open it to add more material but that is normal. Other than that, there aren't an other insects or flies that hang around. There is also no odor at all which is a huge bonus! Overall, I highly recommend this tumbling compost bin.
G**G
Good Enough
This is a product that’s actually worth spending the time to write a review. The FCMP IM4000 arrived yesterday in a relatively small box considering the final size of the composter. It was very well packed and all the components were there and in good shape. The plastic panels are not incredibly robust but are well designed and fit together easily. The metal stand appears to use tubing just a wee bit thicker than what was used with beach-chairs of old and may be the eventual weak point, but for the next few years it should be fine. I might put a base underneath to secure the bottom tubes and prevent their anticipated spread and therefore weakening of the structure. If FCMP offered a reasonably priced plastic base to both secure the base tubes and keep them off the dirt, I’d buy it. For a moderately capable DYI’er, assembly was easy and obvious. A 10mm box wrench, a small adjustable wrench, or even basic plyers and a flat screwdriver are all one needs; however, the screws also have a square (Robertson) recess and a SQ1 bit with a ¼” hex-driver makes assembly much easier. The serrated bases on the flanged nuts mean that, with finger tightening of the screw to the nut, there’s probably no need for a wrench or plyers when tightening those screws – the serrations bite into the plastic and the screws easily tighten with possibly just a little pressure applied with your fingers to the nut. The only exception is with the nuts and screws that attach the axel bar to the stand – for those you’ll want wrench or pliers. I did find the on-line instructions to be significantly better than those provided with the product. Just remember that the panel with the slide is the last one to be installed and it attaches to the end cap edges that have 7 vice 4 holes. Also, the chamber divider panel needs to fit within the side panels’ inner slot. The first few panels may be problematic in making sure that the center divider remains in the slots, but as more panels are added, everything lines up and assembly becomes easier. All of this will make much more sense as you look at the parts and start putting things together. Anticipating that grit will eventually make its way into the space between the axel bar and its outer plastic sleeve/tube, I applied a layer of silicone grease (that I happened to have on hand) along the entire length of the axel. I figured that, while the container was empty, this easy bit of pre-maintenance would likely save me some frustration in the future and allow the tumbler to spin much easier. I fumbled and bungled a bit, but it was all together in under an hour. In fact, writing this review is taking longer than putting together the tumbler. The final product could be higher off the ground, making it easier to empty the chambers. Putting a plastic sheet underneath and dumping the contents on that, which is what FCMP recommends, seems lame. I’d much rather put a small wheelbarrow or big bucket underneath. Those are something else that FCMP should market. I did consider the much better built Jora tumbler, but couldn’t justify the significant price difference. I also purchased a compost thermometer and some composter starter. Theoretically, in 2-8 weeks, I'll know if this works as hoped. If so, in the end, the FCMP IM4000 will be good enough.
M**N
Hope it will compost.
Put together with all these little screws and nuts. That was okay but shorted me one of the screws and gave me three extra nuts. The stand is a bit wobbly because the nuts do not tighten all the way to the screws. Instructions not good as you need to put the plastic bar cover inside before you put the side on so l will just leave my metal bar without the plastic cover. Otherwise all good.
J**T
Good product for a novice composter with a small yard
Bought this a little over a year ago. Not sure what the fuss is about with the assembly, it was easy. Make sure to put something down if you're doing it inside, as it does have some oily residue that's a little messy. This was my first attempt at composting, and the first year was iffy. I definitely didn't have enough browns, it started smelling off. Got smarter this year and saved a couple of bags of leaves from fall cleanup. In March, after almost a year of cooking, it was finally looking close to something useful. I ended up putting on some garden gloves and crumbling it by hand, as I had a lot of matted balls rather than loose crumbles. It's a little challenging to get it all out when you're trying to empty it, but not a huge deal. Emptied one side first, then the other about a week later. Sifted it over some plastic fencing and dumped the big pieces back in to break down further. Also, meant to move it into the garage during winter but it was too heavy, so I left it out and it survived the Chicago winter just fine. Now onto my second batch, and already it's looking way better than my first attempt. Not sure if it's the higher ratio of leaves to scraps or a little bit of the first batch to jump start the process on the second batch, but it's already looking way better - looks like I could get a finished batch in the next couple of months. I was definitely losing faith and wondering how everyone else had such success when I didn't, but it's just a learning process. Anyway, it's a good product, easy to use, neat, and effective!
A**R
Home composter
Delivered much beyond the scheduled date that too after taking up the matter with the CC. Assembling the product is really tough. Look for the marking on the frame for correct allignment ( Could have been printed in the slip) and the holes &buttons on the panels for trouble free fixing. Looks sturdy .No comments for the performance of the product since its just two days.
A**Z
Buen compostero
Es bastante amplio, los materiales son de calidad. Tiene muchas piezas y lleva un tiempo armarlo, no viene con herramientas para ensamblar pero solo se necesita un destornillador y una llave. El ensamblado es bastante fácil.
D**N
Badly made
Several panels were cracked and damaged. Pieces did not fit together well. Overall a poorly constructed piece of garbage. Do not buy!
A**ー
Easy setup
Quick delivery and easy set up
I**I
A must for your gardening needs!
Excellent product! No missing or damaged pieces, quality materials. I recommend that user take time to familiarize themselves with assembly instructions. They are not difficult, but some thought IS needed. I put it together by myself, and didn’t rush it. I will be buying another one! Made in CANADA! Additional comments: EXCELLENT result after using product over summer! The result of putting green matter from kitchen and garden into composter resulted in fluffy, black, sweet-smelling compost! A lot of it, considering it’s not huge and taking up garden space.
Trustpilot
1 month ago
2 weeks ago